

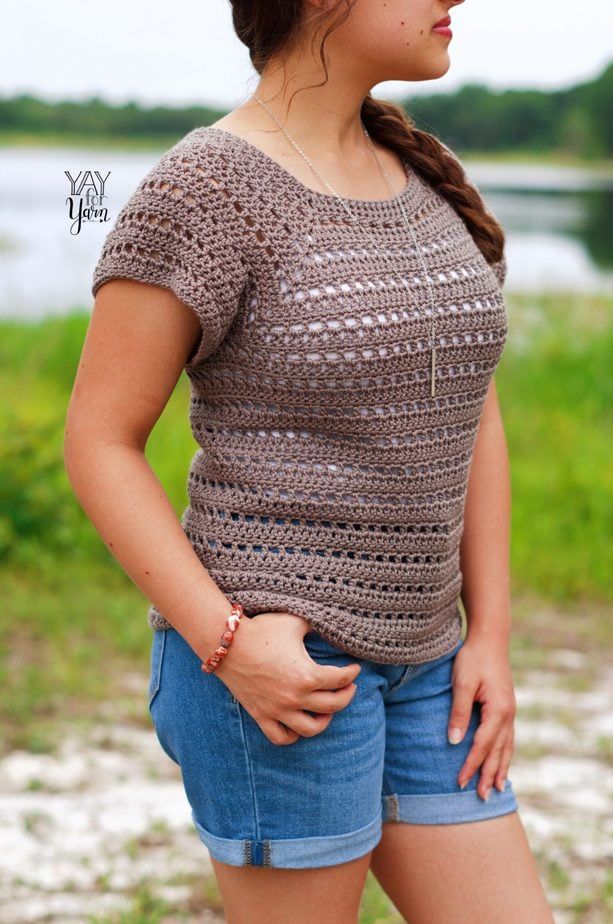
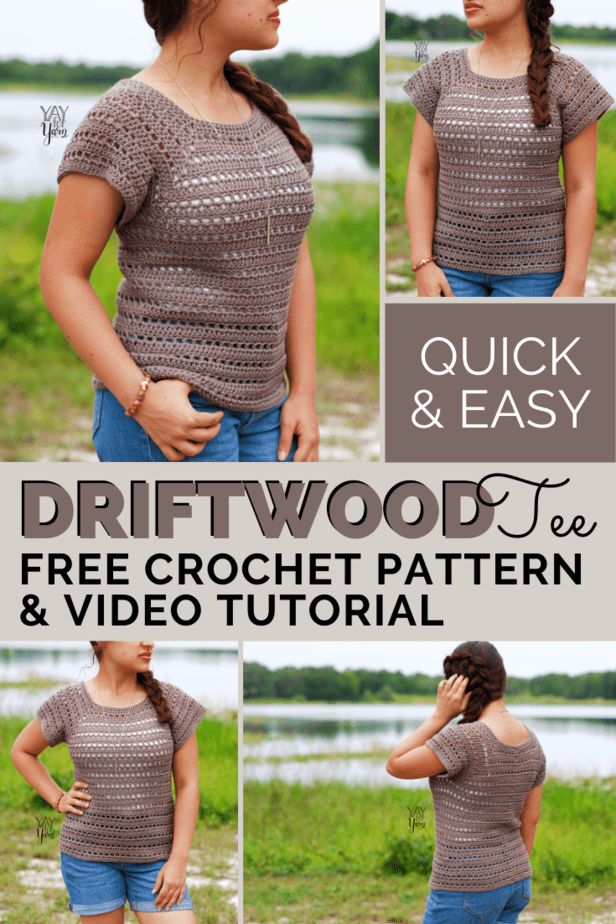
This easy, size inclusive crochet top pattern is great for summer! Crochet your own with this free crochet pattern & video tutorial.
Table of Contents
Crochet summer tops are some of my favorite projects to make. Here in Florida, we have summer for 3/4 of the year, so I always love a simple crocheted top that is cute, comfortable, and breathable in the summer heat.
This raglan-style tee features an easy-to-work eyelet stitch pattern, which makes decorative holes in the fabric. Those little holes allow air to pass through the fabric, helping to make the tee breathable.
How to Choose the Best Yarn for a Crochet Summer Top
This women’s top crochet pattern calls for #4 Medium / Worsted Weight yarn. I prefer to use a washable, low-fuzz yarn for summer garment projects. For the Driftwood Tee, I chose to use Lion Brand ZZ Twist, a smooth, washable, fuzz-free acrylic yarn with lovely drape.
This yarn is spun with a Z-twist, in the opposite direction that most yarns are spun. It is 100% acrylic, but the yarn is very smooth, slightly silky, and does not have any fuzz, which makes it great for crocheting a summer tee. If a yarn is fuzzy, the garment made from it will trap body heat. That’s great for a winter sweater, but not for summer clothes! For this project, you’ll want to use a yarn that has very little fuzz to it. (See this blog post for tips on choosing yarns for summer garment projects.)
When selecting the yarn you want to use for this pattern, make sure the yarn label says it is #4 Worsted Weight. Then, purchase enough skeins of the yarn you want to use so that you have at least the total number of yards required in the pattern for the size you are making.
How do I Choose a Size?
The Driftwood Tee crochet pattern includes instructions for 9 sizes, from a women’s Extra Small to a 5X. To decide which size you want to make, you’ll need to measure around the fullest part of the bust. Then, follow the instructions in the “Sizing” section of the pattern to select the size according to the wearer’s bust measurement.
If you’d like to make the tee longer or shorter, you can do so by working more or fewer rounds in the body of the tee. You can lengthen or shorten the sleeves in the same manner. But if you plan on adjusting the length, be sure to purchase more yarn than the pattern says you’ll need. It’s never fun to run out of yarn in the middle of a project!

How to Crochet a Summer Top
There are many ways to crochet clothing. Some tops are crocheted as flat pieces, then sewn together. You can also crochet a top in the round. This is usually done from the top (neckline) down to the hem. The Driftwood Tee is crocheted raglan-style, from the top down, and then a bit of length is added to the sleeves after the body is finished.
Raglan shaping might sound complex, but it’s really not any more difficult than making a granny square. We just begin at the neckline, and add stitches at the corners to create a square with a neck-hole in the middle. Then, the square is folded to divide the sleeve stitches from the body stitches.
This free summer top crochet pattern uses simple construction, with a few special stitches. If you’re comfortable with simple crochet techniques, and familiar with reading a written pattern and working in the round, you can make this project. Plus, there’s a full video tutorial for this project, which will walk you through the written instructions and help you follow along.
Ready to get started? Let’s crochet the Driftwood Tee!
Driftwood Tee Crochet Pattern
by Yay For Yarn
Skill Level: Advanced Beginner
Sizing:
> Sizing follows the Craft Yarn Council’s standards for Women’s sizes.
> This tee has a classic fit, with about 3-5” of positive ease. If you are between sizes, size up if you want a looser-fit tee, or size down if you want a more fitted tee. Measure the bust of the wearer, and choose the size that is closest to the wearer’s bust measurement, under the title “To Fit Bust”.
> Length of Tee is adjustable.
> Instructions and yarn requirements for size X-Small are given outside the parentheses, with Small, Medium, Large, X-Large, 2X, 3X, 4X, and 5X given inside the parentheses, like this:
X-Small (Small, Medium, Large, X-Large, 2X, 3X, 4X, 5X).
> When only one number is given, it applies to all sizes.
To Fit Bust:
- X-Small: 30” (76 cm)
- Small: 34” (86 cm)
- Medium: 38” (96.5 cm)
- Large: 42” (107 cm)
- X-Large: 46” (117 cm)
- 2X: 50” (127 cm)
- 3X: 54” (137 cm)
- 4X: 58” (147 cm)
- 5X: 62” (157.5 cm)
Finished Bust / Back Length from Top of Shoulder to Hem:
- X-Small: 32.7” (83 cm) / 20.2” (51 cm)
- Small: 37” (94 cm) / 21.2” (54 cm)
- Medium: 41.4” (105 cm) / 22.3” (57 cm)
- Large: 45.8” (116 cm) / 23.4” (59 cm)
- X-Large: 50” (127 cm) / 24.5” (62 cm)
- 2X: 54.5” (138 cm) / 24.5” (62 cm)
- 3X: 59” (150 cm) / 25.6” (65 cm)
- 4X: 63.2” (161 cm) / 26.7” (68 cm)
- 5X: 67.6” (172 cm) / 27.8” (71 cm)
You Will Need:
- About 649 (772, 900, 1041, 1188, 1292, 1454, 1624, 1801) Yards of #4 Worsted Weight Yarn (I used Lion Brand ZZ Twist in Taupe, 100% Acrylic, 3.5 oz / 100g / 246 yds per skein, 3 (4, 4, 5, 5, 6, 6, 7, 8) skeins)
- US Size J / 6 mm Crochet Hook
- 1 Locking or Split-Ring Stitch Marker
- Scissors
- Measuring Tape
- Yarn Needle or Blunt Tapestry Needle
Gauge: 11 stitches = 3” (7.6 cm); 11 rows = 4” (10 cm) in main stitch pattern

Abbreviations:
st(s): stitch(es)
sk: skip
nxt: next
ea: each
sp: space
beg: beginning
ch: chain
sc: single crochet
hdc: half-double crochet
dc: double crochet
*Fsc: foundation single crochet
*CSSC: chainless starting single crochet
*CSHDC: chainless starting half-double crochet
*CSDC: chainless starting double crochet
*invslst: invisible slip stitch
*This is a special stitch. See instructions below to learn how to work this stitch.
Special Stitches
Foundation Single Crochet: (video tutorial here)
To begin, chain 2. Insert hook into the 2nd chain from the hook. Yarn over, pull up a loop. Yarn over, pull through one loop on hook (one chain made). Yarn over, pull through both remaining loops on hook.
For all following stitches: Turn work upside-down so the bottom (foundation) edge is facing you. On the bottom of the previous stitch, there is what looks like the top of a normal crochet stitch (the chain from the previous stitch). Insert hook into both strands of that “stitch”. Yarn over, pull up a loop. Yarn over, pull through one loop on hook (chain made). Yarn over, pull through both remaining loops on hook.
Chainless Starting Single Crochet: (video tutorial here)
Stretch loop on hook slightly. Insert hook in the specified stitch. Yarn over, pull up a loop. Yarn over, pull through 2 loops on hook.
Chainless Starting Half-Double Crochet: (video tutorial here)
Stretch loop on hook until it is slightly longer than a regular half-double crochet. Place a locking stitch marker or safety pin around the stretched loop and hold it against the back of your hook with your finger. Yarn over with the stretched loop on your hook (not the working yarn) 1 time. Insert the hook into the specified stitch. Yarn over, pull up a loop. Yarn over, pull through all 3 loops on hook.
*It is best not to remove the stitch marker until you have joined into the top of the CSHDC at the end of the round.
*If you do not want to use the CSHDC, you can replace it with “ch 1, hdc in specified st”.
Chainless Starting Double Crochet: (video tutorial here)
Stretch loop on hook until it is slightly longer than a regular double crochet. Holding the top of the loop still with your finger, yarn over with the stretched loop on your hook (not the working yarn) 1 time. Insert the hook into the specified stitch. Yarn over, pull up a loop of yarn. (Yarn over, pull through 2 loops on hook) 2 times.
Invisible Slip Stitch: (video tutorial here)
Remove hook from current loop. Insert hook from back to front through the top of the chainless starting stitch from beg of round. Place original loop back on hook. Pull loop through the st from front to back.
Pattern for Gauge Swatch
Row 1: Ch 20. Sk 1st ch, sc in 2nd ch from hook and in ea ch across. <19 sts, not including skipped ch.>
Row 2: Turn. CSDC in same st. Dc in ea remaining st across.
Row 3: Turn. CSSC in same st. Sc in ea remaining st across.
Row 4: Turn. Ch 1, hdc in same st. *Ch 1, sk 1, hdc in nxt st*. Repeat from *to* to end of row.
Row 5: Turn. CSDC in same st. Dc in ea st and ch-sp across.
Repeat Rows 3-5 three more times. Tie off, block, and measure gauge.

Driftwood Tee Instructions
How to Crochet the Driftwood Tee
This tee is worked from the top down, beginning at the neckline. Once the yoke (upper portion of the sweater) is finished, we’ll separate the sleeve stitches from the body stitches and work the body and sleeves of the tee separately.
This pattern begins with a row of foundation single crochet instead of a foundation chain. The foundation single crochet is simple to work, and makes the foundation chain and the first row of single crochet at the same time. The foundation edge, when worked in this way, has much more stretch and flexibility than a regular foundation chain. I highly recommend using the foundation single crochet to begin your panel, but instructions for a regular foundation chain and row of single crochet are also included.
Yoke
Round 1: Ch 2, fsc in 2nd ch from hook. Work 79 more fsc for a total of 80 sts. Invslst in top of 1st fsc to join. <You should have 80 sts, not including beg chs or invslst.>
OR
Round 1: Ch 81. Sc in 2nd ch from hook and in ea of nxt 79 chs. Invslst in top of 1st sc to join. <You should have 80 sts, not including beg chs or invslst.>
Round 2: Turn. CSDC in nxt st. Dc in nxt 9 sts. (2 dc, ch 1, 2 dc) in nxt st. *Dc in nxt 19 sts. (2 dc, ch 1, 2 dc) in nxt st.* Repeat from *to* 2 more times. Dc in nxt 9 sts. Invslst in top of CSDC from beg of round to join. <You should have 96 sts, including ch sts, but not including invslst.>
Round 3: Turn. CSSC in nxt st. *Sc across to corner ch-sp, (sc, ch 1, sc) in corner ch-sp.* Repeat from *to* 3 more times. Sc across remaining sts of round, invslst in top of CSSC from beg of round to join. <8 sts increased.>
Round 4: Do not turn. CSHDC in same st. [*ch 1, sk 1, hdc in nxt st*. Repeat from *to* until 1 st is left before corner ch-sp. Ch 1, sk 1, (hdc, ch 1, hdc) in corner ch-sp.] four times. Repeat from *to* until 1 st is left in round. Ch 1, sk 1, invslst in top of CSHDC from beg of round to join. Remove marker from top of CSHDC. <8 sts increased.>
Round 5: Turn. CSDC in nxt ch-sp. *Dc in ea st and ch-sp across to corner ch-sp. (2 dc, ch 1, 2 dc) in corner ch-sp.* Repeat from *to* 3 more times. Dc in ea st and ch-sp across to end of round. Invslst in top of CSDC from beg of round to join. <16 sts increased.>
Repeat Rounds 3-5; 3 (4, 5, 6, 7, 8, 9, 10, 11) more times. <You should now have 224 (256, 288, 320, 352, 384, 416, 448, 480) sts.>

Body
We will now divide the sleeve stitches from the body stitches, and finish working the body of the tee. We will join yarn and work the rest of the sleeves later.
Round 6: Turn. CSSC in nxt st. *Sc in ea st across to nxt corner ch-sp. Sc in corner ch-sp, ch 3. Sk all sts along nxt side of square, sc in nxt corner ch-sp. Repeat from *to* once more. Sc across remaining sts of round, invslst in top of CSSC from beg of round to join. <You should have 120 (136, 152, 168, 184, 200, 216, 232, 248) sts, including ch sts, but not including invslst.>
Round 7: Do not turn. CSHDC in same st. [Ch 1, sk 1, hdc in nxt st] around to last st. Ch 1, sk 1, invslst in top of CSHDC from beg of round to join. Remove marker from top of CSHDC. <You should have 120 (136, 152, 168, 184, 200, 216, 232, 248) sts, including ch sts, but not including invslst.>
Round 8: Turn. CSDC in nxt ch-sp. Dc in ea st and ch-sp around. Invslst in top of CSDC from beg of round to join. <You should have 120 (136, 152, 168, 184, 200, 216, 232, 248) sts, not including invslst.>
Round 9: Turn. CSSC in nxt st. Sc in ea st around. Invslst in top of CSSC from beg of round to join. <You should have 120 (136, 152, 168, 184, 200, 216, 232, 248) sts, including ch sts, not including invslst.>
Repeat Rounds 7-9; 10 (10, 10, 10, 10, 9, 9, 9, 9) more times. (To make the tee longer or shorter, just repeat Rounds 7-9 more / fewer times.) Tie off, weave in ends.
Sleeves
Join yarn in center ch st at underarm, making sure the back side of the last double crochet round on the armhole edge is facing out.
Round 1: CSSC in same st. Sc in nxt ch st, sc in corner ch-sp of yoke. Sc in ea st across sleeve opening. Sc in corner ch-sp of yoke, sc in last ch of underarm. Invslst in top of CSSC from beg of round to join. <You should have 60 (68, 76, 84, 92, 100, 108, 116, 124) sts, not including invslst.>
Round 2: Do not turn. CSHDC in nxt st. [Ch 1, sk 1, hdc in nxt st] around to last st. Ch 1, sk 1, invslst in top of CSHDC from beg of round to join. Remove marker from top of CSHDC. <You should have 60 (68, 76, 84, 92, 100, 108, 116, 124) sts, including ch sts, but not including invslst.>
Round 3: Turn. CSDC in nxt ch-sp. Dc in ea st and ch-sp around. Invslst in top of CSDC from beg of round to join. <You should have 60 (68, 76, 84, 92, 100, 108, 116, 124) sts, not including invslst.>
Round 4: Turn. CSSC in nxt st. Sc in ea st around. Invslst in top of CSSC from beg of round to join. <You should have 60 (68, 76, 84, 92, 100, 108, 116, 124) sts, including ch sts, not including invslst.>
Repeat Rounds 2-4 once more. Tie off, weave in ends. Repeat instructions for sleeve at other armhole.
To Block: (video tutorial here)
For natural fibers, pin project out on foam blocking mats. Spray with water until fully saturated, allow to dry.
OR
For acrylic fibers, pin project out on an ironing board or several layers of towels. Hold a steaming iron 2-3” over the surface of the fabric, making sure all of the fabric is penetrated by the steam. Allow to cool / dry.
This pattern is intended for your personal use only. You may not share it, copy it, sell it, give it away, or mass-produce the finished product. However, you may sell the finished items on a small scale, as long as you convey in your item description that you used a Yay For Yarn pattern.
Yay For Yarn Copyright© 2020 – Current. All patterns and photos are owned by Yay For Yarn.
Pin the image below to save this project for later!
")


Do you have any suggestions for other yarn ? The ZZ Twist has been discontinued !
Hi Cindy! You can use any #4 Medium Weight yarn you like, but if you plan on wearing the tee during warmer weather, I recommend following my best tips for choosing yarn for summer garments. I hope this helps!
HELP!
I just finished the yolk and my stitches are way off! My total isn’t even close! I’m wondering if I didn’t do one of the rows correctly, because it’s so far off.
Would you happen to have the totals for each row as they would be repeated? Or how would I figure them out? I had to do the 7 times repeat for the extra large. So when I rip out and redo I will know each side is accurate. Please help thank you. And thank you for the beautiful pattern
Hi Lee Ann. After completing Round 2, you should have 96 stitches. Then, on Rounds 3, 4, and 5, there is a note at the end of each round saying how many stitches have been added to the previous total. Round 3 says “8 sts increased”, so the first time you work Round 3, 96+8=104, so you should have 104 stitches. Round 4 also adds 8 stitches, so after working Round 4 for the first time, you should have 112 stitches. Round 5 adds 16 stitches, so after working Round 5 for the first time, you should have 128 stitches. As you continue repeating Rounds 3-5 seven more times for the X-Large, you can keep a running total of your stitch count as you repeat each round, making sure that each repeat of Round 3 adds 8 stitches, each repeat of Round 4 adds 8 stitches, and each repeat of Round 5 adds 16 stitches. I hope this helps!
Thank you for replying. I have started the pattern over and I only get 120 stitches row 5. I can’t see how it can be 128. Dc in each space and in dc’s is what I did. Doesn’t make any sense. I’m so disappointed because I really want to make this but I can’t get the correct numbers of st. I appreciate your help.
Thank you for your quick reply, unfortunately I didn’t realize you had. So I redid the yoke again, counting every row, but when I get to row 5 I only get 120 stitches! I can’t find where I could have possibly missed 8 stitches! What could I possibly be doing wrong. I’m so disappointed I want to make this sweater so bad!
Hi Lee Ann. Here’s what I would suggest looking for on your piece to see where the problem might be.
1. Are you counting all of the chain stitches in the corners in the stitch count?
2. Look closely at the stitches worked into the corner chain space from the previous round. Do you have 2 double crochet, chain 1, 2 double crochet all worked into the same chain space? All 5 of those stitches should be worked into the corner chain space.
3. Sometimes, it can be a bit difficult to see the top of the stitch before and / or after the corner chain space on the previous round. Look at the stitches on the previous round, on either side of the corner chain space, and follow the post of the stitch up to the top. Make sure that you worked into the top of the stitch on either side of the corner chain space from Round 4.
If none of these things help to identify the issue, you are welcome to send me photos of your piece to blogger[at]yayforyarn.com, and I will be better able to help troubleshoot. I hope this helps!
THANK YOU!!’ I found where I was missing stitches’n right before and right after the corner stitches!! So I now finally have the right count! BUT I’m
Having the worst time with the CSHDC AND CSDC!!! They look terrible. My seam is horrible! The loop ends up too big and leave a bump of yarn in the seam. I’ve tried tightening it up but then I can’t seem to get thru the stitches. Can you help me? What do you suggest? Do you have video to help? Or should I do something different to join? THANK YOU SOOOO MUCH, AS ALWAYS!!
Hi Lee Ann. Yes, if the loops on the chainless starting stitches are too long, they can look loose and not blend in well. If you would like to try a different option, here’s what you could do instead.
For the hdc rounds, start with a chain 1, then hdc in the first stitch of the round. The chain 1 will not count as a stitch, and you will still join with the invisible slip stitch into the top of the first hdc of the round.
For the dc rounds, you could chain 2, then dc in the first stitch of the round. Again, the chain 2 will not count as a stitch, and you will still join with the invisible slip stitch into the top of the first dc of the round. Or, you could work a stacked single crochet (https://theloopholefox.com/stacked-single-crochet/) to equal the height of a double crochet. This is not as invisible as a CSDC, but can work as an alternative if you don’t want to use the CSDC. If you opt for the stacked single crochet, you will still want to use the invisible slip stitch to join.
Even though these options won’t be as invisible, they can still look neat and tidy. I hope this helps!
I would like to know can this pattern be made with cotton yarn? thanks so much
Hi Viola! Yes, you can make this tee in cotton yarn, as long as it is #4 Medium / worsted weight. I would suggest a soft cotton or a mercerized cotton. I hope this helps!
Thanks so much
Useful and creative thoughts. thanks for the idea. this is an amazing crochet giving an attractive look.
Your work is so beautiful. Keep sending us those free patterns of your work for our personal use.
Thanks so much, Susan! I’m glad you’re enjoying the patterns!