

Granny Squares, simplified! Learn to crochet flawless granny squares, without unsightly starting chains or slip stitch joins.
I love making granny squares. They are truly a crochet classic. They’re super cute, simple to make, and extremely versatile.
Table of Contents
However, there are just a few things that I don’t love about the traditional granny square.
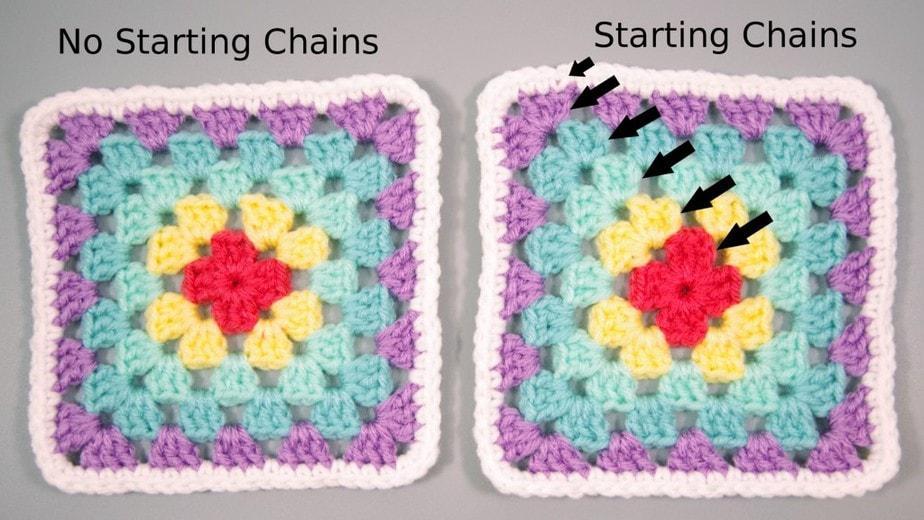
With the typically used method, the rounds begin with a starting chain and are joined with a slip stitch. Then, depending on the method, you may also have to slip stitch across the next double crochet group to get to the corner and begin the next round.
Well, I don’t like that idea. I especially don’t like seeing the starting chain and the slip stitch join. It creates a visible line or ridge going up the work, so you can always see where you stopped and started the round.

So…..
I decided to rethink how I make my granny squares. By beginning with a Chainless Starting Double Crochet, I eliminated those unsightly starting chains. I also changed the way I was joining my rounds, so that each round ends right in the middle of the corner chain space. No more slip stitching across to the next corner. Pretty neat, huh?
So give this method a try… and challenge your crochet friends to find where you began and ended the rounds. It’s truly seamless and invisible!
How to Crochet the Perfect Granny Square
by Yay For Yarn
Skill Level: Advanced Beginner
You Will Need:
- Yarn of your choice (any weight category can be used, thickness of yarn, number of colors, and desired size of square will determine the quantity of yarn needed)
- Crochet Hook (in a size appropriate for the thickness of the yarn you are using)
- Scissors
- Yarn Needle or Blunt Tapestry Needle
Shop Supplies for this Project
 Buy Now →
Knitter’s Pride Rainbow Folding Scissors
Buy Now →
Chibi Metal Yarn Needles – Amazon
Buy Now →
Furls Odyssey II Crochet Hooks
Buy Now →
Abbreviations:
st: stitch
sts: stitches
sp: space
sk: skip
nxt: nxt
ea: each
beg: beginning
ch: chain
sl st: slip stitch
sc: single crochet
hdc: half-double crochet
dc: double crochet
CSSC: Chainless Starting Single Crochet*
CSDC: Chainless Starting Double Crochet*
*This is a special stitch. See instructions below to learn how to work this stitch.
(Click Here for a full Video Tutorial on how to work the CSDC and the CSSC.)
CSDC: Stretch loop on hook until it is slightly longer than a regular double crochet. Holding the top of the loop still with your finger, yarn over with the stretched loop on your hook (not the working yarn) 1 time. Insert the hook into the same stitch the loop is coming from. Yarn over, pull up a loop of yarn. *Yarn over, pull through 2 loops on hook* 2 times.
CSSC: Stretch loop on hook slightly. Insert hook in the same stitch the loop is coming from. Yarn over, pull up a loop. Yarn over, pull through 2 loops on hook.
Granny Square Instructions
Ch 4. sl st in 4th ch from hook to form a ring.
Round 1: CSDC in ring, 2 dc in ring. *ch 2, 3 dc in ring.* Repeat between *and* 2 more times. Ch 1, hdc in top of CSDC from beg of round. This hdc creates part of the corner ch sp, but makes the round end at the very center of the corner ch sp. You should have 20 sts, counting each dc and each ch as a stitch and counting the hdc as a stitch.
Round 2: CSDC in same corner ch sp, 2 dc in same sp. *ch 1, sk nxt 3 sts, (3 dc, ch 2, 3 dc) in nxt corner ch sp.* Repeat between * and * 2 more times. Ch 1, sk nxt 3 sts, 3 dc in nxt corner ch sp (same ch space we began the round from). Ch 1, hdc in top of CSDC from beg of round. This hdc creates part of the corner ch sp, but makes the round end at the very center of the corner ch sp. You should have 36 sts, counting each dc and each ch as a stitch and counting the hdc as a stitch.
Round 3: CSDC in same corner ch sp, 2 dc in same sp. *ch 1, sk nxt 3 sts, 3 dc in nxt ch-1 sp. ch 1, sk nxt 3 sts, (3 dc, ch 2, 3 dc) in nxt corner ch sp.* Repeat between * and * 2 more times. Ch 1, sk nxt 3 sts, 3 dc in nxt ch-1 sp. Ch 1, sk nxt 3 sts, 3 dc in nxt corner ch sp (same ch space we began the round from). Ch 1, hdc in top of CSDC from beg of round. This hdc creates part of the corner ch sp, but makes the round end at the very center of the corner ch sp. You should have 52 sts, counting each dc and each ch as a stitch and counting the hdc as a stitch.
Round 4: CSDC in same corner ch sp, 2 dc in same sp. *(ch 1, sk nxt 3 sts, 3 dc in nxt ch-1 sp) 2 times. ch 1, sk nxt 3 sts, (3 dc, ch 2, 3 dc) in nxt corner ch sp.* Repeat between * and * 2 more times. (Ch 1, sk nxt 3 sts, 3 dc in nxt ch-1 sp) 2 times. Ch 1, sk nxt 3 sts, 3 dc in nxt corner ch sp (same ch space we began the round from). Ch 1, hdc in top of CSDC from beg of round. This hdc creates part of the corner ch sp, but makes the round end at the very center of the corner ch sp. You should have 68 sts, counting each dc and each ch as a stitch and counting the hdc as a stitch.
Round 5: CSDC in same corner ch sp, 2 dc in same sp. *(ch 1, sk nxt 3 sts, 3 dc in nxt ch-1 sp) 3 times. ch 1, sk nxt 3 sts, (3 dc, ch 2, 3 dc) in nxt corner ch sp.* Repeat between * and * 2 more times. (Ch 1, sk nxt 3 sts, 3 dc in nxt ch-1 sp) 3 times. Ch 1, sk nxt 3 sts, 3 dc in nxt corner ch sp (same ch space we began the round from). Ch 1, hdc in top of CSDC from beg of round. This hdc creates part of the corner ch sp, but makes the round end at the very center of the corner ch sp. You should have 84 sts, counting each dc and each ch as a stitch and counting the hdc as a stitch.
Round 6: CSSC in same corner ch sp, sc in same sp. *sc in ea st and ea ch sp across to nxt corner ch sp, 3 sc in corner ch sp.* Repeat between *and* 2 more times. Sc in ea st and ea ch sp across to the same corner ch sp we began the round in, sc in that corner ch sp.
If you want to use the yarn tail to sew your granny squares together, you can join by slip stitching into the CSSC from beg of round. Leave a tail long enough for your seam, cut the yarn and tie off.
If you don’t want to use the yarn tail to sew your granny squares together, use this invisible join method. Cut the yarn, leaving about a 6 inch tail. Stretch the loop on your hook until the end of the tail comes out. Thread that tail through your yarn needle. Skip the CSSC from beg of round, and insert the needle from back to front through the nxt sc of the round (the one after the CSSC). Pull the needle through. Now, insert the needle down through the top of the last stitch of the round, in the same place where the tail was coming from. Pull the needle through, and adjust the stitch you just made if necessary. Take a small stitch on the back of the sc round and make a knot, if desired. Weave in ends.
If you want, you can continue to make the granny square as large as you like. After you’ve completed Round 5, all following rounds will be essentially the same. For each following round, always work the sequence “(ch 1, sk nxt 3 sts, 3 dc in nxt ch-1 sp)” one more time than you did on the round before.
To Change Colors:
Once you’ve finished the last round of the previous color, tie off. Insert the hook into the same corner ch sp that you tied off in. Pull up a loop of the new color yarn. Ch 1, and pull that chain stitch very tight. Work the chainless starting stitch for your round into the same corner ch sp, as specified in the pattern. Pull the yarn tail to tighten the chain stitch again and make it disappear. Continue around according to pattern instructions.
This pattern is intended for your personal use only. You may not share it, copy it, sell it, give it away, or mass-produce the finished product. However, you may sell the finished items on a small scale, as long as you convey in your item description that you used a Yay For Yarn pattern.
Yay For Yarn Copyright© 2019 – Current. All patterns and photos are owned by Yay For Yarn.
Pin the image below to save this tutorial for later!

What’s your favorite granny square project?
")


I have been having difficulty learning to crochet. I do not want to quit though. Is there any possibility the instructions can be put in a pdf format. I seem to find written picture tutorials easier at learning. I do appreciate your web site and all that is available through it.
Thank you
Hi Marlene! Yes, I do have this pattern available in a PDF version. You can download it for free here: https://www.ravelry.com/patterns/library/perfect-granny-square-2
(If you do not use Ravelry, you can also get the PDF by signing up for my email list here: https://yay-for-yarn.ck.page/e0014e8be8)
I hope this helps!
I love this Way of perfect seamless crochet a lot better than the chain one and turning, Thank you so much for your tutorial video I loved it so much.
Great tutorial and I really like the outcome. However, the one change I made was using a magic circle to start my square. For me, it makes for greater ease in tightening the circle and it appears much neater.