
")
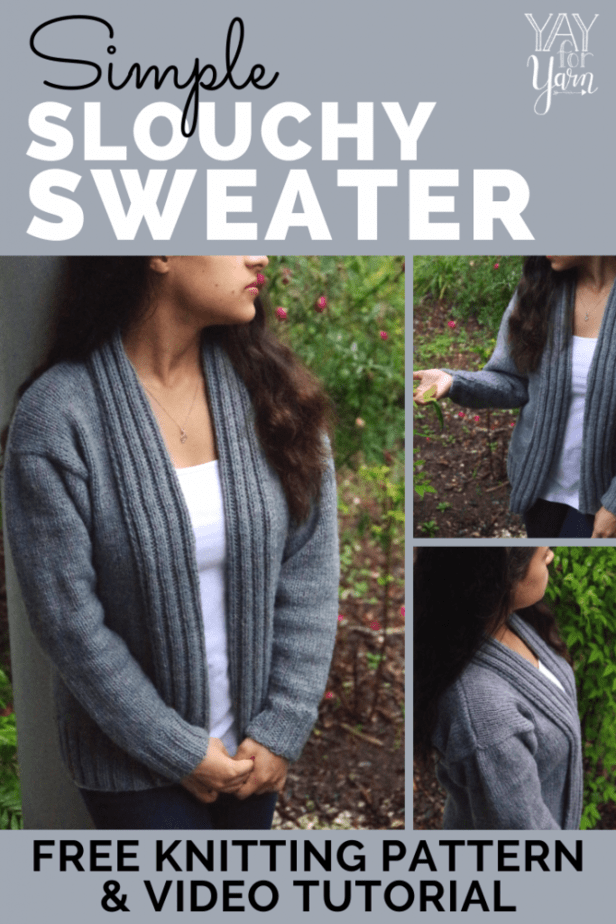
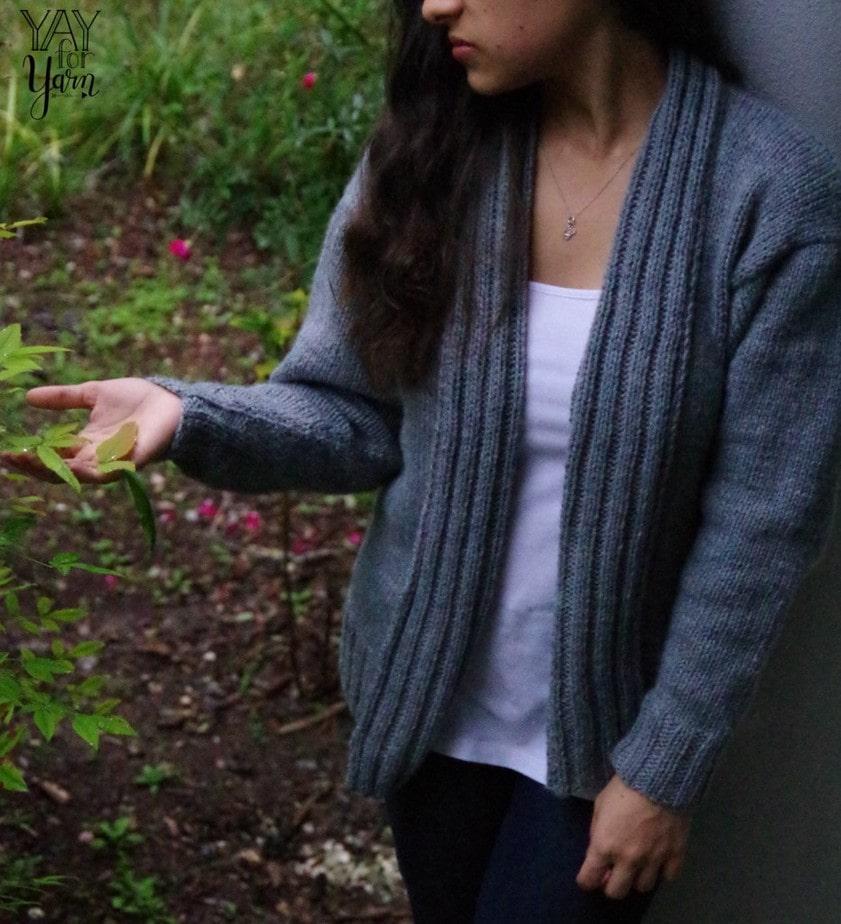
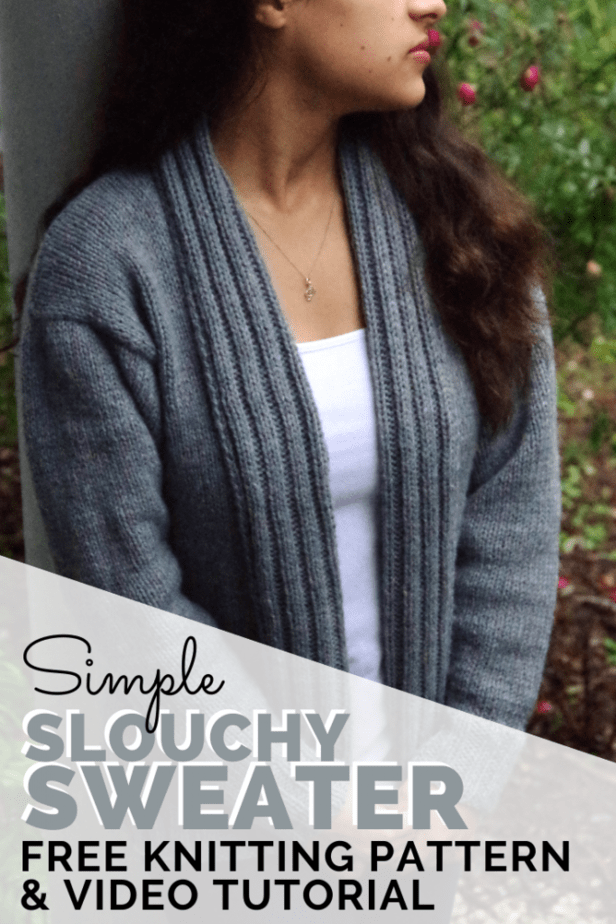
This quick & easy free knitting pattern & video tutorial will teach you how to knit a cardigan, even if you are a beginner knitter! This soft, slouchy cardigan is a fall wardrobe essential. Designed as a perfect “first garment project” for beginner knitters, the entire sweater is made from 3 pieces, with minimal shaping.
Table of Contents
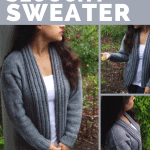
An Easy Cardigan Knitting Pattern
This sweater is one of my new favorite pieces for fall. With its over-sized fit, drop shoulder style, ribbed collar, and hip length hem, this cozy cardigan makes me feel like I’m wrapped up in a snuggly blanket. The Lion Brand Pound of Love yarn I used is just perfect for garments like this – soft and fuzzy, but machine washable. The “Oxford Grey” colorway is heathered, which adds a bit of extra depth and texture to the fabric.
How to Knit a Cardigan for Beginners
When designing this free cardigan pattern, I wanted it to be simple enough for a beginner to knit. So instead of knitting two pieces for the front, one for the back, two more pieces for sleeves, and adding a separate neckline edging, I chose to knit this sweater in only THREE PIECES, one piece for the body of the sweater with a built-in edging, and one for each sleeve. Each piece is a modified rectangle, so there’s no knitting in the round or top down raglan shaping at all.
You will need to use #4 Worsted Weight Yarn for this project. For more information on choosing the right yarn for a pattern, see this post.
If you can knit and purl back and forth in rows, and work a simple increase stitch, you can knit this entire cardigan!
Ready to knit your own Simple Slouchy Sweater?
Grab your yarn and let’s get started!
Simple Slouchy Sweater Knitting Pattern
by Yay for Yarn
Skill Level: Advanced Beginner
Sizing:
- Sizing follows the Craft Yarn Council’s standards for Women’s sizes.
- This sweater fits oversized, with 4” of positive ease. If you are between sizes, size up if you want a more slouchy-fit sweater, or size down if you want a more fitted sweater.
- Instructions and yarn requirements for size X-Small are given outside the parentheses, with Small, Medium, Large, X-Large, 2X, 3X, 4X, and 5X given inside the parentheses, like this: X-Small (Small, Medium, Large, X-Large, 2X, 3X, 4X, 5X). When only one number is given, it applies to all sizes.
To Fit Bust:
- X-Small: 30” (76 cm)
- Small: 34” (86 cm)
- Medium: 38” (96.5 cm)
- Large: 42” (106.7 cm)
- X-Large: 46” (116.8 cm)
- 2X: 50” (127 cm)
- 3X: 54” (137 cm)
- 4X: 58” (147 cm)
- 5X: 62” (157.5 cm)
Finished Bust / Back Length:
- X-Small: 34” (86 cm) / 23” (58.4 cm)
- Small: 38” (96.5 cm) / 23” (58.4 cm)
- Medium: 42” (106.7 cm) / 23 ½” (59.7 cm)
- Large: 46” (116.8 cm) / 23 ½” (59.7 cm)
- X-Large: 50” (127 cm) / 24” (61 cm)
- 2X: 54” (137 cm) / 24” (61 cm)
- 3X: 58” (147 cm) / 24” (61 cm)
- 4X: 62” (157.5 cm) / 24 ½” (62.2 cm)
- 5X: 66” (167.6 cm) / 24 ½” (62.2 cm)

You will need:
- 950 (1,055, 1,140, 1,280, 1,360, 1,470, 1,584, 1,692, 1,790) Yards of soft #4 Worsted Weight Yarn (I used Lion Brand Yarn Pound of Love in Oxford Grey, 16 oz / 1020 yds per ball, 1 (2, 2, 2, 2, 2, 2, 2, 2) Balls)
- US Size 8 (5.0 mm) Circular Knitting Needle, at least 40” long
- 2 Stitch Markers
- 1 Locking Stitch Marker or Safety Pin
- Scissors
- Measuring Tape
- Yarn Needle or Blunt Tapestry Needle
Shop Supplies for this Project
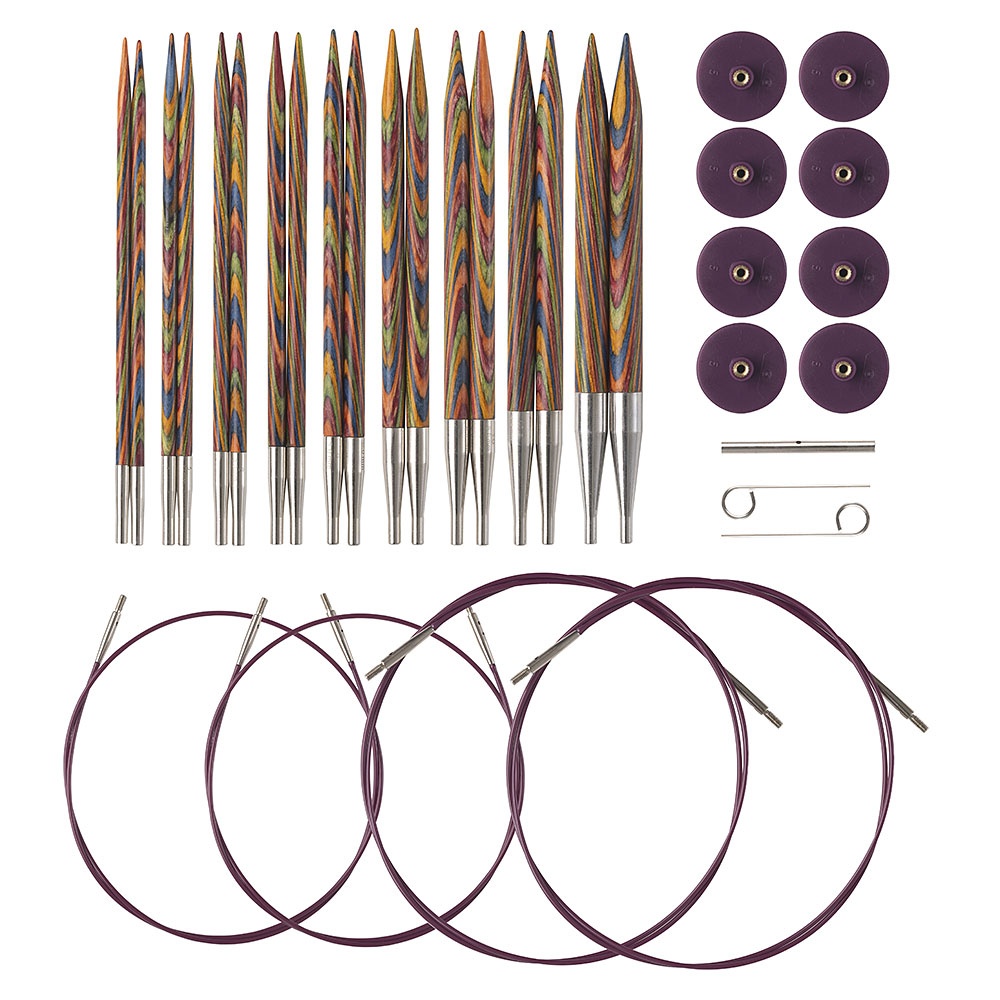
KnitPicks Options Rainbow Interchangeable Knitting Needles
Buy Now →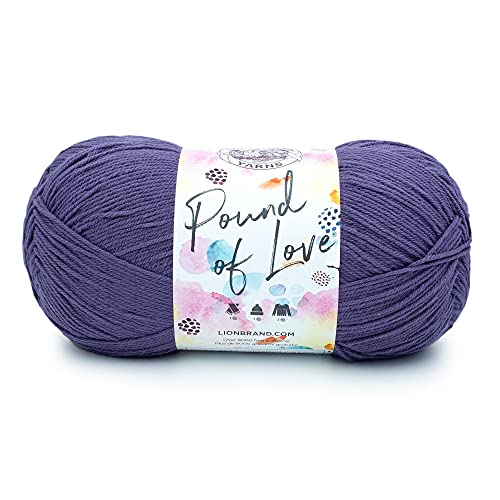
Lion Brand Pound of Love – Amazon
Buy Now →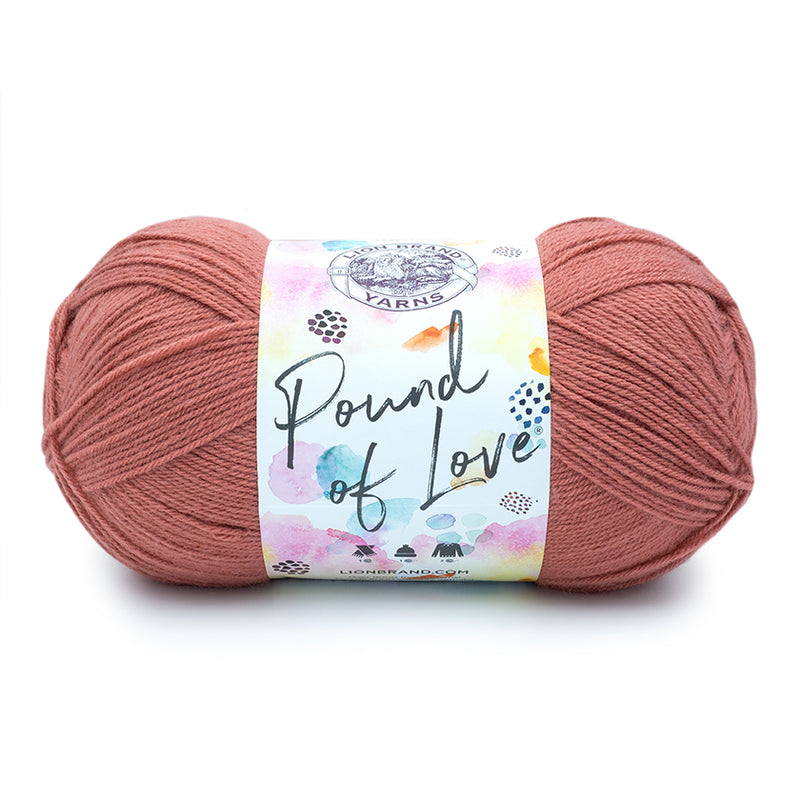
Lion Brand Pound of Love – LionBrand.com
Buy Now →
Chibi Metal Yarn Needles – Amazon
Buy Now →
Knitter’s Pride Rainbow Folding Scissors
Buy Now →
KnitPicks Knitting Stitch Markers
Buy Now →
WeCrochet Locking Stitch Markers
Buy Now →
Gauge:
19 stitches = 4” (10 cm); 19 rows = 3” (7.6 cm) in stockinette stitch (knit all right side rows, purl all wrong side rows)
Note: Needle size given in pattern is a recommendation only. Please use whichever needle size gives you the correct gauge for the pattern with your personal knitting tension.
Abbreviations:
- K: knit
- P: purl
- sl: slip
- st: stitch
- sts: stitches
- nxt: next
- Kf&b: knit front and back*
*This is a special stitch. See instructions below to learn how to work this stitch.
Kf&b: Insert right needle tip into the nxt st on the left needle. Knit that st, but don’t let the old stitch slip off the left needle yet. Bring the right needle behind the left needle, and insert the right needle into back of the same st, and knit through it again. Now let the old stitch slip off the left needle. The Kf&b increases one stitch by working into a stitch twice, once in the front and once in the back.
Simple Slouchy Sweater Instructions
Body of Sweater

With Long-Tail Cast On, cast on 186 (206, 222, 250, 266, 286, 314, 330, 350) sts.
Row 1: *P2, K2* across to last 2 sts, P2. You should have 186 (206, 222, 250, 266, 286, 314, 330, 350) sts.
Row 2: *K2, P2* across to last 2 sts, K2. You should have 186 (206, 222, 250, 266, 286, 314, 330, 350) sts.
Repeat Rows 1-2 until you have a total of 20 rows, ending with row 2. Piece should measure 3” (7.6 cm) from cast on edge.
Row 3: *P2, K2* 6 (6, 6, 7, 7, 7, 8, 8, 8) times, P2. Place a stitch marker on right needle. K 134 (154, 170, 190, 206, 226, 246, 262, 282) sts. Place a stitch marker on right needle. *P2, K2* 6 (6, 6, 7, 7, 7, 8, 8, 8) times, P2. You should have 186 (206, 222, 250, 266, 286, 314, 330, 350) sts.
Row 4: *K2, P2* 6 (6, 6, 7, 7, 7, 8, 8, 8) times, K2. Sl marker, P across to nxt marker, sl marker. *K2, P2* 6 (6, 6, 7, 7, 7, 8, 8, 8) times, K2. You should have 186 (206, 222, 250, 266, 286, 314, 330, 350) sts.
Row 5: *P2, K2* 6 (6, 6, 7, 7, 7, 8, 8, 8) times, P2. Sl marker, K across to nxt marker, sl marker. *P2, K2* 6 (6, 6, 7, 7, 7, 8, 8, 8) times, P2. You should have 186 (206, 222, 250, 266, 286, 314, 330, 350) sts.
Repeat Rows 4-5 until piece measures 15 ½” (15”, 15”, 14 ½”, 14 ½”, 14”, 13 ½”, 13 ½”, 13”) OR 39.4 cm (38 cm, 38 cm, 36.8 cm, 36.8 cm, 35.6 cm, 34.3 cm, 34.4 cm, 33 cm) from cast on edge, ending with row 4.
Upper Right Front
Row 1: *P2, K2* 6 (6, 6, 7, 7, 7, 8, 8, 8) times, P2. Sl marker, K 27 (32, 35, 40, 44, 49, 54, 57, 63) sts. STOP. Do not continue to work across remaining sts. We will now only be working across the section just knit. All remaining sts will sit on the needle until we move on to the nxt section. You should have 53 (58, 61, 70, 74, 79, 88, 91, 97) sts for this section, not including remaining sts held on the needle for later.
Row 2: P 27 (32, 35, 40, 44, 49, 54, 57, 63) sts, sl marker. *K2, P2* 6 (6, 6, 7, 7, 7, 8, 8, 8) times, K2. You should have 53 (58, 61, 70, 74, 79, 88, 91, 97) sts.
Row 3: *P2, K2* 6 (6, 6, 7, 7, 7, 8, 8, 8) times, P2. Sl marker, K 27 (32, 35, 40, 44, 49, 54, 57, 63) sts. You should have 53 (58, 61, 70, 74, 79, 88, 91, 97) sts.
Repeat Rows 2-3 until piece measures 23” (23”, 23 ½”, 23 ½”, 24”, 24”, 24”, 24 ½”, 24 ½”) from cast on edge, ending with row 3.
Row 4: Bind off 26 (31, 34, 39, 43, 48, 53, 56, 62) sts, remove marker. *K2, P2* across to last 2 sts, K2. You should have 27 (27, 27, 31, 31, 31, 35, 35, 35) sts.
Row 5: *P2, K2* across to last 3 sts, P2, K1. You should have 27 (27, 27, 31, 31, 31, 35, 35, 35) sts.
Row 6: P1. *K2, P2* across to last 2 sts, K2. You should have 27 (27, 27, 31, 31, 31, 35, 35, 35) sts.
Repeat Rows 5-6 until ribbing extends 2 ¾” (2 ¾”, 3”, 3”, 3 ¼”, 3 ¼”, 3 ¼”, 3 ½”, 3 ½”) OR 7 cm (7 cm, 7.6 cm, 7.6 cm, 8.3 cm, 8.3 cm, 8.3 cm, 8.9 cm, 8.9 cm) past bound-off edge from row 4, ending with row 5. Bind off in pattern (knitting the K sts & purling the P sts). Cut yarn, leaving a 1 yard tail, and tie off.

Upper Back
With the right side of the work facing you, begin with new yarn in 1st st on the right of remaining sts (first st nxt to upper right front).
Row 1: K 80 (90, 100, 110, 118, 128, 138, 148, 156) sts. STOP. Do not continue to work across remaining sts. We will now only be working across the section just knit. All remaining sts will sit on the needle until we move on to the nxt section. You should have 80 (90, 100, 110, 118, 128, 138, 148, 156) sts.
Row 2: P across. You should have 80 (90, 100, 110, 118, 128, 138, 148, 156) sts.
Row 3: K across. You should have 80 (90, 100, 110, 118, 128, 138, 148, 156) sts.
Repeat Rows 2-3 until piece measures 23” (23”, 23 ½”, 23 ½”, 24”, 24”, 24”, 24 ½”, 24 ½”) OR 58.4 cm (58.4 cm, 59.7 cm, 59.7 cm, 61 cm, 61 cm, 61 cm, 62.2 cm, 62.2 cm) from cast on edge. Bind off, cut yarn leaving a 6” tail, tie off.
Upper Left Front
With the right side of the work facing you, begin with new yarn in 1st st on the right of remaining sts (first st nxt to upper back).
Row 1: K 27 (32, 35, 40, 44, 49, 54, 57, 63) sts, sl marker. *P2, K2* 6 (6, 6, 7, 7, 7, 8, 8, 8) times, P2. You should have 53 (58, 61, 70, 74, 79, 88, 91, 97) sts.
Row 2: *K2, P2* 6 (6, 6, 7, 7, 7, 8, 8, 8) times, K2. Sl marker, P 27 (32, 35, 40, 44, 49, 54, 57, 63) sts. You should have 53 (58, 61, 70, 74, 79, 88, 91, 97) sts.
Repeat Rows 1-2 until piece measures 23” (23”, 23 ½”, 23 ½”, 24”, 24”, 24”, 24 ½”, 24 ½”) OR 58.4 cm (58.4 cm, 59.7 cm, 59.7 cm, 61 cm, 61 cm, 61 cm, 62.2 cm, 62.2 cm) from cast on edge, ending with row 2.
Row 3: Bind off 26 (31, 34, 39, 43, 48, 53, 56, 62) sts, remove marker. *P2, K2* across to last 2 sts, P2. You should have 27 (27, 27, 31, 31, 31, 35, 35, 35) sts.
Row 4: *K2, P2* across to last 3 sts, K2, P1. You should have 27 (27, 27, 31, 31, 31, 35, 35, 35) sts.
Row 5: K1. *P2, K2* across to last 2 sts, P2. You should have 27 (27, 27, 31, 31, 31, 35, 35, 35) sts.
Repeat Rows 4-5 until ribbing extends 2 ¾” (2 ¾”, 3”, 3”, 3 ¼”, 3 ¼”, 3 ¼”, 3 ½”, 3 ½”) OR 7 cm (7 cm, 7.6 cm, 7.6 cm, 8.3 cm, 8.3 cm, 8.3 cm, 8.9 cm, 8.9 cm) past bound-off edge from row 3, ending with row 5. Bind off in pattern (knitting the K sts & purling the P sts). Cut yarn, leaving a 1 yard tail, and tie off.
Sleeve (make 2)

With Long Tail Cast On, cast on 34 (38, 42, 46, 50, 58, 62, 66, 70) sts.
Row 1: *K2, P2* across to last 2 sts, K2. You should have 34 (38, 42, 46, 50, 58, 62, 66, 70) sts.
Row 2: *P2, K2* across to last 2 sts, P2. You should have 34 (38, 42, 46, 50, 58, 62, 66, 70) sts.
Repeat Rows 1-2 until piece measures 2 ½” (6.4 cm) from cast on edge, ending with row 2.
Row 3: K across.
Row 4: P across.
Row 5: K1, Kf&b, K across to last 2 sts, Kf&b, K1. (2 sts increased)
Row 6: P across.
Repeat Rows 3-6, 19 more times. You should now have 74 (78, 82, 86, 90, 98, 102, 106, 110) sts.
Repeat Rows 3-4, 8 (8, 8, 8, 4, 4, 1, 1, 1) more time(s). Bind off, cut yarn, leaving a tail at least 2 yards long. Tie off.
Assembly
Block all pieces before seaming. Use the blocking method recommended for the type of yarn you are using. Lion Brand Pound of Love is 100% Acrylic, so I steam blocked my pieces (pin to finished measurements on ironing board or thick towels, hold steaming iron 2”-3” / 5 cm – 7.6 cm above the fabric). For animal fiber yarns, it is generally recommend to wet block (pin to finished measurements on blocking mat, spray with water, let dry). For more information on Blocking, see this article.
Lay Body of Sweater wrong-side-up, and fold both front sections to the center so the armhole slits are on the sides. See the extended section of ribbing at the top of each front? We will be sewing the bind-off edges of those extended sections together to make the back of the collar.
Notice that on one extension, the yarn tail comes from the collar edge (long edge that goes down to the bottom of the sweater), and the other comes from the other edge (short edge that goes down a bit to meet the shoulder edge of the front). Thread the tail that comes from the collar edge through your yarn needle.
Bring the bound-off edges of the ribbing extensions together, and turn them both over so they are wrong-side-up. The purl side of the stockinette portions from the fronts will be facing up. We are sewing this seam with wrong sides up so the pretty side of the seam will be on the wrong side. When the sweater is right-side-out and the collar is folded back, the pretty side of the seam will face out. Starting from the collar edge, begin mattress stitching the bound-off edges of the ribbing extensions together, stopping when you reach the other side of the ribbing extensions. Take a small stitch at the end of the seam, wrap the yarn around the needle, and pull the needle through to make a knot. Turn the work over so the right side of the sweater is facing up.
You now have 2 yarn tails at the edge of the work, where the seam you just made is. This edge is the back neck edge, and will be sewn to the middle of the upper back edge (at the back of the neck). The right side of the sweater should be facing out. Fold the Upper Back edge in half to find the center, and line up the center with the collar seam just made. We will sew the next seam with the yarn tail that is still on your needle, beginning at those aligned center points and working your way out to the shoulder edge. Mattress stitch one half of the upper back edge to one half of the back neck / upper front edge. When you reach the shoulder edge, take a small stitch at the end of the seam, wrap the yarn around the needle, and pull the needle through to make a knot.
Now thread the other yarn tail from the collar seam / center of back neck edge through your yarn needle. Mattress stitch the other half of the upper back edge to the other half of the back neck / upper front edge. When you reach the shoulder edge, take a small stitch at the end of the seam, wrap the yarn around the needle, and pull the needle through to make a knot.

Now we will attach the sleeves. Take one of the sleeves and find the long yarn tail at the top / bind-off edge. Thread this yarn tail through your yarn needle. Lay the body of the sweater flat, and find the bottom of the armhole slit. Lay the top edge of the sleeve right side up next to the armhole, making sure the top edge of the sleeve is parallel with the armhole edge. Fold the top edge of the sleeve in half to find the center. With your locking stitch marker or safety pin, “pin” the center point of the top of the sleeve to the edge of the shoulder seam. Begin at the bottom of the armhole slit and the top corner of the sleeve (where the yarn tail is coming from). Skip the first stitch of the sleeve, as this will be used as an edge stitch in the next seam. Mattress stitch the first half of the sleeve to the armhole (from the bottom of the armhole slit to the shoulder seam). When you reach the stitch marker, remove it, and use it to pin the other top corner of the sleeve to the first corner that is already sewn to the sweater. Continue mattress stitching the second half of the sleeve to the other half of the armhole slit (from the shoulder seam back around to the bottom of the slit). When you reach the bottom of the armhole slit, leave the last stitch of the sleeve for an edge stitch on the next seam. Take a small stitch at the edge of the armhole, wrap the yarn around the needle, and pull the needle through to make a knot.
Bring the two long edges of the sleeve together with right sides up. Beginning at the underarm, mattress stitch those edges together, stopping when you get to the edge of the sleeve cuff. Take a small stitch at the edge of the cuff, wrap the yarn around the needle, and pull the needle through to make a knot.
Repeat instructions for attaching sleeve with the second sleeve. Weave in all remaining ends.This pattern is intended for your personal use only. You may not share it, copy it, sell it, give it away, or mass-produce the finished product. However, you may sell the finished items on a small scale, as long as you convey in your item description that you used a Yay For Yarn pattern.
Yay For Yarn Copyright© 2018 – Current. All patterns and photos are owned by Yay For Yarn.
Pin the image below to save this project for later!
Have you ever knitted a garment?
Happy Yarning! 🙂
")


Hi, I see in an earlier comment that to lengthen the sleeves, just add more rows to the top of the sleeve. I will definitely check, but I tend to have gorilla arms (really long!!), and I’m betting I may need to add as much as 3 inches…or more! Should all that length be added to the top of the sleeve? Or maybe add an extra knit and purl row between rows 4 and 6 so 6 rows repeated instead of 4 as I’m.working the increase rows? Which would be best?
Hi Jen! If you need to add about 3 inches in length, here’s what I would suggest. The gauge is 19 rows in 3″. So you’ll need to add about 19 or 20 rows. The set of Rows 3-6 is to be repeated 19 times after the first time, so adding another pair of knit and purl rows each time would add an extra 38 rows. I would recommend adding an extra pair of rows to every other repeat, instead of every repeat. This will add the approximate extra length that you need, and then you can add a few additional plain rows at the end if needed, keeping in mind that this sweater has a drop shoulder style, and the sleeve does not need to be long enough to reach the top of the shoulder. I hope this helps! If you have any more questions, please let me know.
Hi, I have long & skinny arms too so I may need to extend the sleeves, so I appreciate this guidance. I was also wondering if you can also make the sleeves narrower in diameter (skinnier) by just starting with fewer stitches on the needle for the sleeves, like 30 instead of 34? Or would that really change how it fits into the armhole?
Last question (for now), I don’t understand the sizing numbers above. For the X-small, it says both 30″ bust and 34″ bust. Are those measuring two different things? Or what’s correct? Thank you very much, this is my first attempt at making clothing!
Hi Naomi. If you want to make the sleeves narrower, it would be possible to do so, but would take some modifications. If you’re comfortable experimenting with that, I would be happy to explain how you would go about making the necessary adjustments to make the sleeves narrower (and yes, it would affect how the sleeve fits into the armhole, so that would be adjusted as well).
Yes, those bust measurements are measuring two different things. The first list of bust measurements (where it says 30″ bust for the X-Small) is the measurement of the person wearing the sweater. So you would measure the bust of the wearer, and choose to make the size that most closely matches the wearer’s measurement in that list. The list of measurements that says “finished bust” is the actual finished measurement of the sweater, as the sweater is slightly larger than the person’s body measurements, so there is some ease, as this sweater is not designed to be snug fitting.
I hope this helps! If you have any more questions, please let me know.
Hi,
I accidentally reversed the order on row one and two. I started row one with K2, P2 and ended with K2. For row two I started with P2. Will this be a problem? Thanks in advance!
Hi Cindy. If you are up for adapting the pattern to reverse the ribbing columns for the rest of your sweater body, that could work. However, it would be much easier to just undo those rows and start over following the ribbing instructions as written in the pattern. Then, you can just follow the instructions for the rest of the sweater body as written, without having to make any changes. I hope this helps!
Hello, I had a question regarding this portion of the body of the sweater.
-Repeat Rows 4-5 until piece measures 15 ½” (15”, 15”, 14 ½”, 14 ½”, 14”, 13 ½”, 13 ½”, 13”) OR 39.4 cm (38 cm, 38 cm, 36.8 cm, 36.8 cm, 35.6 cm, 34.3 cm, 34.4 cm, 33 cm) from cast on edge, ending with row 4. ———–
I was curious if the length is supposed to decrease as the sizes increase? I understand that we can obviously continue until it’s the length we want, however I was wanting to know if there was a specific reason for the lengths decreasing.
Hi Destini! Yes, there is a reason that the lengths decrease in the larger sizes. The overall length of the sweater gets slightly longer in the larger sizes, but the armholes are also deeper in the larger sizes. So we begin making the armholes a little lower on the sweater in the larger sizes. This is why the length of the lower portion of the body of the sweater is supposed to be slightly shorter. It determines where the armholes begin, and does not affect the overall length. I hope this helps!
That helps tremendously! Thank you so much!!
If I want to make the sweater longer, I understand that I should just continue rows 4&5 until I get the measurement I want for the body of the sweater. However, should I then lengthen upper right front, upper back and upper left back too? So if I add 4 inches to the body of the sweater, do I add the same 4 inches to the rest? Example below:
Body of sweater- the pattern for the body of the sweater states to repeat rows 4&5 until the piece measures 14 1/2 in. from cast on edge. I am going to add more rows so the piece measures 18 1/2 in. from cast on.
Upper right front – the pattern has row 2&3 repeating until piece measures 23 1/2 inches from cast on edge. Would I add 4 inches here too so that the piece should measure 27 1/2 inches from cast on edge?
And then do the same for the upper back and upper left front?
Thank you for your assistance with this.
Hi Kim. If you want to add length to the sweater, you would only need to continue repeating rows 4 and 5 until the piece is the length you want from underarm to hem. If you were to also lengthen the upper back, upper right front, and upper left front, then the armholes would be deeper, and the sleeve would not match the armhole in size. So I would just recommend lengthening the lower portion of the sweater only. I hope this helps!
If we prefer to knit sleeves in the round is it possible to just pick up stitches around the arm holes after the body of the garment is assembled in order save having to mattress stitch the arms on to the body?
Hi Zoe. Yes, you could pick up stitches around the arm holes if you would like to adapt the sleeve shaping to be worked from the top down instead of from the bottom up. I hope this helps!
Hi, I made this sweater with #4 Worsted Weight yarn and loved the style but it is just too warm for where I live so I passed it on to my sister. She loves it. I am thinking of trying to make it with a #3 cotton yarn but I know that it may not be as simple as matching gauge. Is there other things I need to keep in mind while altering the pattern for the lighter weight yarn.
Thanks
Hi Mary. I’m glad your sister loves the sweater! If you want to use #3 yarn for this pattern, I would only recommend doing so if you have some experience altering patterns. If you match the pattern gauge with a thinner yarn, that will alter the drape and texture of the fabric a bit. Most likely, the fabric will be more open. It may also affect your row gauge, as the more open fabric may tend to hang a little longer. You’ll definitely want to make a gauge swatch, block it, measure your gauge, hang it up for awhile (at least 12 hours) and measure again to see if the row gauge stretches any after hanging it up. If the row gauge does change quite a bit, you may need to work fewer rows in some sections of the pattern to compensate for that. I hope this helps, and I hope your sweater turns out great!
When first dividing the back do you use a stitch holder for the stitches to be picked up later? I see stitch holders as part of the required tools but nothing within the pattern indicating when to use them. Am I missing something.
Thank you.
Hi Dorothy. Most stitch holders are too small to hold the upper back stitches for this project. Because we’re using a circular needle, all of those extra stitches can just sit on the long cable of the needle while you’re working with the current section of stitches. There is no need for any other tools or stitch holders since we have that long circular needle. Once you bind off the first upper section of the cardigan, it will no longer be on your needle, so you can just slide the next section of stitches up to the needle tip to start working the next upper section. I hope this helps!
Hi there. I knitted this pattern and saw it is a drop shoulder. I want to knit another one without a drop shoulder and not sure how to go about it. I am new at knitting. Help please ????
Hi Carina! If you want to knit a cardigan without a drop shoulder, you’ll need to look for a pattern with a different construction method for the shoulders and sleeves. The drop shoulder is part of what makes the pattern so simple, but if you wanted to modify this pattern to have a different type of sleeve, that would be much more difficult than just finding another plain cardigan pattern with set-in or raglan sleeves. Other sleeve styles require more shaping in the armholes and in the upper part of the sleeve. If you are comfortable with basic increases and decreases, other types of sleeves can be doable for a beginner, but modifying a pattern is much more difficult for a new knitter. Here’s an example of a fairly simple cardigan pattern with raglan sleeves. Many patterns designed for beginners have drop shoulder shaping, though, as that is the easiest to work. I hope this helps!
Thank you!
Can I turn this into a vest by just leaving off the sleeves and finishing the armhole (crochet around or pick up and knit a band)?
Thanks!
Barb
Yes, you can leave the sleeves off. The body piece will still extend over the shoulders some, as it is a drop shoulder style, but you can make it without sleeves if you like. I hope this helps!
the completed sleeves are very baggy… is this the design or did i do something wrong. Is there a way to remedy this?
Hi Florence! Yes, the sleeves on this sweater are designed to be slouchy and loose-fitting. If you want to make them a little smaller, you could sew the sleeve seam further away from the edge of the piece, so that a bit of the excess fabric will be taken up in the seam. The edges inside the sleeve after it is sewn can be carefully tacked down on the inside so they lay smoothly and don’t feel bulky when the sweater is worn. I hope this helps!
Hi Yay for Yarn: I purchased Simply Slouchy Sweater pattern x 1. But I have been denied access to the pattern, the notice said to contact merchant. #0078617692 dated today 08th Jan 21. Also I’m having logging into your website, I have tried a number of times. Thank you, Shirley.
Hi Shirley! Downloading the pattern does not require logging into my website, and purchasing a pattern does not create an account on my website. So if you’d like to log into my site, you’ll need to create an account with your email address and a password. As for downloading the pattern, I can see your order in my system. It looks like it is denying your download attempts because you have already downloaded the pattern 10 times. Please try searching in the files on your device to see if the pattern was properly saved there. If you go to your file browser and search “YayForYarn” it should pull up the file for you. If it is not there, I can reset your download limit so you can download again, or I can manually email the pattern to you. Please let me know if you continue to have a problem with the download. I am happy to help!
Hi there!
I saw your video on youtube, but i didnt get how many balls you used in this project, honestly I have no idea what 91 (2,2,2,2,2,2…) means at all.
I’m from Brazil so we use the metric system here, so you used a 5mm #8 US circular needle correct?
The biggest ball of yard I found here has 347m, so I was just doing the math for how many balls I need and how much thats gonna cost. Can you help me out with that?
Hi Sarah! Yes, a #8 US circular needle is 5mm. I used a yarn that comes in 1 pound balls (which is very large for a skein of yarn), but if you’re using a yarn that comes in smaller skeins, you’ll want to go by the yardage and convert that to meters.
The instructions and yarn requirements for size X-Small are given outside the parentheses, with Small, Medium, Large, X-Large, 2X, 3X, 4X, and 5X given inside the parentheses, like this: X-Small (Small, Medium, Large, X-Large, 2X, 3X, 4X, 5X). So whenever you see a list of numbers like that in the pattern, that is showing the numbers you need to follow for each size. The number for X-Small is first, before the parentheses, the next number just inside the parentheses is for the size Small, the next number is for the size Medium, etc. So when you look at the yarn requirements… “950 (1,055, 1,140, 1,280, 1,360, 1,470, 1,584, 1,692, 1,790) Yards of soft #4 Worsted Weight Yarn (I used Lion Brand Pound of Love in Oxford Grey, 16 oz / 1020 yds per ball, 1 (2, 2, 2, 2, 2, 2, 2, 2) Balls)”, the X-Small needs 950 yards of yarn, the Small needs 1,055 yards of yarn, the Medium needs 1,140 yards, the Large needs 1,280 yards, etc. The same thing applies when you’re following the instructions. If the pattern says, “With Long-Tail Cast On, cast on 186 (206, 222, 250, 266, 286, 314, 330, 350) sts”, then if you’re making the X-Small, you’ll cast on 186 stitches. If you’re making the Medium, you’ll cast on 206, if you’re making the Large, you’ll cast on 222, etc, and the numbers go up to a size 5X, so if you made the size 5X, you would cast on 350. Any time you see a list of numbers like that in the pattern, they are giving the numbers to follow for each size. You’ll only need to follow the numbers that pertain to the size you are making.
To determine how much yarn you will need, decide which size you are going to make according to the measurements in the Sizing section of the pattern. Then, see which number of yards in the yarn requirements applies to the size you are making. You can take the number of yards and convert it to meters to figure out how much yarn you will need of whatever yarn you want to use.
I hope this helps, and I hope your cardigan turns out great!
Hi Yay for Yarn! I’m getting ready to start this sweater but have a few questions! My first is about guage…my swatch came out with 3.5in by 4.5in is that enough increased size to look into changing my needle size for the project or is it small enough to be inconsequential?
My next question is also about size, my bust is 61in so it’s closer to the 5x size, I like a more fitted fit to my sweaters and see that the sweater is made with 4″ of positive ease, so does that mean that I should lean more towards the 4x size?
My last question is just if the stockinette stitch could be swapped for something like the seed stitch?
Thanks so much for your beautiful pattern and your time! This will be my first big knitting project and your video and pattern look so clear and helpeful I’m excited to make the sweater!
Hi Amy! If your gauge swatch was 19 stitches by 19 rows, and it came out 4.5 inches wide and 3.5 inches high, then yes, that is definitely enough of a difference to need to change needle sizes. As you swatch for gauge, I recommend making your swatch a bit larger (more stitches and rows) than what the gauge measurement tells you to measure. The edge stitches can tend to be a slightly different size, so for the most accurate measurement, it’s best to make your swatch a bit larger than the gauge measurement and measure only the stitches and rows inside the swatch, not including the edges. So you might try making your next swatch at least 22 stitches wide and at least 22 rows high. For more info on gauge, see this tutorial.
As for sizing, the finished measurement of the 4X (including the ease) is 62″. If you like a more fitted sweater, you can make the 4X if you prefer. One thing that can help is if you measure an existing garment that you like the fit of to see what the bust measurement is, and going by that to determine which size you want to make.
You could substitute seed stitch for the stockinette, as long as your seed stitch gauge is the same as the pattern calls for in stockinette. This may slightly affect the drape of the fabric, but could still work just fine.
I hope this helps, and I hope your sweater turns out great!
Happy Yarning! 🙂
hello. i am going to start the simply slouchy sweater. my quwation is: do i need to slip stitches for my edges to come out looking neatly/
Hi Jane. If you like, you could replace the first stitch of each row with a slipped stitch. However, if you tighten the first and last stitches of each row a little bit, that can help make sure the edge stitches don’t look loose. Also, the first and last stitches of the body panel will curl under a little bit in the ribbing column on the very edge, so the edge stitches along the front neck edges don’t really show. All other edge stitches in the pattern get sewn into a seam. As you knit your gauge swatch, I would suggest tightening the edge stitches on one side, and slipping them on the other side. That can help you decide which option you prefer for the yarn you are using. I hope this helps!
Oh! I Forgot to ask, can the long tail cast on be substituted for another method or will that change the outcome?
Yes, you could substitute a different cast on method for the long tail cast on if you prefer. As long as the cast on edge still has a bit of give to it, it won’t affect the finished sweater to swap cast-ons. I hope this helps!
Hi, I would like to make this, but I would like the collar to be double in the neck, but single towards the bottom. How can I make that possible? Work 2st+ 3 times 4 and then encreasing somewhere till 2st+ 6 times 4 on both sides? Thank you for your reply and thank you for this pattern!
Hi Angela. With the way this collar is shaped, I am not sure if that would work. You would need to begin with half of the ribbing width stitches along the front edge, and then gradually begin adding stitches at approximately where the base of the armhole begins. If you just add stitches at the edge, you may not get a neat, clean edge that would look nice on the collar. If you would like to look for a pattern that has this type of collar, you can search for “knitted sweater pattern with shawl collar” on google, pinterest, etc. I hope this helps!
Thank you so much for the pattern–I am loving making it! Is there a way to make the sleeves balloon sleeves?
Hi Ashley. Yes, I think you could make the sleeves into balloon sleeves. After you knit the cuff ribbing of the sleeve, you’ll probably need to work an entire row of increases to add the extra stitches for the puffy part of the sleeve. Then, after several inches of plain stockinette stitch, you would gradually begin decreasing stitches as you work your way up to taper the sleeve shape. You’ll want to end with the same number of stitches as the pattern says the sleeve should have on the last few rows. I hope this helps!
Thanks so much for this incredibly informative tutorial! This will be my first attempt at a garment & I’m feeling much more confident about attempting it now 🙂
One question … I picked up a no. 6 bulky yarn, would this be okay to use for this pattern or am I better off using the no. 4?
Thanks again!
Hi Nicole! Yes, you’ll want to use the #4 yarn for this project. #6 yarn is much thicker, and will make your stitches much larger, throwing off the size of the finished sweater by quite a lot. The pattern is designed for a #4 yarn, so that’s what you’ll need to use for the sweater to turn out the right size. I hope this helps!
Hi,
Thank you so much for sharing this pattern and video! You’ve layed everything out so clearly for us and I can’t wait to try this project! I was wondering if I could use a cotton or wool yarn for those pattern (in #4 Worsted weight), I’m thinking of making it for two friends of mine, one of whom is vegan and the other prefers natural fibres. Appreciate your help!
Hi Jessica! Yes, you could use a #4 weight yarn in another fiber if you prefer. For the cotton, you’ll want to choose a soft, pliable cotton (not a dishcloth type of cotton, which would be too stiff). I hope this helps!
That’s takes many hours to knit a cardigan, isn’t it?
I have circular knitting needles which is have 40 inches long!
Nice! I love your cardigan! I never knit that cardigan before, so I’ll knit that cardigan. The size I’ll be making is the size XL, is that sounds OK to knit that cardigan?
Hi Emily! Yes, you could knit the XL if you like. 🙂
I am a bit confused about making the length of the jumper before dividing for the back and two fronts……why are the larger sizes made shorter then the smaller sizes…at 34.3cms it wont cover my butt and l want it too
Hi Robyn! The larger sizes do not finish shorter, but because the armholes are a little deeper, we divide into the upper sections a little lower on the piece. If you would like it to be longer, you can continue repeating the rows in that section as instructed until the sweater is the length you want from underarm to hem. I hope this helps!
Love your style of teaching. I’d like to make this longer to below the butt..would you suggest using increases? TIA
Hi Elizabeth. If you would like the sweater to be longer, you can continue working Rows 4-5 until the lower part of the sweater is the length you want from underarm to hem. However, if you would like the sweater to be wider at the hem, you would need to start with a longer cast on and work decreases in the stockinette stitch area. This sweater is worked from the bottom up, so adding stitches would make it wider at the top. By starting with extra stitches and gradually taking them away with decreases, the sweater will begin wider at the hem and then come to the actual size you are making according to the pattern. I would suggest choosing which size you need to make, then decide how many extra stitches you want to start with at the cast on. If you make sure you decrease the same number of stitches you added to the cast on, then the rest of the sweater will work up as normal. I hope this helps!
Perfect! Makes sense. Again, love your calm, thorough way of explaining things.
Hi. In your pattern for the sleeve you don’t give the sizes for the length of the sleeve. Could you please let me know what the sizes are
Hi Janet! The sleeves are designed to come to the wrist, according to the Craft Yarn Council’s standard sizing information. However, this sweater is a drop-shoulder style, meaning the body of the sweater comes over the shoulder. Because of this, the finished sleeve pieces are not the same length as the whole arm from top of shoulder to wrist. The length from the center back of neck to wrist is designed to closely match the measurements given in the Craft Yarn Council’s standard sizing. Are you needing the finished length and width of the sleeve? If so, for which size? Thanks!
Hi my name isJanet and I am trying to make this sweater. I am using a #4 medium weight yarn but I am not able to get the gauge right. I have found that I need to use a size 2 needle to get the right gauge. What am I doing wrong
Hi Janet! If it takes a needle that small for you to get the correct gauge for the pattern, it may be that your tension is very, very loose. Perhaps you could try running the yarn through your hand a different way to tighten the tension. I have a tutorial on correcting tension problems here. (It is geared towards continental knitters, but the tension tips can help with other knitting methods as well.) The knitting does not have to be tight, so that it is hard to insert the needle into a stitch, but the stitches should sit snugly around the needle while still being able to slide across the needle smoothly. I hope this helps! Please let me know if you have any more questions. I am happy to help!
Ok I tried to tighten up my stitches but I still didn’t get enough to make the gauge of 19 stitches = 4 inches and 19 rows to = 3 inches. I got as far as 15 rows before I got to 3 inches
What size needle are you using? Is it a smaller size than the pattern calls for? If the stitches still aren’t tight enough, you might try wrapping the yarn around one of your fingers to add more tension. Wrapping around a small circumference can add more tension to the yarn, so even if you already have it wrapped around a finger, it might help to wrap the yarn around another finger, or wrap it twice around the same finger.
Hi I took your advice and wrapped my yarn around my finger and it made a big difference. I also was using bamboo knitting needles and switched to medal one size 7
Glad it helped!
I love the sweater pattern but I am looking for a plain cardigan sweater. Do you know where I can find a pattern for one
Most cardigans have some sort of detailing on them, whether it be the collar, the stitch pattern, or the shape. If you’re looking for a different style, I would suggest looking on Pinterest. If you cannot find what you’re looking for there, Ravelry has a huge pattern directory with lots of search filters to narrow down the patterns. I don’t use Ravelry much, but their pattern database can be very helpful.
Thank you for your help I appreciate you taking your time to help me
Hello. I came to comments for the same reason. I’m making a size large and wondering what the finished sleeve length should be. I think my row gauge is tighter than yours so I may need to go by inches instead of row count. Thank you!!
Hi Krystal. If your row gauge is tighter, and switching to a different needle material or way of wrapping the yarn doesn’t help, you could adjust the sleeve length if needed. I would suggest working through the sleeve instructions as written, and then using safety pins to temporarily attach your sleeve piece to the shoulder of the body piece. Then you can try it on and determine whether the sleeve needs a little more length for the best fit. If it does, you can just knit a few more rows back and forth of stockinette stitch at the top of the sleeve to adjust the length. I hope this helps!
Thanks for the pattern. If I wanted to make one-row buttonholes for pockets on each side, approximately what rows should I do that on?
Hi Kristin! Are you wanting to add a buttonhole at the top of a pocket? If so, you would need to measure the finished length of the sweater (given in the finished measurements of the pattern) against the wearer, to see how long the sweater will fall. Then, you can decide how far up from the hem you want the top of your pocket to be, and place the buttonhole when you get to that length in your knitting. I hope this helps!
The link and the title say this pattern is free to download, but when I scroll down to get it, the only option is to click to purchase. Is this no longer free?
Thank you.
Hi Suzanne! Yes, the pattern is available for free, but not free to download. The free version of the written pattern is available to view in the blog post above. The printable PDF version of the pattern can be purchased to download from my shop. I hope this helps!
Hi, this is my first time making a cardigan.
I have started making the cardigan, and just finished doing the bottom hem.
I have done 18 rows and it measures 3” already. Do I still do 20 rows, or go by measurement?
Hi Rosa! If you already have 3″ and you have only knit 18 rows, that might be caused by your gauge. If your gauge does not match the pattern gauge, the sweater can come out the wrong size. I would recommend checking your gauge to see if it matches the gauge in the pattern. Even if you are using the same size needle as the pattern says, your personal knitting tension is likely different than mine. The most important thing is not to use the exact needle size the pattern calls for, but to use whatever needle size gets you the correct gauge for the pattern. For more info on gauge, check out this post. I hope this helps!
How can I lengthen the sleeves? Should I just add more rows once I get finished with the increases?
Hi Linda! Yes, you could add length to the sleeves that way if you need to. However, please keep in mind that the sweater is a drop-shoulder style, which means the body of the sweater comes down over the shoulder a bit. Because of that, the sleeves are shorter than the length of the whole arm. Part of the length of the sleeve is coming from the body of the sweater. So before you lengthen the sleeve, I would suggest trying the body of the sweater on the wearer, and measuring from the armhole edge of the sweater to the wearer’s wrist. This can help you know exactly how much length you need to add. I hope this helps!
Thank for clarifying on sleeve.i was about to re do my sleeves
Hi,
I love this tutorial. This will be my first knitting project other than a scarf on 3rd grade. ha.
I am very motivated to do it.. but I wonder how long is the sweater. Is hard to see the full view of the sweater in the pictures. I wonder if is long enough to wear with leggings? Could you share a pic of the whole sweater?
Hi Veronica! The sweater will come to different lengths on people of different heights. I would suggest going by the finished back length measurement in the pattern for the size you want to make. Then, you can measure from the base of the back of your neck down to the finished back length of the sweater to see how the length will be on you. If you would like to lengthen the sweater, you can continue repeating rows 4-5 in the instructions for the body of the sweater until the piece is the length you would like it to be from underarm to hem. I hope this helps!
Thank you for this clear pattern and for taking the time to video the instructions as well! It helps so much to verify that you are reading the pattern correctly to refer to the video. My question is that in the blog post photos, it seems like maybe your sample cardigan photos are knit from a different yarn, like maybe Malabrigo with that gorgeous color shading. The Lion Pound of Love oxford gray seems like it’s more solid grey? Would you mind sharing the yarn and color in the example blog photos? Thanks again!
Hi Nichole! The sweater in the photos is the same sweater shown in the video, knit in Pound of Love in Oxford Grey. It does have a slight heathered look to the color, but it is the same yarn in all the photos and in the video. I hope this helps!
Thanks for replying! This helped a lot… phew! Have a nice day.
Hi, i like this pattern and want to make it. I have wool which has gauge 12 row and 10 stiches equal to 10cm(4″). Required needle size is 10mm. my bust size is 90 cm. Can you help me with how many stiches i should cast on?
Hi. The yarn you have sounds like it is a #6 Super Bulky yarn. This pattern calls for a #4 Worsted Weight yarn. If you want to use this pattern to make a sweater, you’ll need to use #4 Worsted Weight yarn. If you use #6 Super Bulky yarn, you wouldn’t just have to change the number of stitches cast on. To use that yarn, you would need to re-write the entire pattern. Therefore, I do not recommend using the yarn you have for this sweater pattern. If you want to use that yarn, you’ll need to find a different pattern that uses #6 Super Bulky yarn. I hope this helps!
Thanks for reply
No problem! Happy Yarning!
My chest size is 36″ do I use the small size or medium size to knit the sweater? Thanks
Hi! You can do either the small or the medium. The sweater has 4″ of ease, which means the finished sweater is 4″ larger than the actual bust measurement. Since you are between sizes, if you make the small, you will have 2″ of ease, or if you make the medium, you will have 6″ of ease. It just depends on whether you want a closer fit or a more oversized fit. I hope this helps!
How long should the sleeves be when done? Thanks kids keep messing up my count on repeat.
Hi Stephanie! Because some of the rows that are repeated involve increases, it is important to make sure you have the correct number of repeats so that the sleeve will be the correct width as well as the correct length. The finished sleeve should measure approx. 17 1/2″ (17 1/2″, 17 1/2″, 17 1/2″, 16 1/2″, 16 1/2″, 15 1/2″, 15 1/2″, 15 1/2″) long. However, I would also recommend checking by how many stitches you have on your needle to see if you have done enough increases. I hope this helps!
Hi! I’ve started making this sweater, and I’m living it so far! I have a quick question: how long is the body of the sweater supposed to measure horizontally? I’ve measured it and it measures 37 inches, and I’m worried that my Pound of Love won’t last the entire garment. I checked your measurements and they state that the finished piece is 34 inches for extra small, and blocked; I haven’t blocked it yet. Thanks for any help you might give me, and I love this pattern and your channel! All the best!
Hi! I’ve started making this sweater, and I’m loving it so far! I have a quick question: how long is the body of the sweater supposed to measure horizontally? I’ve measured it and it measures 37 inches, and I’m worried that my Pound of Love won’t last the entire garment. I checked your measurements and they state that the finished piece is 34 inches for extra small, and blocked; I haven’t blocked it yet. Thanks for any help you might give me, and I love this pattern and your channel! All the best!
Hi Madeline. The measurement in the pattern for the finished sweater is the finished bust measurement. However, that does not include the ribbing that goes up both fronts, as that is designed to fold back and does not add to the bust circumference measurement. As long as your gauge matches the gauge in the pattern, and as long as you are not changing or altering the pattern, your Pound of Love should last through the whole sweater. I hope this helps!
Hi! I just finished this and put it in the wash, hoping it will shrink a LOT! I measured for the large but honestly probably needed to make the small for a snugger fit. It will be a comfy big sweater and a good learning experience since it was my first. 🙂
How do I go about making this a longer cardigan? I love the pattern.
Hi Kari! Yes, you can make this cardigan longer. When you get to the part that says, “Repeat Rows 4-5 until piece measures 15 ½” (15”, 15”, 14 ½”, 14 ½”, 14”, 13 ½”, 13 ½”, 13”) OR 39.4 cm (38 cm, 38 cm, 36.8 cm, 36.8 cm, 35.6 cm, 34.3 cm, 34.4 cm, 33 cm) from cast on edge, ending with row 4”, just keep repeating rows 4-5 until it is the length you want. This part is the section from the hem to the underarm, so keep going until it is the length you want to the underarm, ending with row 4. You can then continue with the rest of the pattern. I hope this helps!
Thank you so much can’t wait to start knitting this.
You’re welcome! I hope your sweater turns out great!
Hi, just out of curiosity, are we able to knit the sleeves in round instead if flat?
Hi Regina! Yes, as long as you feel comfortable making that alteration, you could knit the sleeves in the round if you prefer. I hope this helps!
I have been swatching. I am a medium knitter in regards to knitting tight or loose. I have used an 8, 6 and am now on a size 5 needles. I am using Hiya Hiya interchangeables and they are steel, which can make my knitting looser than wood or acrylic needles. I like using steel for acrylic yarn because I find wood and acrylics have too much grip for my liking. I got 17 stitches to 4 inches with my 6s so have gone down to a 5. Is this uncommon? I think I was getting 15 stitches with the 8s for a 4 inch section. Thanks for any help you can give.
Hi Margaret! If steel needles make your knitting looser, have you tried using a different way of wrapping the yarn through your hand? That can help to compensate for the change in your tension. Every knitter is different, and the same tension hold may not work for everyone.
I normally like to weave the yarn under and over my fingers, so it comes over top of my index finger. I tend to knit looser with steel or nickel-plated needles and very thin yarn, so in that case I wrap the yarn around my pinky finger before weaving it through my hand.
Having the yarn wrapped around one of the fingers adds more tension to the yarn. If you already wrap the yarn around one of your fingers, you might also try either wrapping it around a second finger or wrapping it around your wrist.
It is normal to have to adjust the needle size to get gauge, but if you have to go down several sizes, changing the way you are tensioning the yarn might help.
I hope this helps, and I hope your sweater turns out great!
I’m interested in making this sweater for myself and was wondering for the
plus sizes 1 x on up would I need to use a larger size circular needle to fit
the extra stitches on or would a size 40 circular needle hold all the stitches
for the plus size pattern also would it be wise to buy more than 2 balls of
pound of love yarn for the plus sizes even though it is a large skein. Thank
you for your response.
Hi Cynthia! You can use a longer circular needle if you like, but the stitches should fit on a needle that is 40″ long. The piece will not lay flat on the needle, but will be bunched together a bit. And yes, with 2 balls, there is enough yarn for any of the sizes. Even the 5X size can be made with 2 balls, with over 200 yards of yarn left over. I hope this helps!
Hello! This pattern looks great, I will definitely try it out! I would like to start the armholes a bit higher up and make the sleeves a bit narrower in the upper part- in order to do this, I would start the splits in the back-piece higher up, and I would stop increasing the stitches on the sleeve-pieces once the width of the sleeve matches the width of the armhole. Do you think this would work, or is there something else I have to pay attention to? Also, thank you so much for the clear instructions and for the detailed youtube-video – it really helps getting an explanation for everything that happens. 🙂
Hi Vera! Yes, that is how you would raise the armholes and make the sleeves narrower. I’m glad you enjoyed the video tutorial! Please let me know how the sweater turns out for you. Happy Yarning!
If my needles are a size 10(6mm) can I still make this sweater? Is there anything I should do since my needles are a a different size?
Hi Kiara. With any knitting pattern, needle size is a suggestion. Everyone knits a little differently, and one knitter may make looser or tighter stitches with the same size needle as another knitter. HOWEVER, it is EXTREMELY IMPORTANT that your gauge is correct. Gauge refers to the size of the stitches, and how many stitches you get within a certain measurement. This pattern calls for 19 stitches in 4″. If, with a size 10 needle, you get 19 stitches in 4″, then you could use that needle. But, if you get less than 19 stitches in 4″, you cannot use the size 10 needles. (Same thing goes if you get more than 19 stitches in 4″, you’d need a larger needle, but that is not very likely in this case.) If you get less than 19 stitches in 4″, then your stitches are going to be too large, and you’re going to have to spend a few bucks and get a smaller size needle. Even if it seems like it’s only a little bit off, “close enough” is not going to work. You need to get the gauge correct for the sweater to come out the right size. The stitches being a little larger than what the pattern requires will throw off the sizing by quite a bit. The sweater will come out significantly larger than it is supposed to. This could also cause you to run out of yarn, because the sweater being larger will use up more yarn. You need a needle size that will give you 19 stitches in 4″, and yes, it does need to be a circular knitting needle, at least 40″ long. If you try to do this on straight needles, all of the stitches will not fit on the needles and they will fall off and get dropped. The circular needle is used so that there is room for all of those stitches to sit on it, even though we are knitting back and forth. If you are just getting started, I understand if that is the only needle size you have so far. But, if you plan on continuing to knit, you’re going to need more sizes of needles. So, if you want to make this sweater, please get a circular needle that will give you the correct gauge. Most likely, you’ll get the correct gauge with a size 7, 8, or 9. Let’s say you get 18 stitches in 4″ with your size 10 needle, in that case you would probably need to buy a size 8 needle to get the correct gauge. If you get 18 1/2 stitches in 4″ on your size 10 needle, you’ll probably need a size 9 needle to get the correct gauge. It’s always more important to get the correct gauge than to use the same size needle the pattern recommends. Unless a pattern says “exact gauge is not critical for this project”, than the exact gauge IS critical. Please understand that I’m not trying to just tell you what to do, but I’m trying to help you so you won’t run into a lot of problems as you make the sweater. If you do a gauge swatch with your needles, please let me know how many stitches you get in 4″ and I can estimate what size needle you’ll need to buy to get the correct gauge. Hope this helps! Please let me know if you have any more questions. Thanks!
Hi! Love the pattern. Quick question, why does the length of the body of the sweater shorten the larger the size? For example the XS is 15 1/2 inches but the L is 14 1/2 inches. Would it change much if I decided to make the body a little longer for a longer fit?
Hi Chelsea! Yes, it is shorter for the larger sizes. This is because there is not as much difference in the back length between sizes, but the larger sizes have deeper armholes. So even though the larger sizes are slightly longer in the back length, we make the lower portion shorter to make the armholes begin a little lower. All sizes still finish at the correct back length according to the finished measurements. And yes, you can make it longer if you like. 🙂 Hope this helps! Thanks!
Hi, just been watching your video, this is a great pattern, it’s now in my queue! One question about the sleeves, is there a particular reason they are knit flat and sewn in? My preference is to pick up Stitches around the arm holes and knit down, in the round…..I hate sewing up, lazy I know, but things that need piecing together don’t get finished! Would this work for your pattern?
I’m going to explore the rest of your website know, so glad I found you!
Hi Helen! If you feel comfortable altering the pattern to be worked from the top down in the round, it can be done that way. Hope this helps!