

Are the edges of your crochet wavy? Are there gaps from turning chains along the sides? Fix that problem NOW with a Chainless Starting Stitch!
When working back and forth in rows, have you ever had one of these annoying little predicaments?
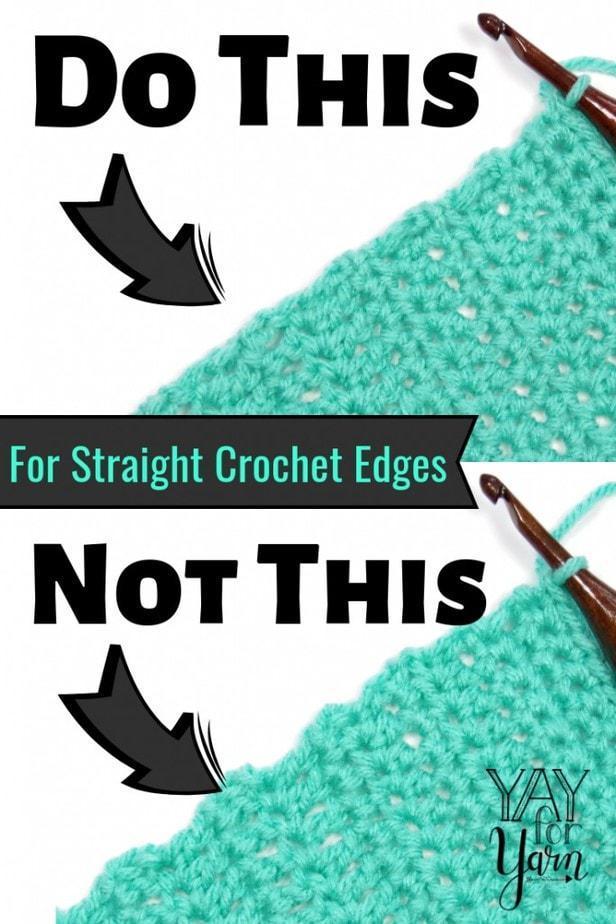
- If you do not count the turning chain as a stitch, the edges of your piece are wavy. The turning chains “bubble” out at the beginning of every other row. OR…
- If you do count the turning chain as a stitch, the edges of your piece have little gaps at the beginning of every other row. This happens because a turning chain is not the same shape or thickness as a regular stitch.
While these things aren’t as noticeable with shorter stitches, they can be quite obvious when using taller stitches and longer turning chains.
Well, both of these issues can be avoided.
You see, these little ugly things happen because of the turning chains themselves. The purpose of the turning chain is to get your hook up to the correct height to begin the row you’re about to work. The problem is that a turning chain is not the same shape as a regular stitch. Because the rest of the stitches are straighter and thicker than a turning chain, that turning chain will not blend in with the rest of the work. It will often bend outward and appear thinner than the other stitches.
So to correct those problems, we eliminate the turning chains altogether.
But how do you get your hook up to the correct height to begin the row? Well, this is where the Chainless Starting Stitches come in. A Chainless Starting Stitch is a special stitch that replaces the turning chain, gets your hook up the the correct height, and looks just like a regular stitch. It’s truly chain-less!
So how do these Chainless Starting Stitches work? Luckily, they aren’t much harder to work than a regular stitch. Watch the video below for a full, step-by-step tutorial, where I’ll show you how to work the Chainless Starting Double Crochet, the Chainless Starting Half-Double Crochet, and the Chainless Starting Single Crochet.
So, let’s say you want to use a Chainless Starting Stitch in a pattern, instead of the turning chain the pattern calls for. You’ll likely be in one of two scenarios:
- The pattern does not count the turning chain as a stitch. Pattern tells you to work the first stitch of the row in the same stitch the chain is coming from. In this case, you’ll need to eliminate the turning chain completely. Then, replace the first stitch of the row with the Chainless Starting Stitch.
- The pattern does count the turning chain as a stitch. Pattern tells you to work the first stitch of the row in the next stitch after the one the chain is coming from. In this case, you’ll just replace the turning chain with the Chainless Starting Stitch.
Have you tried the Chainless Starting Stitches yet?
Pin the image below to save this article for later!
")


My pattern alternates rows with single and half double crochets. Will the Chainless turning work with this pattern?
Hi. Yes, this technique can work with stitch patterns. If the row starts with a single crochet, use the chainless starting single crochet instead. If it starts with a half-double crochet, you could either start with a chainless starting half-double crochet, or chain 1 and half-double crochet in the same stitch. (The chainless starting half-double crochet can be a little trickier to work into on the following row when you’re working back and forth in rows.) I hope this helps!
Is there a cheat sheet for the chainless stitch or is that the print out of the Foundation Stitches? sorry I got confused again lol
Hi Mona. Yes, there is a separate cheat sheet for the chainless starting stitches. I hope this helps!
Hello! I know this is an older post but I am a beginner and am having a terrible time with keeping my edges looking nice. My question is when doing a stitch that has a combination of a singe crochet and a double crochet, which turning chain stitch would I start with? I’m using the Suzette stitch. (It alternates 3 rows of Suzette with 3 rows of double crochet).
I know for sure the double crochet is the 1st demo you give – just unsure of the Suzette. Thank you so much!!!!
Vickey
Hi Vickey. If you’re working with a combination stitch pattern, you’ll want to start with the chainless starting stitch that is the same height as the row of your stitch pattern. If the stitch pattern begins at the edge of the piece, I would recommend starting the row of Suzette stitch by working a chainless starting single crochet and a regular double crochet in the first stitch of the row, as the first stitches of your Suzette stitch pattern. I have used that method with Suzette stitch in projects before. However, if your row begins with an edge stitch before working the stitch pattern, you could try using a chainless starting single crochet to begin the row, and then starting your stitch pattern. I hope this helps!
I loved your video on the chainless turns. I would like written instructions as well. I have been crocheting for 40 years, and was always stumped on how to avoid the wave and gaps. This was brilliant!
Trying to watch the chainless video but the one that is coming up on this post is for a knitted tablet sleeve. Is there another post?
Hi Nancy. If the video currently playing is not the video for this post, just refresh the page. The video player will automatically start playing another one of my videos after a short time if the viewer does not click to choose to keep watching the current video. Refreshing the page will make the video player start again with the video associated with this blog post. If you have any problems with the video player, just let me know. I hope this helps!
Awesome tip, thank you for sharing. Can’t wait to start using it.
I loved your video on Chainless Starting Stitches.
Please can I receive the written instructions for them
Hi Penny. You can sign up to get the free printable cheat sheet here. Just enter your name and email address in the form and it will send you the cheat sheet. (The cheat sheet will be available to download when you click the “confirm subscription” button in the confirmation email.) I hope this helps!
Hello! Where did you get your crochet hook from??
Hi! The exact hook I used in these photos is unfortunately no longer available. However, there are several shops on Etsy that make similar hooks from wood, just go to etsy.com and search for “ergonomic wood crochet hooks”. I hope this helps!
How do I access the video?
Hi Trish. The video should play automatically in the blog post above. The video player should load in the post, and then the player will get smaller and slide over to the side of the post after you scroll past it. Once the ad finishes playing at the beginning, the video will play for you. (If you have an ad blocker running in your browser, it may be that the ad blocker could block the video player from loading.) The video is also posted on my YouTube channel. I hope this helps!
Thank you for sharing!
PLEASE SEND ME YOUR CHEAT SHEET ON CHAINLESS FOUNDATION
Hi Carole. To get the free cheat sheet on foundation crochet stitches, you can visit this page and enter your name and email address. The cheat sheet will be sent to you automatically. I hope this helps!
I’m confused. In your hat video, you treat the chainless first stitch as a double crochet, but in the flat video, you loop over one, then do a double crochet.
Hi Madelyne. Whether you’re working in the round or on a flat piece, the chainless starting double crochet is worked exactly the same way. Yarning over with the stretched loop at the beginning is an important part of the stitch, no matter where you’re working it. It is always treated as a double crochet stitch. If you have any questions about how to work the stitch, just let me know. 🙂
Thank you so much for all your effort and time. You explain things so clearly. I appreciate your content very very much. Thank you!
Hello! I have been using this technique with much success for quite some time now. Thank you!
Do you have any hints on working these stitches BLO?
Hi Kari. If you use these stitches in the back loop only, the first loop you pull up will start to make the stretched loop come undone. If you want to work a chainless stitch in the back loop only, I would suggest you first chain 1 and pull the chain very tight so it almost disappears. This will create the equivalent of a small knot to secure the position of the working yarn, so that when you insert the hook into the back loop and pull up the first loop of your stitch, it won’t affect your stretched loop. I hope this helps!
So so glad I came across this! I’m a self taught crocheted and it had never made sense to me why there was ever chains but did it anyways because that’s how it was done! So glad someone figured it out.
I just used your trick for the first time and I cannot believe the difference it made! This is amazing and has changed my crocheting forever. Thank you so much for posting this. I am so thrilled with how much better my work looks now. Thank you, thank you, thank you!
THANK YOU!!!
nice eager to try
Does this method change the number of stitches at all or so you follow the pattern with the same amount of sticthes
Hi Linda! The chainless starting stitch replaces the turning chain, so whether it affects the number of stitches depends on whether your pattern counts the turning chain as a stitch or not. There is a section near the bottom of the blog post above that explains how to know which stitches to count. But no, the chainless starting stitch technique does not change the stitch count. You just have to take note of how the turning chain is counted in the pattern you are following. I hope this helps!
GENIUS!
Thank you so much for this super-simple technique that makes so much sense. Sorted out all my queries on starting and ending rows, and now it all looks so neat, and makes all the difference!
Thanks again.
Liza
Love to crochet. I make a lot of things and give them away. I do have a totem of baby things I keep for showers and parties.
I am a beginner crocheter
Thank you so very much for this brilliant idea and the very clear and easy to understand video. This will make for such a more beautiful and tailored project. Can’t wait to try it.
Well, well, well!! You surely made my day! I love neat work and I wished I knew how to do straight edges.
Thanks a million for your lovely tutorial….God bless!!
You’re welcome! I’m so glad you enjoyed it!
For the foundation chainless double crochet are you continuing along the row working the dc in the front and middle loops of the foundation (as you did for the chainless start)?
Hi Kat. Are you referring to the Chainless Starting Double Crochet, or the Foundation Double Crochet (which I show in a different tutorial)? If you are talking about working the Chainless Starting Double Crochet into a foundation chain, then yes, you can insert the remaining double crochet stitches into two strands of each chain stitch if you like. I hope this helps!
I have been using the wavy edge method but yours looks much neater! I will try this!
This is so useful thank you so much for sharing, I’ve just tried this technique now on a baby cardigan and it looks great, so much better than the gappy turning chain! Love it!
Wow, this is awesome. I’ve always counting the turning chain as a stitch to have the right number of stitches, this is going to make my work clean and unnoticeable. I’m making 2 Afghan gifts this technique will be so helpful
Very interesting but how much extra time does it take to use this technique? Seems like a lot of extra fiddling.
Hi! It may take a little practice to learn to make the chainless starting stitches quickly and smoothly. However, once you are comfortable with the stitches, it doesn’t really take any extra time to work the chainless stitches instead of a turning chain (like maybe one extra second). Hope this helps!
Love the help!!
I have crocheted for over 50 years and have never seen anything like this! You are a genius! Can’t wait to try it!
Absolutely brilliant! Thank you for sharing.
You’re welcome, Annette! I’m glad you found it helpful!
Thank you!
You’re welcome, Suzanne!
Those uneven and messy edges have always bothered me. Thanks for the tutorial.
You’re welcome, Jacquie! I’m so glad it was helpful to you!
Please signed me up for your email and send me your cheat sheet
Hi Teresa! Just click here and enter your name and email address on that page, and the cheat sheet will be sent to you automatically. Hope this helps!
I love it , can’t wait to try it!!!!
I’m so glad you liked it!
Great remedy!
need to get the written tutorial. Thank you.
Hi Diane! You can get the free printable written tutorial by clicking on the photo of the printable. That will take you to the page where you can enter your email address to sign up for the email list. You’ll then receive a confirmation email with a button that says “yes, subscribe me to this list”. Click that button to confirm your subscription. You’ll receive the email with instructions to download your free printable shortly after. Hope this helps! Thanks!
I came across your pin on my Pinterest feed the other day. I pinned it so I wouldn’t lose it. I’m so glad I did!! You are a genius! I have struggled with my Crochet edges forever but now they look beautiful. You are amazing, my friend! Keep up the great work!!