

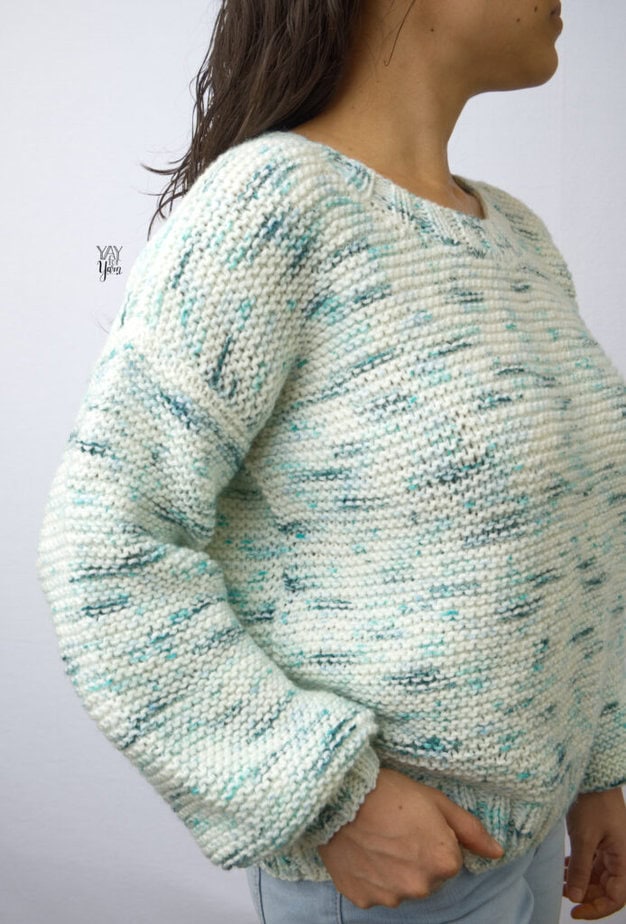
Looking for a simple pullover knitting pattern for women? This free sweater pattern is made using only basic knitting techniques, with minimal shaping. Start making your own Basic Knit Pullover today with this free pattern & video tutorial for beginners.
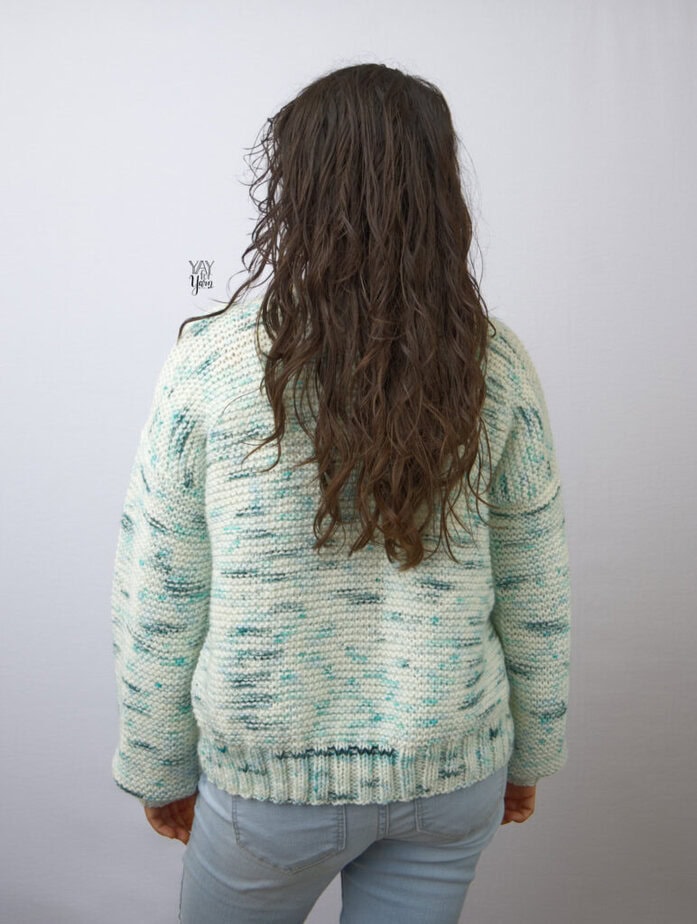
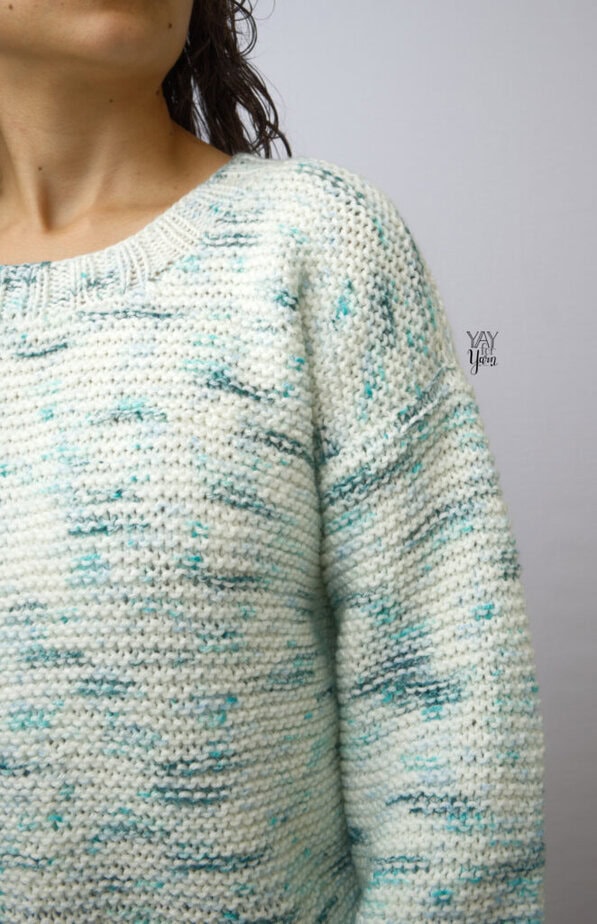
A simple pullover sweater is a cozy and versatile wardrobe staple. The Basic Knit Pullover is simple enough to be approachable for beginners familiar with fundamental knitting techniques, and is perfect for when you just want to make an easy sweater that’s not too complicated to knit. Its classic, slightly oversized silhouette is made with minimal shaping, and the garter stitch fabric keeps purl stitches to a minimum. This sweater is also a great canvas for showcasing the beauty of multicolored or hand-dyed yarns, or adding your own custom stripe pattern.
(In some countries, a pullover sweater like this would be called a jumper.)
Table of Contents
- How to Choose the Right Yarn for a Knitted Sweater
- Why Do I Need a Circular Knitting Needle to Knit this Pullover?
- How to Match the Pattern Gauge and Choose the Right Needle Size
- How do I Choose a Size?
- Can I Knit This Sweater If I Am A Beginner? What Stitches and Skills Do I Need to Know to Knit a Sweater?

How to Choose the Right Yarn for a Knitted Sweater
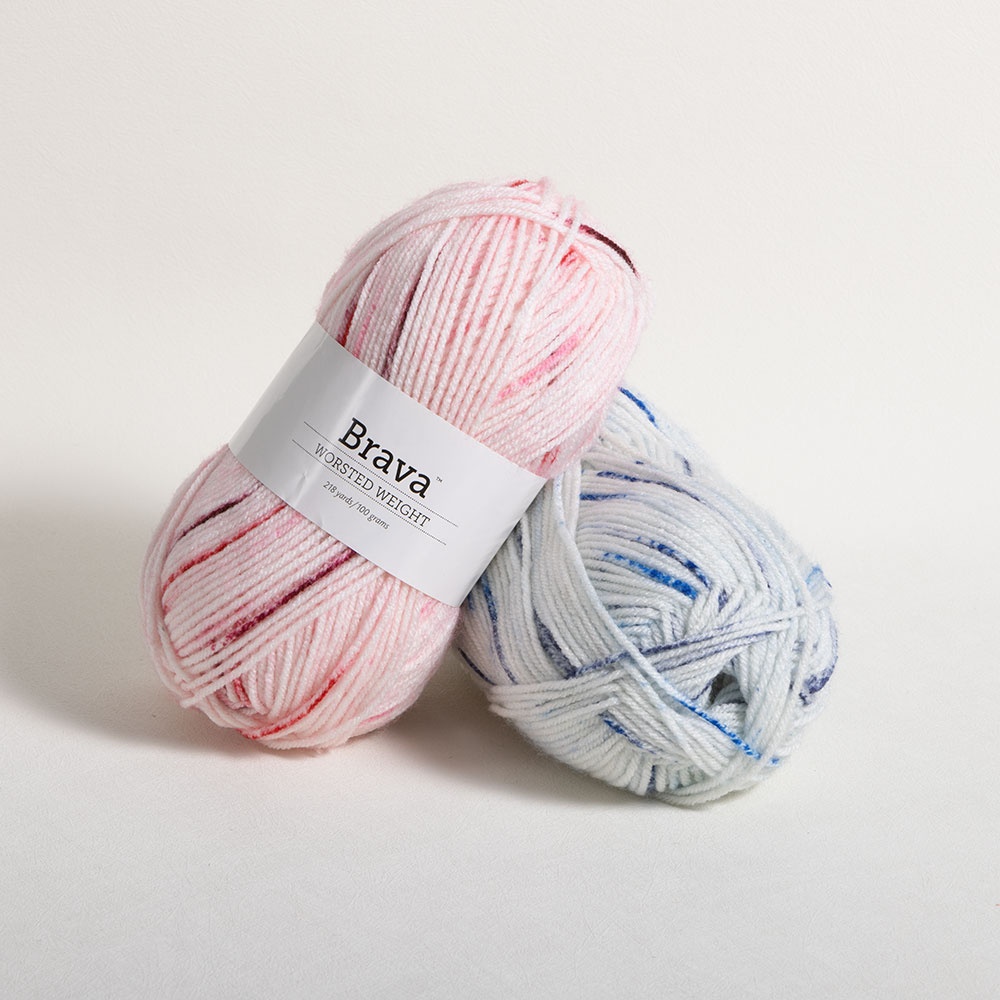
This pattern calls for #4 Medium / Worsted Weight yarn. I used KnitPicks Brava Speckle, which is soft and budget-friendly, but still has a similar look to the speckle dye technique that is popular in hand-dyed yarn.
Most #4 Medium Weight yarns will be suitable for this project. For more info on the US Standard Yarn Weight System that classifies the thickness of a yarn, click here.
When choosing a yarn for a knitted sweater, you’ll want to make sure the yarn you are using feels soft against the skin. No one wants to wear an itchy sweater! Your yarn doesn’t have to be expensive to be comfortable, though. The KnitPicks Brava Speckle that I used is a budget-friendly acrylic, but still feels soft enough to make a cozy garment.
A simple sweater like this one is great for highlighting the lovely colors in a multicolored or variegated yarn, or working stripes in the colors of your choice. A solid colored yarn would also work very well for this pattern, creating a versatile wardrobe staple.
Why Do I Need a Circular Knitting Needle to Knit this Pullover?
Even though this sweater is knit mostly in flat pieces (working back and forth in rows), straight knitting needles are not really long enough to comfortably accommodate the amount of stitches that need to be knit in each piece. A circular needle is very handy in this instance, because it can be used to knit back and forth in rows, and its length can accommodate the number of stitches needed.
When we get to the Neck Ribbing at the end of the pattern, we will be using the circular needle to knit in the round, but all the other portions of the sweater are knit flat.
There are also two needle sizes required for this pattern. One needle size will be used for the main portion of the sweater, and a needle that is one size smaller than the main needle will be used for the ribbing.
I prefer to use Interchangeable Circular Knitting Needles, which have needle tips that can be attached to cords of different lengths. For more info, you can learn more about my favorite wooden interchangeable circulars here, or check out my favorite metal interchangeable circulars here. I also have a tutorial on How to Use Interchangeable Circular Knitting Needles.
However, a regular (fixed) circular needle in the size that you need to match the pattern gauge, and another that is one size smaller than that, will work just fine if you don’t have interchangeable circular needles.

How to Match the Pattern Gauge and Choose the Right Needle Size
Even though the pattern gives a recommended needle size to use for this project, you’ll need to choose the needle size that gets you the gauge specified in the pattern. This will ensure that your sweater will turn out the right size, and prevent you from running out of yarn before you’re finished.
To make your gauge swatch, cast on enough stitches with the recommended needle size to make a square about 5 inches wide, and knit every stitch across each row until your piece measures about 5 inches high. Then, block your swatch and measure your gauge.
If your gauge does not match the gauge given in the pattern, you can unravel your swatch, and try using a larger or smaller needle size to knit the gauge swatch again. This will help you know which needle size you’ll need to use to make this project. Learn more about checking your gauge here.
Once you find the needle size that gives you the correct gauge for the pattern, you’ll also need another needle that is one size smaller than the needle size that you used to match the pattern gauge. The smaller size needles will be used for the ribbing, to make the ribbing neat, stretchy and elastic, and the larger needles will be used for the main fabric of the pullover.
Check out more beginner-friendly free knitting patterns:
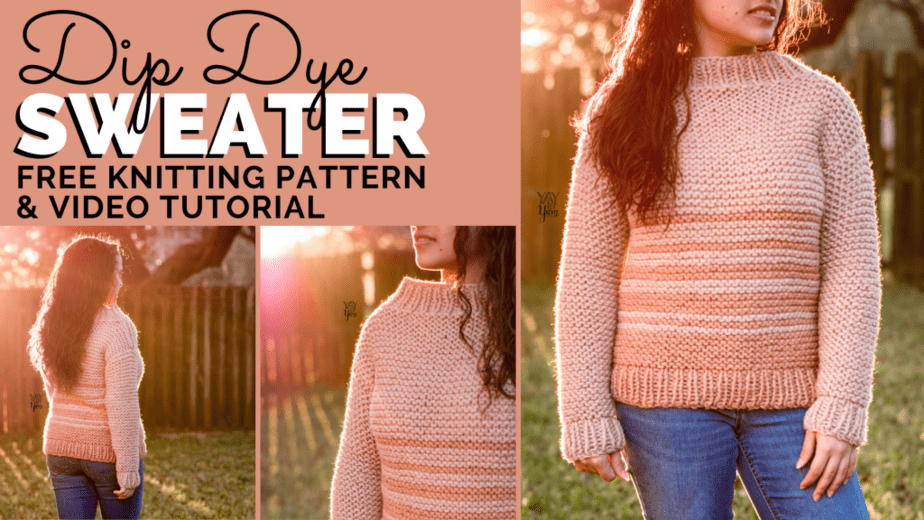
Dip Dye Sweater – FREE Easy Women’s Pullover Sweater Knitting Pattern by Yay For Yarn
Brava Stripe Blanket – Free Blanket Knitting Pattern

Simple Slouchy Sweater – FREE Knitting Pattern & Video Tutorial – How to Knit a Cardigan for Beginners

The Easiest Knitted Hat Ever (Made from a Rectangle!) – Free Knitting Pattern by Yay For Yarn
How do I Choose a Size?
The Basic Knit Pullover knitting pattern includes instructions for 9 sizes, from a women’s size X-Small to 5X. To decide which size you want to make, you’ll need to measure around the fullest part of the bust, the chest circumference. Then, follow the instructions in the “Sizing” section of the pattern to select the size according to the wearer’s bust measurement.
Please note that the sweater length will fall differently on individuals of different heights. To see how long the sweater hem will fall, measure the back length measurement against the wearer.
Can I Knit This Sweater If I Am A Beginner? What Stitches and Skills Do I Need to Know to Knit a Sweater?
The project level for this easy knit sweater pattern is labeled “Basic”. To make this simple project, you’ll need to know how to work the basic knitting stitches, cast on, bind off, and work back and forth in rows. You will also need to know how to count your stitches and count your rows in garter stitch (knit every row).
Additional techniques used, such as increase and decrease stitches, as well as seaming techniques, are detailed in the video tutorial, and are approachable for a knitter who is already familiar with the basic knitting stitches.
You will also need to be comfortable reading a simple written pattern. (See this article by the Craft Yarn Council to learn more about how to read a knitting pattern.) If you are familiar with those techniques, you can make this sweater.

Basic Knit Pullover
Knitting Pattern by Yay For Yarn
Project Level: Basic
Sizing:
Sizing follows the Craft Yarn Council’s standards for Women’s sizes.
This sweater has a slightly oversized fit, with 6-8” (15-20 cm) of positive ease. If you are between sizes, size up if you want a looser-fit sweater, or size down if you want a more fitted sweater. Measure the bust of the wearer, and choose the size that is closest to the wearer’s bust measurement, under the title, “To Fit Bust”.
Instructions and yarn requirements for size X-Small are given outside the parentheses, with Small, Medium, Large, X-Large, 2X, 3X, 4X, and 5X given inside the parentheses, like this:
X-Small (Small, Medium, Large, X-Large, 2X, 3X, 4X, 5X).
When only one number is given, it applies to all sizes.
When a set of instructions does not apply to all sizes, the numbers that would normally be given for the sizes that the instructions do not apply to will be replaced with dashes, like this: – (-, -, 56, 63, 63, 70, 70, 70)
To Fit Bust:
30 (34, 38, 42, 46, 50, 54, 58, 62)” / 76 (86.5, 96.5, 106.5, 117, 127, 137, 147.5, 157.5) cm
Finished Bust:
36 (40, 44, 48, 54, 58, 62, 66, 70)” / 91.5 (101.5, 112, 122, 137, 147, 157.5, 167.5, 178) cm
Back Length:
20.5 (21, 21.5, 21.5, 22, 22, 22, 22.5, 22.5)” / 52 (53.5, 54, 54.5, 55.5, 56, 56, 57, 57) cm
Please Note: Pullover length will fall differently on individuals of different heights. To see how long the sweater will fall, measure the back length measurement against the wearer.
You Will Need:
- 975 (1110, 1228, 1355, 1516, 1670, 1800, 1962, 2092) yards of #4 Worsted Weight Yarn (I used KnitPicks Brava Speckle in “Tidal Speckle”, 100% Premium Acrylic, 3.5oz / 100g or 218 yds / 199m per skein, 5 (6, 6, 7, 7, 8, 9, 9, 10) skeins)
- US Size 10 / 6.0 mm Circular Knitting Needle, at least 24” long (or size needed to obtain pattern gauge)
- US Size 9 / 5.5 mm Circular Knitting Needle, at least 24” long (or one size smaller than the size needed to obtain pattern gauge)
- Scissors
- Measuring Tape
- Yarn Needle or Blunt Tapestry Needle
- Locking Stitch Marker or Safety Pin
- Stitch Marker that fits onto your Size 9 knitting needle
Shop Supplies & Tools for this Project
 Buy Now →
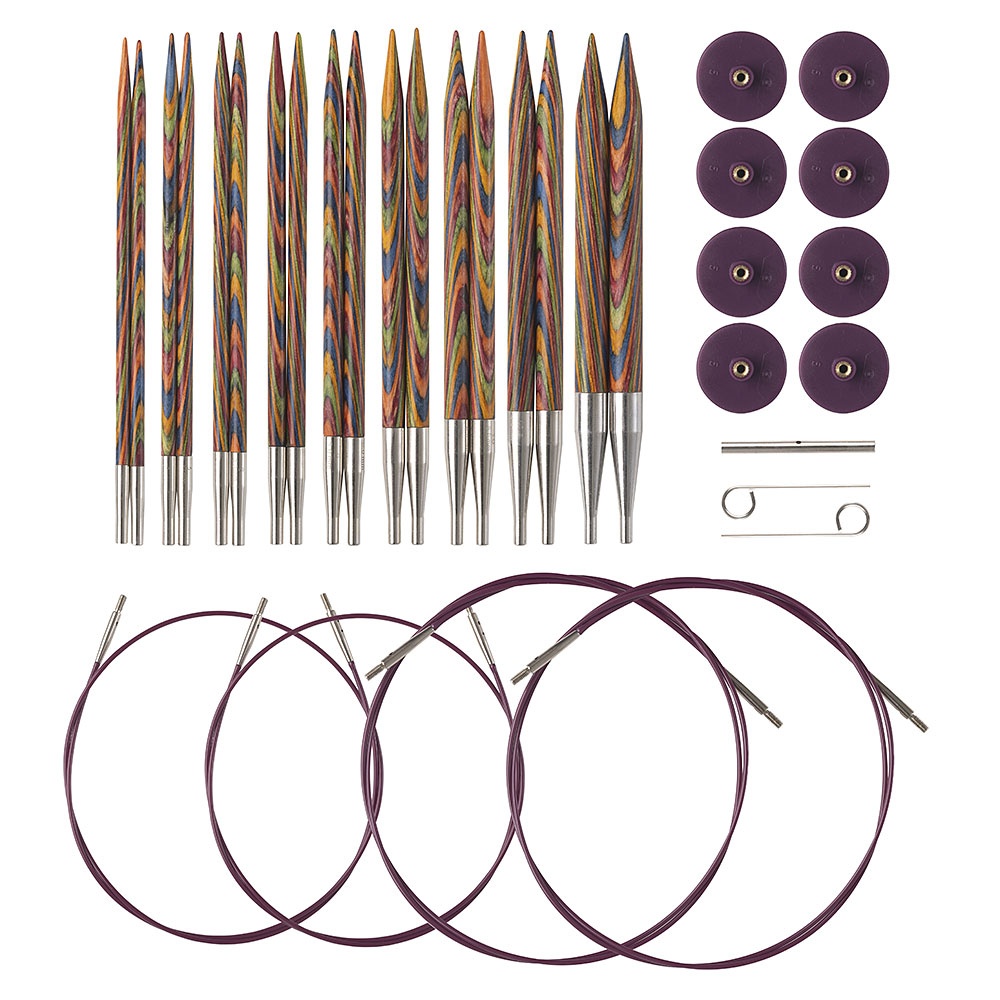
KnitPicks Options Rainbow Interchangeable Knitting Needles
Buy Now →
Chibi Metal Yarn Needles – Amazon
Buy Now →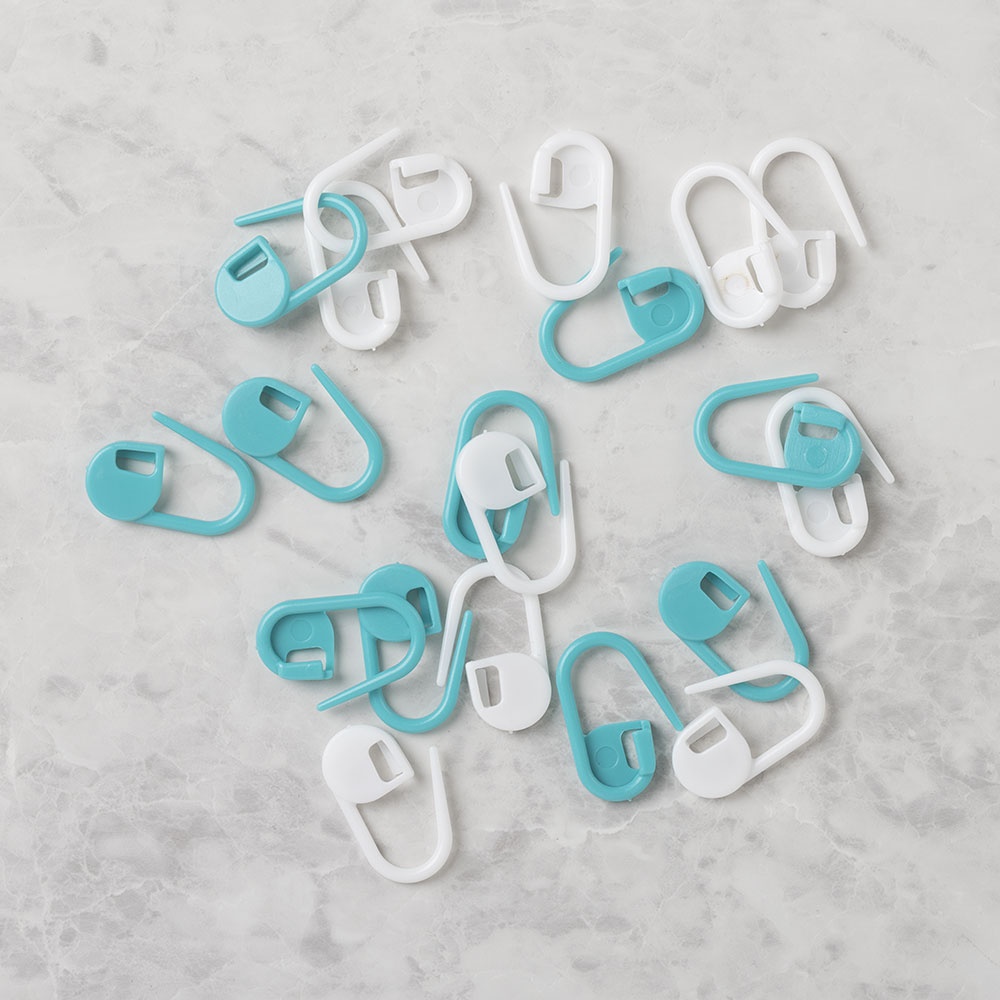
WeCrochet Locking Stitch Markers
Buy Now →
KnitPicks Knitting Stitch Markers
Buy Now →
Knitter’s Pride Rainbow Folding Scissors
Buy Now →
Gauge:
16 sts = 4” (10 cm), and 28 rows = 4” (10 cm) in garter stitch (knit every row)
(Note: Gauge should be measured after blocking your swatch.)
Once you have found the needle size that helps you match the pattern gauge, that will be the needle size you will use for most of the sweater. For the ribbing (anytime the pattern says to use a Size 9 needle), you will use a needle that is one size smaller than the needle size that you are using for the main body of the sweater.
Abbreviations:
K: knit
P: purl
st(s): stitch(es)
CO: cast on
BO: bind off
K2tog: knit 2 stitches together
*SSK: slip, slip, knit
*Kf&b: knit front and back
*This is a special stitch. See instructions below to learn how to work this stitch.
Special Stitches
SSK: Insert right needle tip into the next st as if to knit, but don’t knit through it. Slip (move) that stitch onto the right needle. Slip the next stitch in the same manner. Then, insert the left needle back through the front of the two slipped stitches on your right needle, so that both needle tips are going through those two stitches, forming an ‘X’. Knit through both of the stitches. This decreases one stitch.
Kf&b: Insert right needle tip into the next st on the left needle. Knit that st, but don’t let the old stitch slip off the left needle yet. Bring the right needle behind the left needle, and insert the right needle into the back of the same st, and knit through it again. Now let the old stitch slip off the left needle. The Kf&b increases one stitch by working into a stitch twice, once in the front and once in the back.
Basic Knit Pullover Instructions
Pullover Back
With US Size 9 knitting needle, CO 72 (80, 88, 96, 108, 116, 124, 132, 140) sts.
Rows 1-14: *K2, P2* across.
Switch to US Size 10 knitting needle.
Row 15: K across.
Repeat Row 15: 111 (115, 117, 119, 121, 123, 123, 125, 125) more times.
Back Neck Shaping
Row 1: K 30 (33, 37, 40, 46, 49, 53, 56, 60) sts. BO the next 12 (14, 14, 16, 16, 18, 18, 20, 20) sts. K the remaining 29 (32, 36, 39, 45, 48, 52, 55, 59) sts in your row. You now have two sections of stitches remaining on the needle. We are going to work the left shoulder (where the yarn is currently coming from) first, and go back and finish the right shoulder later.
Back Left Shoulder
Row 1 (wrong side): K 30 (33, 37, 40, 46, 49, 53, 56, 60) sts.
Row 2: BO 4 sts, K remaining sts across. <You should have 26 (29, 33, 36, 42, 45, 49, 52, 56) sts.>
Row 3: K across to last 2 sts, K2tog. <1 st decreased>
Row 4: SSK, K across remaining sts. <1 st decreased>
Rows 5-6: Repeat Rows 3-4. <You should have 22 (25, 29, 32, 38, 41, 45, 48, 52) sts.>
Row 7: K across.
Row 8: SSK, K across remaining sts. <1 st decreased>
Rows 9-10: Repeat Rows 7-8. <You should have 20 (23, 27, 30, 36, 39, 43, 46, 50) sts.>
Rows 11-15: K across.
BO all remaining sts, leaving a tail at least 20” long for seaming.
Back Right Shoulder
With the wrong side of the work facing you, join new yarn at the neck edge of the remaining sts held on the needle.
Row 1: BO 4 sts, K remaining sts across. <You should have 26 (29, 33, 36, 42, 45, 49, 52, 56) sts.>
Row 2: K across to last 2 sts, K2tog. <1 st decreased>
Row 3: SSK, K across remaining sts. <1 st decreased>
Rows 4-5: Repeat Rows 2-3. <You should have 22 (25, 29, 32, 38, 41, 45, 48, 52) sts.>
Row 6: K across.
Row 7: SSK, K across remaining sts. <1 st decreased>
Rows 8-9: Repeat Rows 6-7. <You should have 20 (23, 27, 30, 36, 39, 43, 46, 50) sts.>
Rows 10-15: K across.
BO all remaining sts, leaving a tail at least 20” long for seaming.
Pullover Front
With US Size 9 knitting needle, CO 72 (80, 88, 96, 108, 116, 124, 132, 140) sts.
Rows 1-14: *K2, P2* across.
Switch to US Size 10 knitting needle.
Row 15: K across.
Repeat Row 15: 95 (99, 101, 103, 105, 107, 107, 109, 109) more times.
Front Neck Shaping
Row 1: K 32 (35, 39, 42, 48, 51, 55, 58, 62) sts. BO the next 8 (10, 10, 12, 12, 14, 14, 16, 16) sts. K the remaining 31 (34, 38, 41, 47, 50, 54, 57, 61) sts in your row. You now have two sections of stitches remaining on the needle. We are going to work the left shoulder (where the yarn is currently coming from) first, and go back and finish the right shoulder later.
Front Left Shoulder
Row 1 (wrong side): K 32 (35, 39, 42, 48, 51, 55, 58, 62) sts.
Row 2: BO 4 sts, K remaining sts across. <You should have 28 (31, 35, 38, 44, 47, 51, 54, 58) sts.>
Row 3: K across to last 2 sts, K2tog. <1 st decreased>
Row 4: SSK, K across remaining sts. <1 st decreased>
Row 5: Repeat Row 3.
Row 6: K across.
Row 7: Repeat Row 3.
Rows 8-11: Repeat Rows 6-7.
Rows 12-14: K across.
Row 15: Repeat Row 3.
Rows 16-19: Repeat Rows 12-15. <You should have 20 (23, 27, 30, 36, 39, 43, 46, 50) sts.>
Rows 20-31: K across.
BO all remaining sts, leaving a tail at least 20” long for seaming.
Front Right Shoulder
With the wrong side of the work facing you, join new yarn at the neck edge of the remaining sts held on the needle.
Row 1: BO 4 sts, K remaining sts across. <You should have 28 (31, 35, 38, 44, 47, 51, 54, 58) sts.>
Row 2: K across to last 2 sts, K2tog. <1 st decreased>
Row 3: SSK, K across remaining sts. <1 st decreased>
Row 4: Repeat Row 2.
Row 5: K across.
Row 6: Repeat Row 2.
Rows 7-10: Repeat Rows 5-6.
Rows 11-13: K across.
Row 14: Repeat Row 2.
Rows 15-18: Repeat Rows 11-14. <You should have 20 (23, 27, 30, 36, 39, 43, 46, 50) sts.>
Rows 19-31: K across.
BO all remaining sts, leaving a tail at least 20” long for seaming.
Sleeve (make 2)
With US Size 9 knitting needle, CO 28 (32, 32, 32, 36, 36, 40, 40, 40) sts.
Rows 1-12: *K2, P2* across.
Change to US Size 10 knitting needle. We will now work increases to add width to the sleeve.
Row 13: K across.
Row 14: *K3, Kf&b* across. <You should have 35 (40, 40, 40, 45, 45, 50, 50, 50) sts.>
Rows 15-17: K across.
Row 18: *K4, Kf&b* across. <You should have 42 (48, 48, 48, 54, 54, 60, 60, 60) sts.>
For size X-Small, Small, and Medium, stop here and skip to Row 27.
For all remaining sizes:
Rows 19-21: K across.
Row 22: *K5, Kf&b* across. <You should have – (-, -, 56, 63, 63, 70, 70, 70) sts.>
For size Large, X-Large, 2X, and 3X, stop here. For size Large, 2X, and 3X, skip to Row 27. For size X-Large, skip to Row 31.
For size 4X and 5X:
Row 23-25: K across.
Row 26: *K6, Kf&b* across. <You should have – (-, -, -, -, -, -, 80, 80) sts.>
For size 4X, stop here and skip to Row 31.
For size X-Small (Small, Medium, Large, -, 2X, 3X, -, 5X):
Rows 27-29: K across.
Row 30: Kf&b, K across to last st, Kf&b. <2 sts increased>
Repeat Rows 28-30: 2 (0, 2, 0, -, 2, 2, -, 2) more times.
For all sizes:
You should have 48 (50, 54, 58, 63, 69, 76, 80, 86) sts at this point.
Row 31: K across.
Repeat Row 31: 85 (97, 89, 97, 101, 91, 91, 103, 91) more times. (These numbers vary so much because the different sizes require different amounts of increase rows to have been worked. Therefore, the number of rows required to reach the finished sleeve length will vary quite a bit between sizes.)
BO all sts loosely, leaving a tail at least 1 yard long. I recommend using the Suspended Bind Off on the sleeve, to make sure the bind-off edge is stretchy and will not feel restrictive when worn.
Assembly
With right sides facing up, lay the pullover back and pullover front out so that the shoulder edges are together. Thread one of the yarn tails from the shoulder of one panel through your yarn needle. Working from the outside edge of the shoulder seam towards the neck opening, use the mattress stitch to sew the bind-off edge of the front shoulder to the bind-off edge of the back shoulder on one side of your sweater.
To seam with mattress stitch when joining two bind-off edges together:
Take a stitch through the corner of each piece to begin. On each side, going perpendicular to the bind-off edge, there are short strands of yarn in the fabric that look like a ladder. These strands are right next to the bind-off edge. With your yarn needle always pointing the same direction when inserting into the fabric, insert your needle under the next two “ladder” strands along the bind-off edge on one panel, and pull your yarn through, leaving your stitches loose. Then, insert your needle under the next two “ladder” strands along the bind-off edge of the other panel, and pull your yarn through, leaving your stitches loose.
Continue stitching, alternating back and forth between the two bind-off edges, taking two “ladder” strands with each stitch. Keep your stitches loose. You can, however, pull the seaming yarn to tighten the stitches you have worked so far, if at any point you need more length in your seaming yarn.
When you reach the end of the seam, pull on your seaming yarn to close up the loose seaming stitches until the seam looks neat. Then, grasp the seam at both ends and stretch it out. This makes sure there is enough ease in the seaming yarn. Take one more stitch through both corners of the panels at the neck opening edge, and make a knot to tie off your seam.
Weave in the yarn tail. Repeat on the other shoulder, and sew the front shoulder to the back shoulder on the other side of your sweater, using one of the yarn tails. Tie off, and weave in the yarn tail.
To attach each sleeve:
Fold the top edge of the sleeve in half to find the halfway point along this edge. Use a locking stitch marker or safety pin to pin the halfway point along the top edge of the sleeve to the end of the shoulder seam that is along the outside edge of the sweater. Thread the yarn tail at the top edge of the sleeve through your yarn needle, and use the mattress stitch to seam the bind-off edge of the sleeve to the side edge of the body of the sweater.
To seam with mattress stitch when joining a bind-off edge to a side edge:
Make sure both pieces are laying flat, with the center point on the top edge of the sleeve aligned with the shoulder seam of the body panels. Take a stitch through the corner of the sleeve and through the point on the body panel where the corner of the sleeve lines up with the body panel.
On the sleeve edge, we will be working into the same kind of “ladder” strands of yarn as we stitched through on the shoulder seam. On the body panels, we will be working into the ends of the ridges of the garter stitch fabric.
With your yarn needle always pointing the same direction when inserting into the fabric, bring your yarn needle over to the sleeve edge, and pick up the next two “ladder” strands with your needle. Pull the needle through, leaving your stitches loose. Then, bring your yarn needle to the edge of the body panel, and pick up the rainbow-shaped strand of yarn that comes up to the edge of the fabric on the next garter ridge. Pull the needle through, leaving your stitches loose.
Continue stitching, alternating back and forth between the two edges, stitching through two “ladder” strands with each stitch on the sleeve edge, and one rainbow-shaped strand of yarn on the edge of the next garter ridge on the body panel. Keep your stitches loose. You can, however, pull the seaming yarn to tighten the stitches you have worked so far, if at any point you need more length in your seaming yarn.
When you reach the shoulder seam of the body panel and the halfway-point of the sleeve edge, from then on, the garter stitch fabric on the body panel will be oriented in the opposite direction. You will now see bowl-shaped strands of yarn on the ends of the garter ridges on the body panel, and work into those as you continue seaming the sleeve edge to the body panel. The pin aligning the sleeve with the body panel can be removed. You may choose to pin the remaining corner of the sleeve to the edge of the body panel while you stitch the rest of the seam.
When you reach the end of the seam, pull on your seaming yarn to close up the loose seaming stitches until the seam looks neat. Then, grasp the seam at both ends and stretch it out. This makes sure there is enough ease in the seaming yarn. Take one more stitch through the corner of the sleeve and the edge of the body panel, and make a knot to tie off your seam.
Weave in the yarn tail. Repeat to join the other sleeve to the other side of the sweater. Tie off, and weave in the yarn tail.
Side Seams:
Fold the piece at the shoulder seams so that the front panel is laying on top of the back panel, with the right side of the fabric facing out. Line up the cast on edge of the front panel with the cast on edge of the back panel. We will be stitching the front of the sweater to the back, working from the ribbing at the bottom of the sweater up to the underarm.
The first part of the side edges that we have to join is the ribbing. Because there is not an extra selvedge stitch in the ribbing, we will not use mattress stitch to sew the ribbing edges together. Instead, use a whip stitch to join the edge of the front ribbing to the edge of the back ribbing.
When you reach the garter stitch portion of the sweater, begin using the mattress stitch as follows.
To seam the side edges of garter stitch pieces with mattress stitch:
With your yarn needle always pointing the same direction when inserting into the fabric, insert the needle through the bowl-shaped strand of yarn on the edge of the next garter ridge on the panel that is on your right. Pull the needle through, leaving your stitches loose. Then, insert the needle through the rainbow-shaped strand of yarn on the edge of the next garter ridge on the panel that is on your left.
Continue stitching, alternating back and forth between the two edges, stitching through one bowl-shaped strand on the edge of the next garter ridge on the panel on your right, and one rainbow-shaped strand on the edge of the next garter ridge on the panel on your left. Keep your stitches loose. You can, however, pull the seaming yarn to tighten the stitches you have worked so far, if at any point you need more length in your seaming yarn.
When you reach the underarm, where the sleeve meets the body panels of the sweater, stop stitching. Pull on your seaming yarn to close up the loose seaming stitches until the seam looks neat. Then, grasp the seam at both ends and stretch it out. This makes sure there is enough ease in the seaming yarn. Take one more stitch through the point where the sleeve meets the body panel, and make a knot to tie off your seam.
Weave in the yarn tail. Repeat to join the side edges of the body panels on the other side of the sweater. Tie off, and weave in the yarn tail.
Sleeve Seams:
Fold the sleeve so that the two side edges of the sleeve meet, with the right side of the fabric facing out. Line up the bottom corners of the sleeve cuff. We will be stitching the sides of the sleeve panel together, working from the sleeve cuff ribbing up to the underarm.
Using the same techniques as described for the side seams, whip stitch the side edges of the cuff ribbing on the sleeve panel together. Then, continue stitching the rest of the seam with mattress stitch, just as you did for the side seams, until you reach the underarm.
When you reach the underarm, where the sleeve meets the body panels of the sweater, stop stitching. Pull on your seaming yarn to close up the loose seaming stitches until the seam looks neat. Then, grasp the seam at both ends and stretch it out. This makes sure there is enough ease in the seaming yarn. Take one more stitch through the point where the sleeve meets the body panel, and make a knot to tie off your seam.
Weave in the yarn tail. Repeat to join the side edges of the sleeve on the other side of the sweater. Tie off, and weave in the yarn tail.
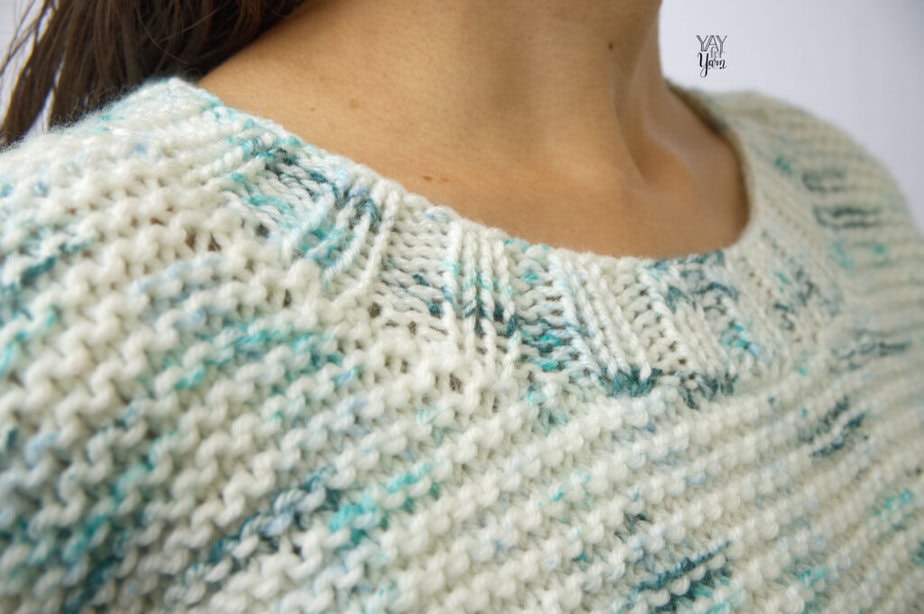
Neck Ribbing
We are now going to pick up stitches around the neckline, with the sweater turned right-side-out, starting from the center back neck. You will need to use the magic loop method, looping the excess cord length of your circular needle out of the way, since the needle is longer than the circumference of the neckline.
(Stitches are picked up working from right to left. To pick up each stitch around the neck opening, insert your right needle tip under two strands of yarn along the edge of the fabric. Yarn over, and pull up a new loop.)
Start at the center back neck. You will be picking up stitches from right to left, in a clockwise direction around the neck. With Size 9 needle, pick up the next 6 (7, 7, 8, 8, 9, 9, 10, 10) bound-off stitches from the center section of the back neck. Pick up the next 4 bound-off stitches along the curve of the neck shaping. Pick up 7 evenly-spaced sts (1 st from the end of each garter ridge) along the side edge of the back neck shaping. Now you should have reached the shoulder seam.
Continuing around to the front neck, pick up 15 evenly-spaced sts (1 st from the end of each garter ridge) along the side edge of the front neck. Pick up the next 4 bound-off stitches along the curve of the neck shaping. Pick up the next 8 (10, 10, 12, 12, 14, 14, 16, 16) bound-off stitches along the center section of the front neck. Pick up the next 4 bound-off stitches along the curve of the neck shaping. Pick up 15 evenly-spaced sts (1 st from the end of each garter ridge) along the side edge of the front neck. Now you should have reached the other shoulder seam.
Working around the other side of the back neck, pick up 7 evenly-spaced sts (1 st from the end of each garter ridge) along the side edge of the back neck shaping. Pick up the next 4 bound-off stitches along the curve of the neck shaping. Pick up the remaining 6 (7, 7, 8, 8, 9, 9, 10, 10) bound-off stitches from the center section of the back neck. You should have reached the center back neck again, where you started.
You should have a total of 80 (84, 84, 88, 88, 92, 92, 96, 96) sts.
As you knit the neck ribbing, you’ll need to loop the excess needle cord out of the way. At the beginning of each round, slide the stitches around your circular needle so that the left needle has stitches sitting on it, ready to knit, and the right needle is hanging out, with the excess cord on the right-hand end of your needle. Loop the excess cord length on the right needle tip out of the way, place a stitch marker on your right needle, and begin knitting in the round as instructed below. You will need to slide the stitches around your circular needle again, so the excess cord length is on the right, and loop the excess cord out of the way to begin the next round. Be sure to slip the stitch marker at the beginning of each round.
Rounds 1-8: *K2, P2* around.
BO in pattern. Tie off and weave in ends.

To Block:
(video tutorial on blocking here)
For natural fibers, pin project out on foam blocking mats. Spray with water until fully saturated, allow to dry.
OR
For acrylic fibers, pin project out on an ironing board or several layers of towels. Hold a steaming iron 2-3” over the surface of the fabric, making sure all of the fabric is penetrated by the steam. Allow to cool / dry.
Enjoy your finished Basic Knit Pullover!
This pattern is intended for your personal use only. You may not share it, copy it, sell it, give it away, or mass-produce the finished product. However, you may sell the finished items on a small scale, as long as you convey in your item description that you used a Yay For Yarn pattern.
Yay For Yarn Copyright© 2025 – Current. All patterns and photos are owned by Yay For Yarn.
Pin the image below to save this project for later!
")


0 Comments