

Knowing how to Count Stitches is essential to any knitting project. In this tutorial, you’ll learn to “read” your knitting to identify and count knit and purl stitches, on the needle and in the fabric.
If you’ve ever followed a knitting pattern, you’ve probably encountered something that says, “you should have (a certain number of) stitches after finishing this round,” or “knit 5, purl 1, knit 6”. But how do you know you are properly counting those stitches? How do you know if you’re even knitting them correctly?
Well, the answer lies in the one skill that can make the difference between a confident knitter and a confused, frustrated one.
It’s called “reading” your knitting, and it’s one of the most important skills you’ll learn. When you know how to read your knitting, you can tell where you are in a pattern, when you’ve made a mistake, and how to fix it, just by looking at the knitting. No more unraveling an entire project just because of one mistake.
The first step in learning to read your knitting is being able to identify the stitches. You need to be able to tell whether a stitch was knitted or purled, and know which strands make up the actual stitches, and which ones do not.
Structure of the Knit and Purl Stitches
Let’s look at some knitted fabric. Here is a photo of the knit side of stockinette stitch. See those two red lines? Those mark the two strands that, together, make the v-shape of one knit stitch. The blue line shows how the stitch is actually one loop of yarn, but the stitch above coming through the middle hides the center part of the loop.

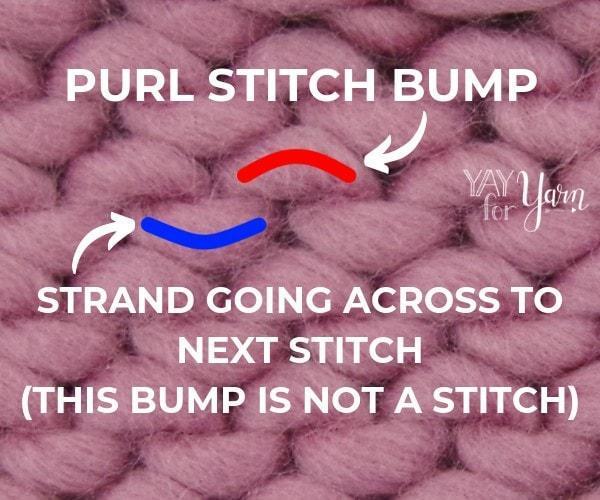
Now, let’s look at the purl side of the work. On the purl side, instead of v-shapes, we see horizontal bumps. Some of the bumps curve upward like a rainbow, and some of the bumps curve downward in a bowl shape. Each “rainbow” stitch is one purl stitch, marked by the red line in the photo below. The bowl-shaped bumps, marked by the blue line, are not stitches. That is where the yarn travels across to the next stitch, but that blue strand does not count as a stitch. (Hint: Remember how in the knit photo, the center part of the stitch loop is hidden by the stitch above? The back part of that loop (marked by the dashed blue line in the photo above) is what makes the purl stitch bump on the other side of the fabric.)
In reality, the knit stitch and the purl stitch both do the same thing: pull a new loop of yarn through an existing loop. The only difference is the direction. For a knit stitch, we insert the needle from front to back and pull the new loop through from back to front. But for a purl stitch, we insert the needle from back to front and pull the new loop through from front to back. So what faces you as a purl stitch on one side of the fabric appears as a knit stitch on the other side, and vice versa. What faces you as a knit stitch on one side appears as a purl stitch on the other side.
Combining Knit and Purl Stitches
In this example, I purled one stitch in the middle of a knit row. You can see the horizontal purl bump that sits under that loop on the needle. On the purl side of the work, this would appear as a v-shaped knit stitch.

Any well-written knitting pattern should give you stitch counts for each row or round. In other words, it should tell you how many stitches you should have on the needle after working each row or round. So you’ll need to know how to count the stitches on the needle.
Each stitch is a loop of yarn, and it sits around the needle. We count the stitches on the needle by counting how many loops are sitting on the needle. In the example below, each stitch on the needle is marked with a red line, for a total of 12 stitches.

Watch the detailed video tutorial below for more info and explanation on counting stitches:
Once you understand the structure of the knitted fabric and how to count your stitches, you’ll be better able to identify where you are in your pattern, even when you lay your knitting down and pick it up again later. Knit and Purl combination stitch patterns will make a lot more sense, and will be easier to work without frustration.
Do you know how to read your knitting?
Pin the image below to save this tutorial for later!

")


So glad I found your page! Unfortunately, the majority of the images aren’t loading (on multiple visits/refreshes). I tried on both Safari and Chrome, but neither have images to show 🙁
Hi Mia. I’m sorry that the images weren’t loading for you. I looked into it, and it seems there was an error with the images that caused them to not display on the page. I have fixed the error. Do the images show up for you now? I hope this helps!
Please send me tutorials on how to make chunky k I k b
eanie hats
Hi Sandra! I have a tutorial for making easy hats in any yarn you like here. I hope this helps!
How do you fix that stitch that looks like a criss cross, or two stitches on one stitch. Nobody covers this mistake. You can’t knit or purl effectively after that happens. I’m not the only one who shares this problem because it’s too common.
Hi. I’m so sorry I didn’t see your comment until now. If the strands of yarn on each side of a stitch are crossed like an X, the stitch is twisted. This is usually caused by inserting the needle into the back “leg” of a stitch instead of the front leg. In other words, when you insert the left needle into the next stitch, your left needle tip should be going through the part of the next stitch that is in front of the right needle. If you insert your left needle into the part of the next stitch that is behind the right needle, and work a stitch, the stitch will come out twisted. (Sometimes this is done intentionally, either for decorative or functional purposes.)
To correct a twisted stitch that you don’t want to be there, all you have to do is lift the twisted stitch off of the needle (use your other needle tip to do this), untwist it, and place it back on the needle so the right-hand side of the loop is sitting in front of the needle.
I hope this helps!