

Learn to SEAMLESSLY GRAFT CROCHET – Join Foundation & Top Edges + Fix Mistakes Without Unraveling
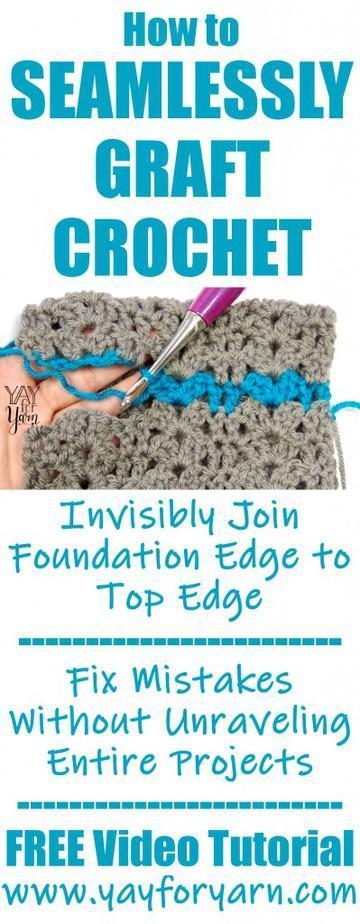
This is a technique I invented years ago, and haven’t shared until creating this video. Seamlessly Grafting Crochet is a method of invisibly joining the foundation edge of the work to the top edge, in any stitch pattern that doesn’t involve working in the back or front loops only. The technique is also great for when you have a mistake you would like to fix, but you’ve already crocheted pretty far past the mistake. Instead of unraveling the entire project, you can just clip the yarn at both ends of the section you want to remove, leaving a 6 inch tail on both remaining sections. You can then work a new section to fill in that area, seamlessly grafting it in.
I used this technique in my Boundless Cowl. Click Here for the FREE Boundless Cowl Crochet Pattern with Video Tutorial!

Pin the image below to save this tutorial for later!
What type of project would you use this technique for?
")


Hi. I was just wondering if there was a way to do this with working into the back loops only? I do a lot of projects using double crochet in the back loops only and it would be great to use this technique. Thank you for your video explaining the basic technique! Paula 🙂
Hi Paula. Yes, you can graft in the back loop only. This does require some extra steps, but it can be done. First you’ll work your last row, cut the yarn leaving a tail (longer than you normally would, just to make sure it will still be long enough to weave in), and unravel the last row you just worked. As you work across the grafting row, instead of pulling the top loop of each stitch through the base of the stitch above on Row 1, you’ll stretch the top loop of the stitch until the whole yarn tail comes out. Then, thread the end through your yarn needle, and use the yarn needle to bring the yarn through the base of the stitch above from right to left (or left to right if you crochet left-handed). Now, look at where the yarn tail came out of the top of the stitch, and insert your yarn needle down through the top of the previous stitch to create the full loop on top of the current stitch. (It can help to compare your grafting stitches to the top of a row of regular stitches to make sure you’re inserting your needle through the right place. Once the needle has been pulled through, you can insert your hook through the loop you just made that is already connected to the base of the stitch above, and work the next stitch with your hook. This does take more time than grafting with both loops in the stitch above, but it is just as invisible when finished. I hope this helps!
Hi I have watched your grafting crochet video and can do all the stitches but the row above mine has front post stitches. I cant seem to be able to get these to look right when I graft. Do you have any suggestions?
Thanks for your help.
Katherin
Hi Katherin! If you’re grafting underneath front post stitches, that can be a little tricky. To replicate the structure of a post stitch, you need the post of the grafting stitch to go through the base of the stitch above. Instead of pulling the top loop of the grafting stitch through the base of the front post stitch, try this… Let’s say you’re working with double crochets. In the grafting row, yarn over, and insert the hook from back to front through the base of the stitch above, then into the stitch you’re working the grafting stitch into (the row below the grafting row). Then, complete the double crochet, without grabbing any of the loops from the base of the stitch above. You want the post of the grafting stitch to be going through the base of the stitch above. Try that out and let me know how it works for you!
Hello,
I just came across one of your wonderful youtube videos.
I knit but have never crocheted but I am very much wanting to learn how to crochet two pieces of knit fabric together.
Have you made a video tutorial about this?
And if not, do have any tips or links you might point me to?
Thank you!
Megan
Hi Megan! I do have a video that shows one way of crocheting pieces of knit fabric together. This scarf is made on a knitting machine, then the ends are closed up by crocheting the live loops of the knitting together. If your pieces are already bound off, you can use the same method by inserting the hook into those same live loops. As for joining the side edges, you can do that with crochet as well. Just make sure you insert the hook into the end of one knitted row from each piece, then finish your crochet stitch. If you are not familiar with crochet, I would recommend watching a few beginner crochet videos before you try this, so you can get a feel for how the stitches are made. Just search youtube for “how to crochet for beginners”. I hope this helps!