

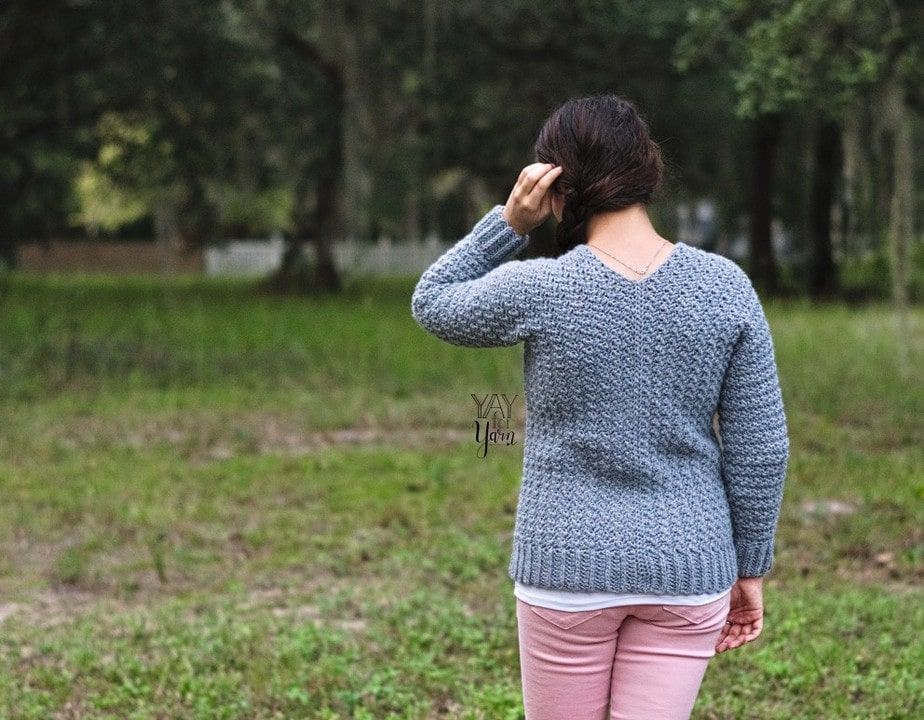
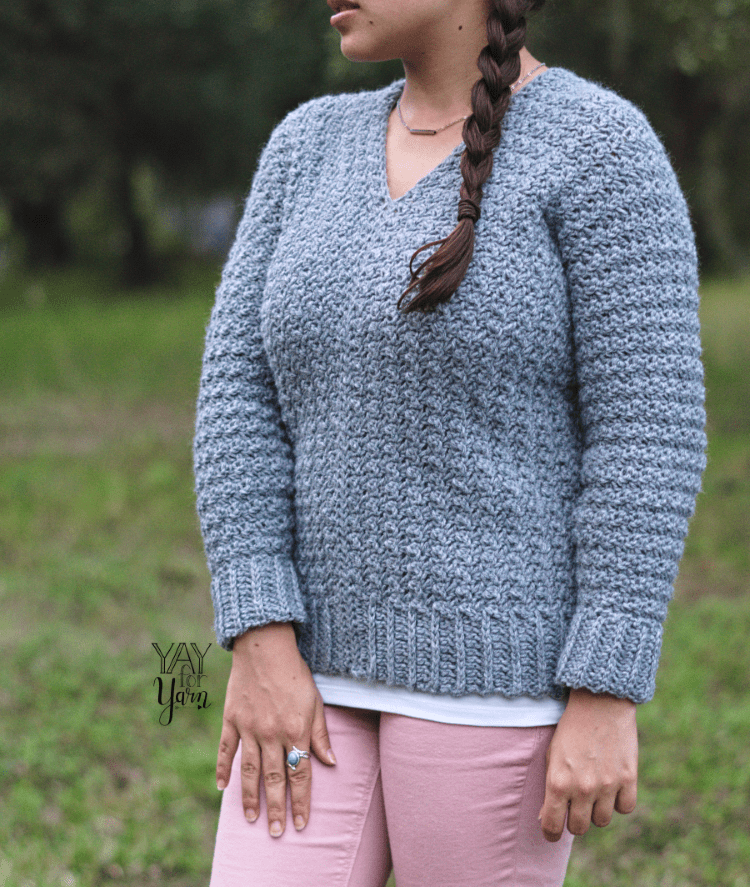
Looking for a classic crochet pullover pattern? This simple, beginner-friendly crochet sweater is made from rectangles, with minimal shaping.
Table of Contents
Textured Pullover Crochet Pattern
by Yay For Yarn
Or, scroll down to view the free version of the written instructions.
Skill Level: Advanced Beginner
Sizing:
– Sizing follows the Craft Yarn Council’s standards for Women’s sizes.
– This sweater has a classic fit, with about 2”-3” (5-7.6 cm) of positive ease. Measure the bust of the wearer, and choose the size that is closest to the wearer’s bust measurement, under the title, “To Fit Bust”.
– Instructions and yarn requirements for size X-Small are given outside the parentheses, with Small, Medium, Large, X-Large, 2X, 3X, 4X, and 5X given inside the parentheses, like this:
X-Small (Small, Medium, Large, X-Large, 2X, 3X, 4X, 5X).
– When only one number is given, it applies to all sizes.
To Fit Bust:
X-Small: 30” (76 cm)
Small: 34” (86 cm)
Medium: 38” (96.5 cm)
Large: 42” (106.7 cm)
X-Large: 46” (116.8 cm)
2X: 50” (127 cm)
3X: 54” (137 cm)
4X: 58” (147 cm)
5X: 62” (157.5 cm)
Finished Bust / Back Length:
X-Small: 32 ¼” (81.9 cm) / 21 ¼” (54 cm)
Small: 36 ¾” (93.3 cm) / 21 ¾” (55.2 cm)
Medium: 41 ¼” (104.8 cm) / 22” (55.9 cm)
Large: 44 ¼” (112.4 cm) / 22 ¼” (56.5 cm)
X-Large: 48 ¾” (123.8 cm) / 22 ½” (57.2 cm)
2X: 53 ¼” (135.3 cm) / 22 ¾” (57.8 cm)
3X: 56 ¼” (142.9 cm) / 22 ¾” (57.8 cm)
4X: 60 ¾” (154.3 cm) / 23 ¼” (59 cm)
5X: 65 ¼” (165.7 cm) / 23 ¼” (59 cm)

You Will Need:
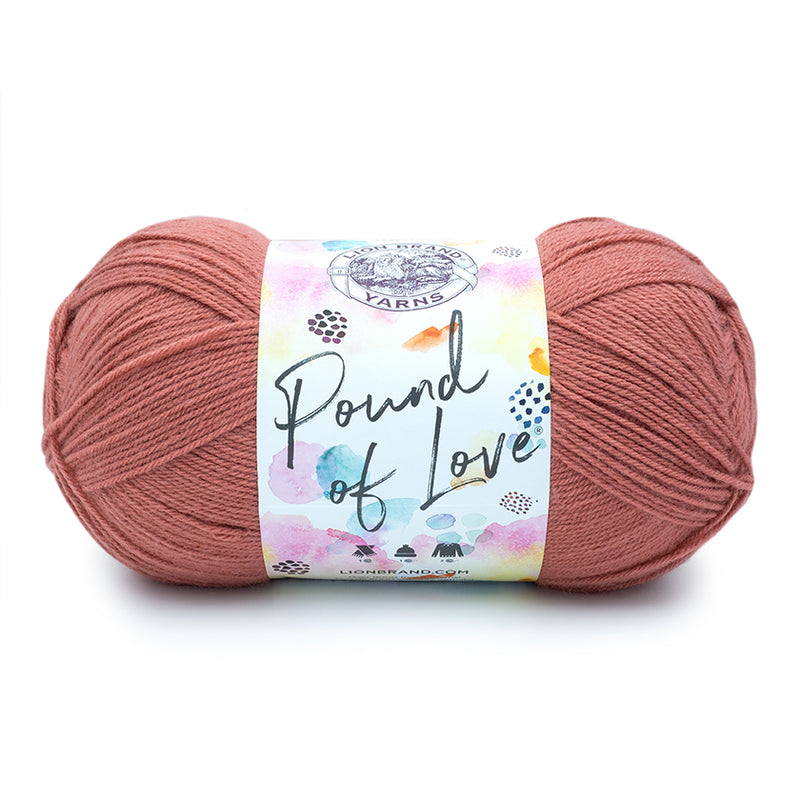
Approx. 1020 (1142, 1261, 1346, 1465, 1591, 1665, 1807, 1907) yards of soft #4 Worsted Weight yarn
(I used Lion Brand Pound of Love, 1020 yards / 16 oz / 454 g per skein, 1 (2, 2, 2, 2, 2, 2, 2, 2) skeins in Oxford Grey)
US Size J (6 mm) crochet hook
Scissors
Measuring Tape
Yarn Needle or Blunt Tapestry Needle
Shop Supplies for this Project
Lion Brand Pound of Love – LionBrand.com
Buy Now →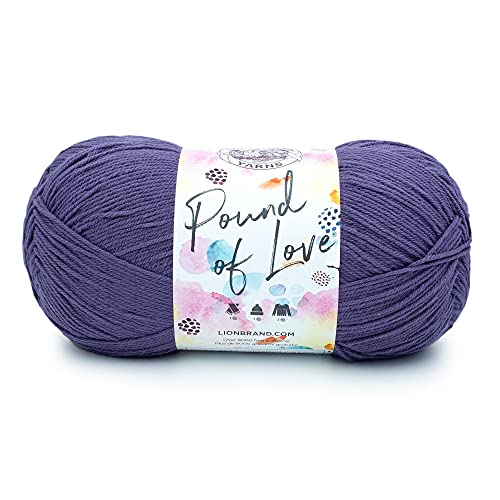
Lion Brand Pound of Love – Amazon
Buy Now →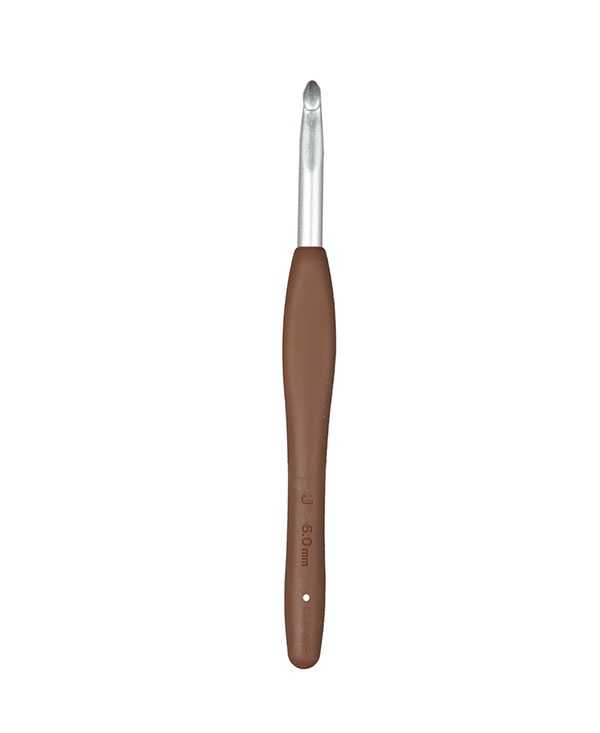 Buy Now →
Chibi Metal Yarn Needles – Amazon
Buy Now →
Knitter’s Pride Rainbow Folding Scissors
Buy Now →
Gauge: 14 stitches = 4” (10 cm); 8 rows = 3” (7.6 cm) in main stitch pattern
Abbreviations:
beg: beginning
ea: each
nxt: next
st: stitch
sts: stitches
sp: space
sk: skip
ch: chain
sc: single crochet
hdc: half-double crochet
dc: double crochet
*sc2tog: single crochet 2 stitches together
*dc2tog: double crochet 2 stitches together
*Fsc: foundation single crochet
*Rhdc: ribbing half-double crochet
*CSSC: chainless starting single crochet
*invslst: invisible slip stitch
*This is a special stitch. See instructions below to learn how to work this stitch.
Special Stitches
Sc2tog: *Insert hook into the next stitch, yarn over and pull up a loop. Repeat from * one more time. Yarn over, pull through all three loops on hook.
Dc2tog: *Yarn over, insert hook into the next stitch, yarn over and pull up a loop. Yarn over, pull through two loops on hook. Repeat from * one more time. Yarn over, pull through all three loops on hook.
Foundation Single Crochet: (video tutorial here)
To begin, chain 2. Insert hook into the 2nd chain from the hook. Yarn over, pull up a loop. Yarn over, pull through one loop on hook. Yarn over, pull through both remaining loops on hook.
For all following stitches: Turn work upside-down so the bottom (foundation) edge is facing you. On the bottom of the previous stitch, there is what looks like the top of a normal crochet stitch. Insert hook into both strands of that “stitch”. Yarn over, pull up a loop. Yarn over, pull through one loop on hook. Yarn over, pull through both remaining loops on hook.
Rhdc: (video tutorial here) Yarn over, insert hook, not into the top of the hdc below, but into the horizontal strand that runs across the front of the hdc below. Yarn over, pull up a loop. Yarn over, pull through all 3 loops on hook.
Chainless Starting Single Crochet: (video tutorial here) Stretch loop on hook slightly. Insert hook in the same stitch the loop is coming from. Yarn over, pull up a loop. Yarn over, pull through 2 loops on hook.
Invslst: (video tutorial here) Remove hook from current loop. Insert hook from back to front through the top of the chainless starting stitch from beg of round. Place original loop back on hook. Pull loop through the st from front to back.

Body Panel (make 2)
Begin by leaving a tail at least 1 yard long.
This pattern begins with a row of foundation single crochet instead of a foundation chain. The foundation single crochet is simple to work, and makes the foundation chain and the first row of single crochet at the same time. The foundation edge, when worked in this way, has much more stretch and flexibility than a regular foundation chain. It is also easier to stitch into when seaming. I highly recommend using the foundation single crochet to begin your panels, but instructions for a regular foundation chain and row of single crochet are also included.
Row 1: ch 2, sk 1 ch, Fsc in 2nd ch from hook. Work 149 (151, 153, 155, 157, 159, 159, 163, 163) more Fsc. You should have 150 (152, 154, 156, 158, 160, 160, 164, 164) sts, not including beg ch sp.
OR
Row 1: ch 151 (153, 155, 157, 159, 161, 161, 165, 165). Sk 1 ch, sc in 2nd ch from hook. Sc in ea ch st across. You should have 150 (152, 154, 156, 158, 160, 160, 164, 164) sts, not including beg ch sp.
Row 2: ch 2, turn. Hdc in same st and in ea of nxt 9 sts. (Sc, dc) in nxt st. *sk 1 st, (sc, dc) in nxt st* across to last 11 sts. Sk 1 st, hdc in ea of nxt 10 sts. You should have 150 (152, 154, 156, 158, 160, 160, 164, 164) sts, not including beg ch sp.
Row 3: ch 2, turn. Rhdc in same st and in ea of nxt 9 sts. (Sc, dc) in nxt st. *sk 1 st, (sc, dc) in nxt st* across to last 11 sts. Sk 1 st, Rhdc in ea of nxt 10 sts. You should have 150 (152, 154, 156, 158, 160, 160, 164, 164) sts, not including beg ch sp.
Repeat Row 3; 18 (21, 24, 26, 29, 32, 34, 37, 40) more times.
Tie off, leaving a tail at least 1 yard long.
Textured Pullover Instructions
Assembling Body of Sweater
Block both panels with the blocking method of your choice.
To Block: (video tutorial here)
For natural fibers, pin project out on foam blocking mats. Spray with water until fully saturated, allow to dry.
OR
For acrylic fibers, pin project out on an ironing board or several layers of towels. Hold a steaming iron 2”-3” over the surface of the fabric, making sure all of the fabric is penetrated by the steam. Allow to cool / dry.
Lay both panels out flat so that the foundation edges are together. The wrong side (back side / bumpy side) of the last row from each panel should be facing up.
We will be stitching the foundation edges of the panels together, leaving a gap in the center of the seam for the neckhole.
Back Seam
Take the yarn tail from the foundation edge of one of the panels, and thread it through your yarn needle. We will be stitching pairs of stitches together. A “pair” of stitches is one stitch from the edge of one panel and one stitch from the edge of the other panel.
Beginning at the ribbing edge, whip stitch 65 (66, 67, 68, 69, 70, 70, 72, 72) pairs of stitches together. Take one more stitch through the last pair of stitches you just worked into, wrap the yarn around the needle, and pull the needle through to make a knot. Weave in the yarn tail.

Front Seam
Rotate the piece so that the other ribbing ends of the panels are closest to you. Take the yarn tail from the foundation edge of one of the panels, and thread it through your yarn needle. We will again be stitching pairs of stitches together. The length of this seam determines the depth of the neckline. To make the neckline higher or lower, simply stitch more or fewer pairs of stitches together.
Beginning at the ribbing edge, whip stitch 55 (55, 55, 56, 56, 56, 56, 56, 56) pairs of stitches together. Take one more stitch through the last pair of stitches you just worked into, wrap the yarn around the needle, and pull the needle through to make a knot. Weave in the yarn tail.
Side Seams
Bring the ribbing ends of the panel together, folding it so the front and back seams are laying on top of each other. The wrong side (bumpy side) of the last row from each panel should be facing out. The folded sections at the top are the shoulders, and the opening in the center seam is the neckhole.
Take the yarn tail from the remaining edge of one of the panels, and thread it through your yarn needle. The edge of the final row of that panel is currently folded so the ribbing stitches from each end are together. We will begin stitching this edge together, beginning at the ribbing. We will stop stitching before we reach the fold, leaving an opening for the armhole.
Beginning at the ribbing edge, whip stitch pairs of stitches together until there are 38 (40, 44, 48, 52, 56, 62, 68, 72) stitches remaining that have not been joined together. Take one more stitch through the last pair of stitches you just worked into, wrap the yarn around the needle, and pull the needle through to make a knot. Weave in the yarn tail.
Repeat these instructions for the other side seam.

Sleeves
We will be joining the yarn at the base of the armhole, and working the first round of the sleeve into the remaining stitches of the armhole.
Lay the sweater in front of you so the top of the side seam is facing you. We need to join the yarn in the top of a double crochet from the last row of the body panel, joining close to the side seam.
Either the stitch on one side of the seam or the stitch on the other side of the seam will be a double crochet from the last row of the body panel. Join yarn in that stitch, leaving a 6”-8” (15-20 cm) tail, and proceed to work round 1.
Round 1: CSSC in same st, dc in same st. *sk 1 st, (sc, dc) in nxt st* around to last st. Sk 1 st, join with invslst in CSSC from beg of round. You should have 38 (40, 44, 48, 52, 56, 62, 68, 72) sts, including CSSC, but not including invslst.
At this point, there will be a small gap at the underarm, right above the end of the seam. Use your yarn tail to make a couple of stitches to close the gap, then make a knot and weave in the tail.
Round 2: Turn. CSSC in same st, dc in same st. *sk 1 st, (sc, dc) in nxt st* around to last st. Sk 1 st, join with invslst in CSSC from beg of round. You should have 38 (40, 44, 48, 52, 56, 62, 68, 72) sts, including CSSC, but not including invslst.
Repeat Round 2; 23 (23, 22, 20, 16, 14, 9, 7, 4) more times.
Round 3: Turn. CSSC in same st, dc in same st. *sk 1 st, (sc, dc) in nxt st* around to last 5 sts. Sk 1, sc2tog, dc2tog. Join with invslst in CSSC from beg of round. 2 sts decreased.
Repeat Round 3; 7 (7, 8, 10, 11, 13, 15, 17, 19) more times.
You should now have 22 (24, 26, 26, 28, 28, 30, 32, 32) sts. Do not tie off.

Ribbing
We will now add the cuff ribbing to the sleeve. The ribbing is worked in rows perpendicular to the previous rounds. We will use slip stitches to join the ribbing to the stitches of the last round of the sleeve as we work.
ch 12.
Row 1: sk 2 chs, hdc in 3rd ch from hook. Hdc in nxt 9 chs. Sl st in nxt 2 sts of sleeve. You should have 10 sts, not including skipped chs or sl sts.
Row 2: Turn. Sk 2 sl sts, Rhdc in ea of nxt 10 sts. You should have 10 sts.
Row 3: ch 2, turn. Rhdc in same st and in ea of nxt 9 sts. Sl st in nxt 2 sts of sleeve. You should have 10 sts, not including skipped chs or sl sts.
Repeat Rows 2-3 until you have worked all the way around the sleeve cuff, ending with Row 2. There should not be any stitches of the last round of the sleeve remaining that have not been slip-stitched into. There should not be a gap between the beginning and end of the ribbing, just a slit. Tie off, leaving a tail.
We will now stitch the ends of the ribbing together. Use the yarn tail to stitch the slit between the beginning and end of the ribbing closed.
Use a back-and-forth stitch to sew the ends together instead of a whip stitch. (You don’t want to stitch over the tops of the stitches, or that last ribbing column made by the top edge of the last row will disappear.)
When you reach the end of the seam, bring the needle to the inside, make a knot, and weave in the ends.
Repeat instructions for sleeve and ribbing to make the second sleeve on the other armhole. Block sleeves using the blocking method of your choice.
To Block: (video tutorial here)
For natural fibers, pin project out on foam blocking mats. Spray with water until fully saturated, allow to dry.
OR
For acrylic fibers, pin project out on an ironing board or several layers of towels. Hold a steaming iron 2”-3” over the surface of the fabric, making sure all of the fabric is penetrated by the steam. Allow to cool / dry.
Enjoy your finished Textured Pullover!
This pattern is intended for your personal use only. You may not share it, copy it, sell it, give it away, or mass-produce the finished product. However, you may sell the finished items on a small scale, as long as you convey in your item description that you used a Yay For Yarn pattern.
Yay For Yarn Copyright© 2019 – Current. All patterns and photos are owned by Yay For Yarn.
Pin the image below to save this project for later!

")


Help. I bought size 4 yarn but I didn’t realize it’s only 6 oz! I am a beginner and don’t know much about yarn differences. Do I still use a 6 hook?
Hi Lee Ann. 6 oz refers to the amount of yarn in each skein by weight (just like if you were to buy a 3-pound bag of potatoes). To make sure you have enough yarn for the project, go by the yards of yarn required in the pattern for the size you are making. Size 4 refers to the thickness of the yarn. The hook size that you use will be determined by your gauge, or the size of your stitches. Different crocheters may use the same hook size, and still end up with different sized stitches from each other, because some people crochet more tightly or more loosely than others. If you’re not familiar with gauge, you can learn more about it here: https://yayforyarn.com/knit-crochet-gauge/ I hope this helps!
I figured it out! Thanks!
Love the pattern. Thank you for keeping your patterns free.
When joining new yarn for starting the sleeve, am I working on the outside of the sweater, or on the inside (the part next to my skin)?
And the same question for starting the ribbing at the end of the sleeve. Do I do that on the outside of the sleeve, or on the inside, next to my skin.
Hi Linda! When you join the yarn for the sleeve, you want the fabric to blend together so you can’t see the line between the body and the sleeve. So look at the last row of the body panel and see which direction it is worked. (Whether the front of the row is facing in or out.) Then, join the yarn and work the first round of the sleeve in the opposite direction from the last row of the body panel. That will make the stitch pattern blend together. As for the ribbing, it doesn’t really matter which direction the ribbing is worked. I hope this helps!