

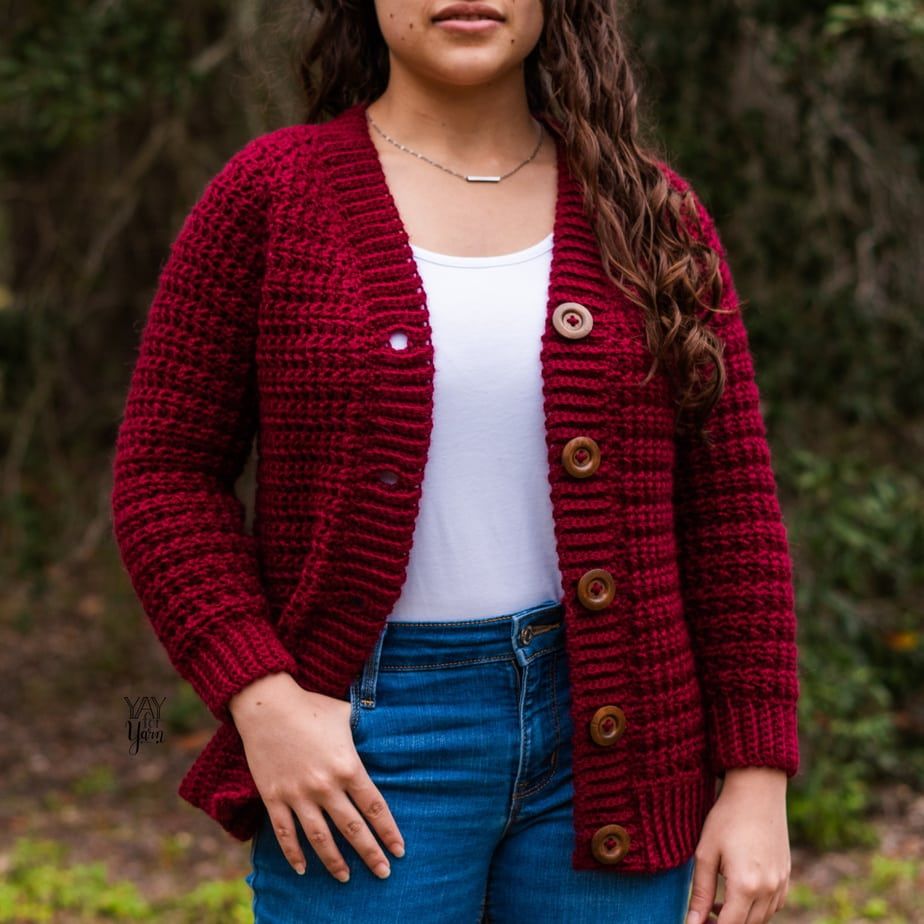
This cozy, versatile crochet cardigan is made in one piece! Crochet your own Crimson Cardigan with this size-inclusive free crochet sweater pattern.
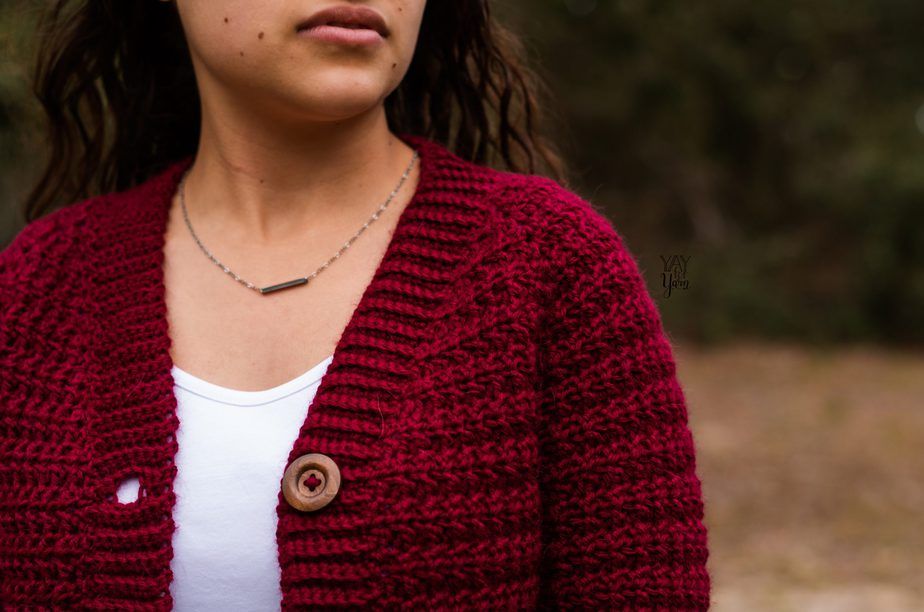
The Crimson Cardigan is the perfect everyday sweater for chilly weather. With its simple styling and comfy, relaxed fit, you can layer your handmade crochet cardigan over any outfit you like.
Table of Contents

Featuring a raglan-style construction, the sleeves and body of this cardigan are all made in one piece. Raglan sweater shaping isn’t super complicated, and is pretty similar to making a granny square. (Bonus: there is only one very short seam to sew at each sleeve cuff!) A single crochet ribbing trims the edges and button bands, adding texture and detail.
How to Choose the Best Yarn for a Women’s Crochet Cardigan
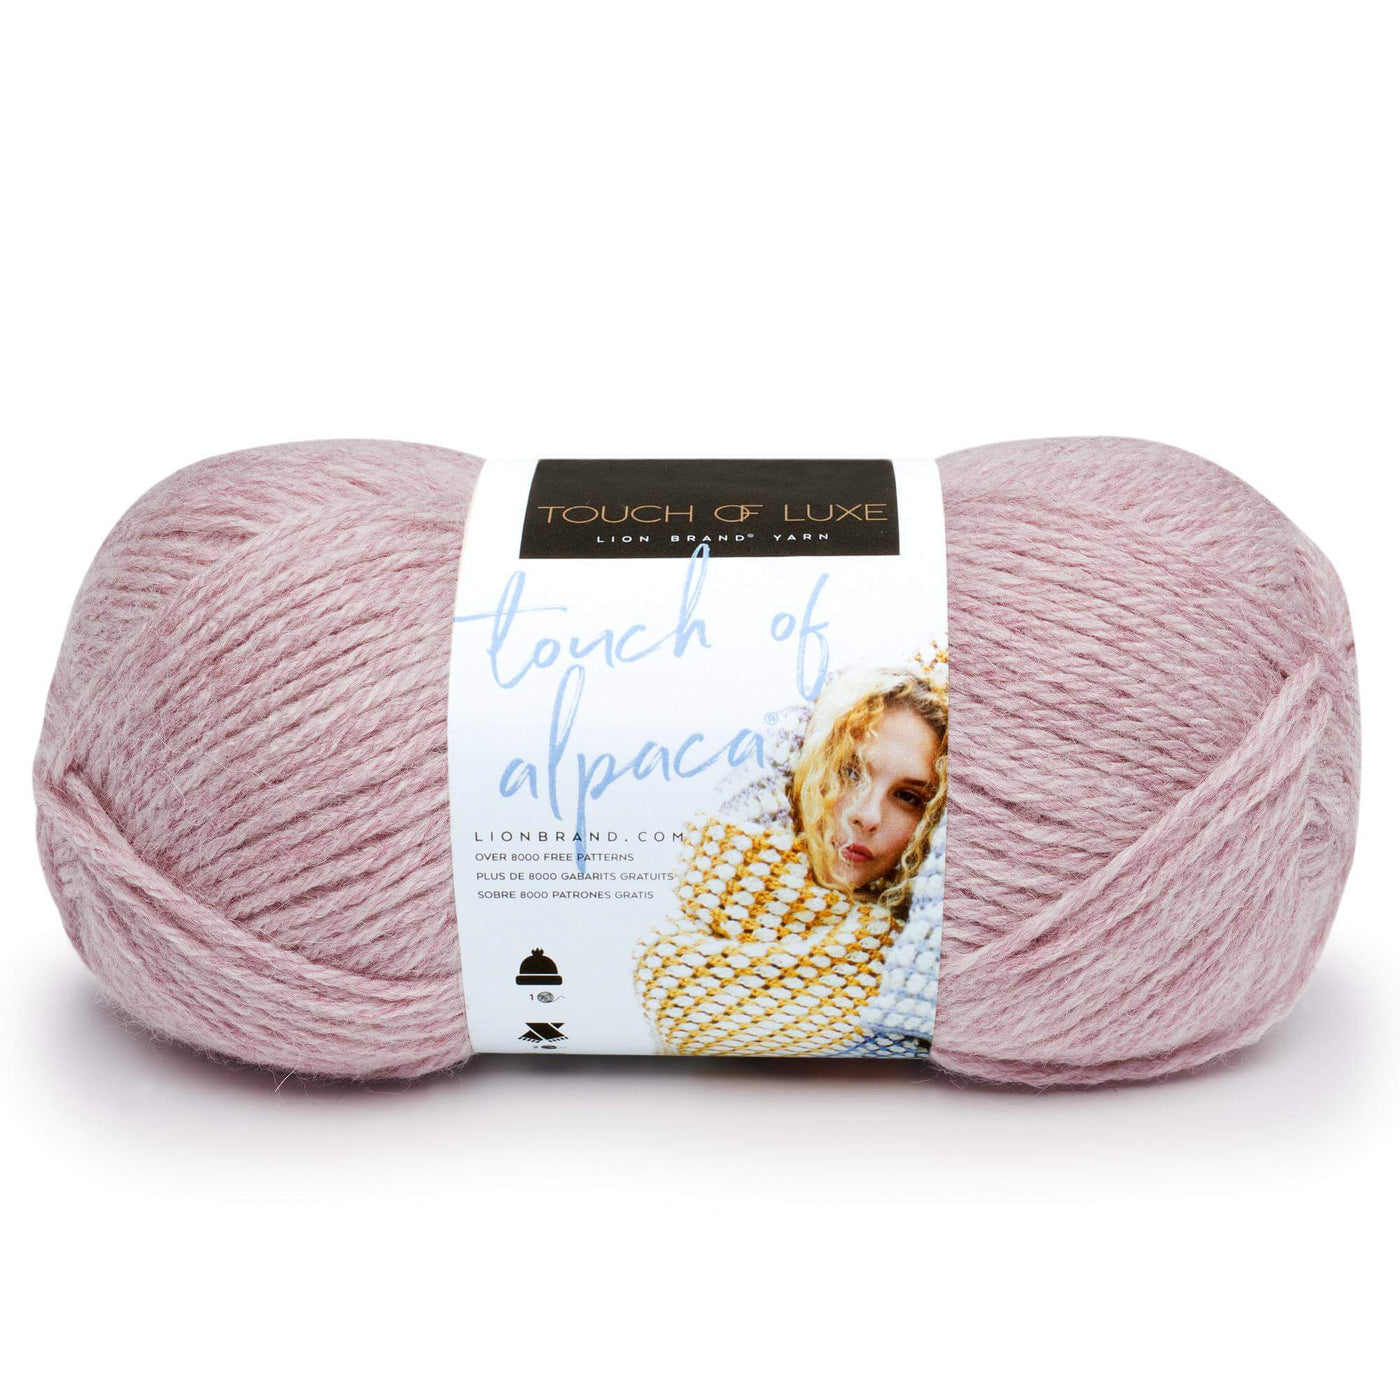
This women’s cardigan crochet pattern calls for #4 Medium / Worsted Weight yarn. I prefer to use a washable yarn for most garments, so I chose to use Lion Brand Touch of Alpaca. It’s a blend of 90% Acrylic and 10% Alpaca, which gives the soft acrylic yarn a luxury feel. Touch of Alpaca comes in two different skein sizes, a 7oz / 200g Bonus Bundle skein and a 3.5oz / 100g regular skein. I used the Bonus Bundle skeins for my cardigan, but the pattern also tells how many skeins you’ll need if you’re using the regular sized skeins. A wool or acrylic yarn would also be suitable for this pattern. Feel free to choose a yarn with a different fiber content if you like, as long as it is #4 Medium Weight.
When selecting the yarn you want to use for this pattern, make sure the yarn label says it is #4 Worsted Weight. Then, purchase enough skeins of the yarn you want to use so that you have at least the total number of yards required in the pattern for the size you are making.

How do I Choose a Size?
The Crimson Cardigan crochet pattern includes instructions for 9 sizes, from a women’s size X-Small to 5X. (Pattern is written for XS, S, M, L, XL, 2XL, 3XL, 4XL, and 5XL.) To decide which size you want to make, you’ll need to measure around the fullest part of the bust. Then, follow the instructions in the “Sizing” section of the pattern to select the size according to the wearer’s bust measurement.
Please note that the cardigan length will fall differently on individuals of different heights. To see how long the cardigan will fall, measure the back length measurement against the wearer.
Check out more size-inclusive women’s crochet cardigan patterns!

1. Cuddle Cardigan Sweater Pattern / 2. Diamond Cardigan / 3. Comfy Cozy Cardigan Sweater Pattern
Can I crochet this if I am a beginner?
This crochet cardigan pattern is labeled “Intermediate” for the skill level, but the stitches and construction are not super complicated. To make this project, you’ll need to know how to work the basic crochet stitches, increase and decrease, work in the round, and work in a simple stitch pattern. Many crochet sweater patterns are made with the double crochet stitch (dc), but I chose to use a simple half-double crochet waffle stitch to give the cardigan more texture. This stitch pattern requires working into the front loop only and back loop only of the stitches below.
You will also need to be comfortable reading a written pattern, and understanding how to follow a set of repeating instructions. (See this article by the Craft Yarn Council to learn more about how to read a crochet pattern.) If you are familiar with those techniques, you can make this cardigan.
Pin this project to save it for later!

Ready to get started? Let’s crochet the Crimson Cardigan!
Crimson Cardigan Crochet Pattern
by Yay For Yarn
NOTE: Pattern has been UPDATED August 23, 2024 to improve the fit of the sleeves. If you have purchased the PDF version of the pattern before this date, please contact me with your order info and I will be happy to send you the updated version of the PDF pattern.
Skill Level: Intermediate
Sizing:
Sizing follows the Craft Yarn Council’s standards for Women’s sizes.
This sweater has a classic fit, with 4-5” (10.2-12.7 cm) of positive ease. If you are between sizes, size up if you want a looser-fit sweater, or size down if you want a more fitted sweater. Measure the bust of the wearer, and choose the size that is closest to the wearer’s bust measurement, under the title, “To Fit Bust”.
Instructions and yarn requirements for size X-Small are given outside the parentheses, with Small, Medium, Large, X-Large, 2X, 3X, 4X, and 5X given inside the parentheses, like this:
X-Small (Small, Medium, Large, X-Large, 2X, 3X, 4X, 5X).
When only one number is given, it applies to all sizes.
When a set of instructions does not apply to all sizes, the numbers that would normally be given for the sizes that the instructions do not apply to will be replaced with dashes, like this:
– (-, -, -, -, 1, 1, 3, 5)
To Fit Bust:
30 (34, 38, 42, 46, 50, 54, 58, 62)” / 76 (86.5, 96.5, 106.5, 117, 127, 137, 147.5, 157.5) cm
Finished Bust:
35 (38, 42, 47, 51, 54, 58, 63, 67)” / 89 (96.5, 106.5, 119.5, 130, 137, 147.5, 160, 170) cm
Back Length:
25 (26, 27, 28, 29, 30, 31, 32, 33)” / 63.5 (66, 68.5, 71, 73.5, 76, 79, 81, 84) cm
Please Note: Cardigan length will fall differently on individuals of different heights. To see how long the cardigan will fall, measure the back length measurement against the wearer.

You Will Need:
- About 1098 (1224, 1371, 1656, 1826, 1985, 2164, 2521, 2720) yards of #4 Worsted Weight Yarn (I used Lion Brand Touch of Alpaca in Crimson, 90% Acrylic, 10% Alpaca, 3.5oz / 100g or 207 yds / 190m per skein, 6 (6, 7, 8, 9, 10, 11, 13, 14) skeins)
- US Size I / 5.5mm Crochet Hook (or size needed to obtain gauge, shop the hook I used here)
- Scissors
- Measuring Tape
- Yarn Needle or Blunt Tapestry Needle
- 5 (5, 5, 6, 6, 6, 6, 6, 6) Buttons, 1 ⅛” in diameter
Shop Supplies for this Project
Lion Brand Touch of Alpaca – LionBrand.com
Buy Now →
Lion Brand Touch of Alpaca – Amazon
Buy Now → Buy Now →
 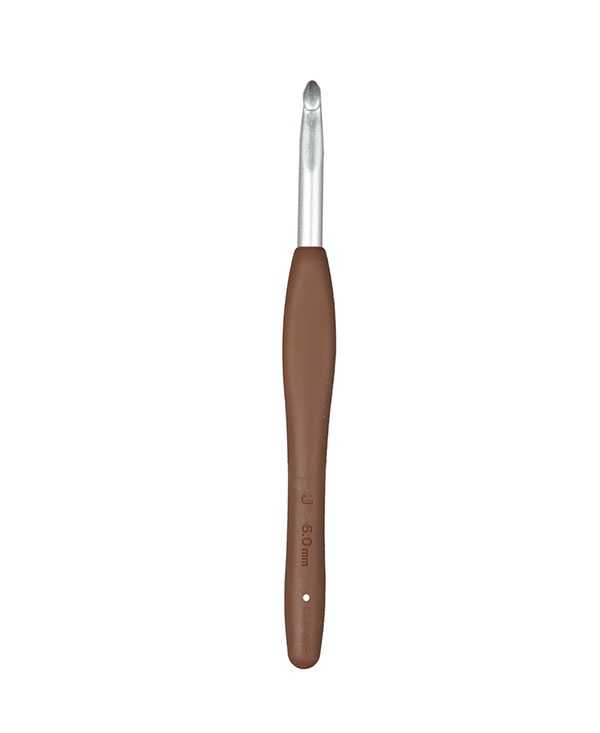 Buy Now →
Chibi Metal Yarn Needles – Amazon
Buy Now →
Knitter’s Pride Rainbow Folding Scissors
Buy Now →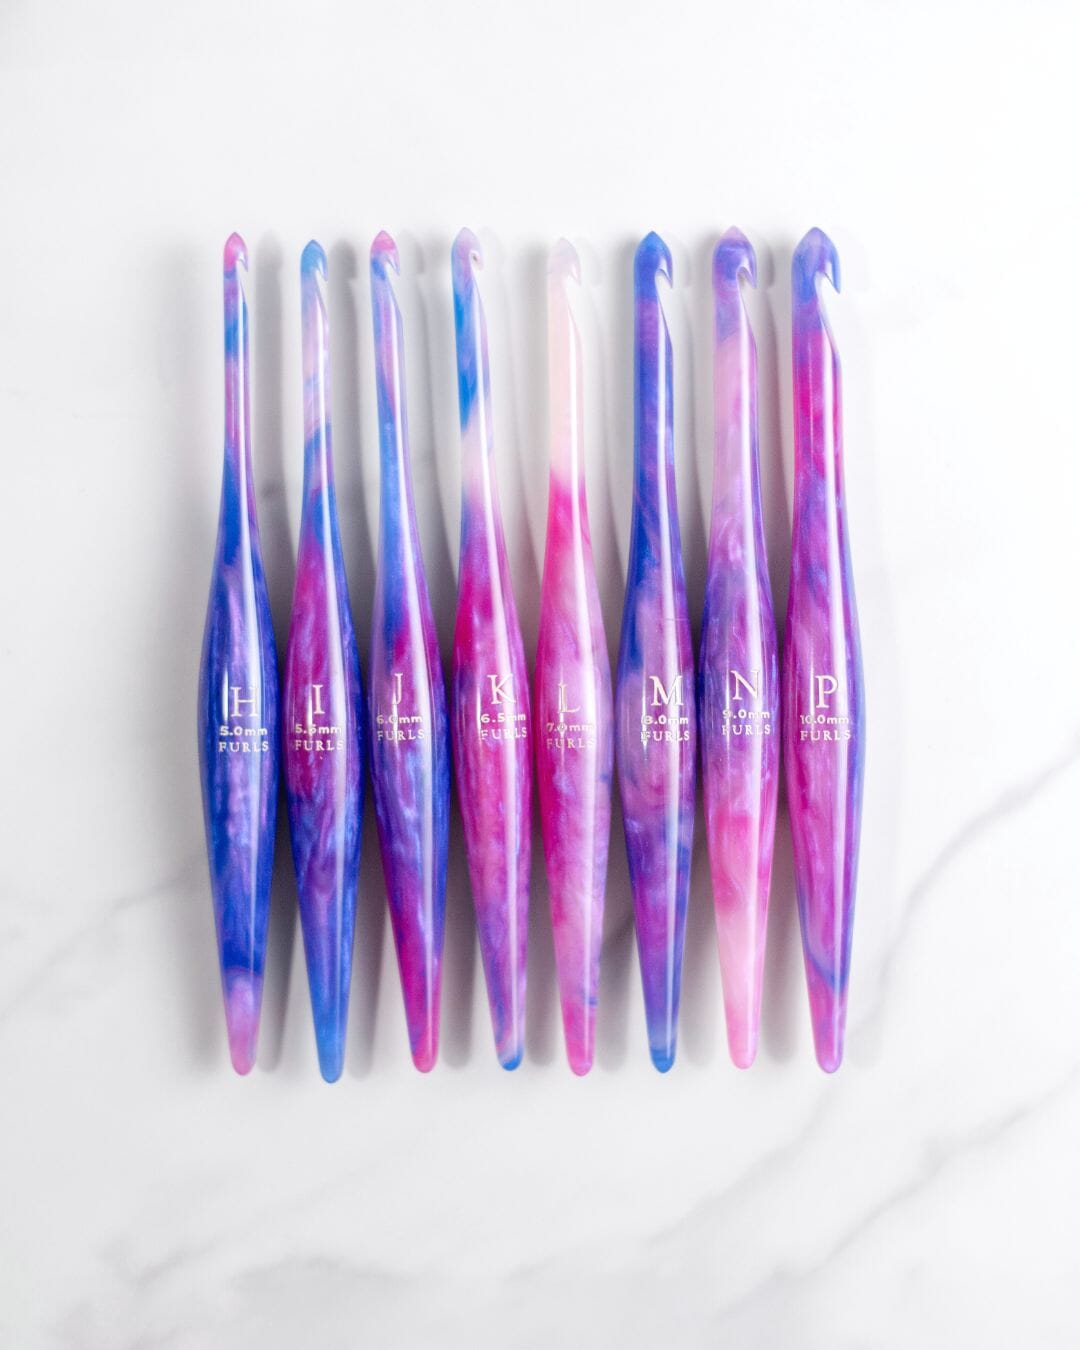
Furls Streamline Resin Crochet Hooks
Buy Now →
Gauge:
16 sts = 4” / 13 rows = 6” in half-double crochet waffle stitch (see instructions for gauge swatch)
(Note: Gauge should be measured after blocking your swatch. Learn more about checking your gauge here.)
Abbreviations:
st(s): stitch(es)
sk: skip
nxt: next
ea: each
sp: space
beg: beginning
ch: chain
sc: single crochet
hdc: half-double crochet
sl st: slip stitch
BLO: back loop only
FLO: front loop only
*Fsc: foundation single crochet
*invslst: invisible slip stitch
*hdc2tog: half-double crochet 2 stitches together
*This is a special stitch. See instructions below to learn how to work this stitch.

Special Stitches
Foundation Single Crochet: (video tutorial here)
To begin, chain 2. Insert hook into the 2nd chain from the hook. Yarn over, pull up a loop. Yarn over, pull through one loop on hook (one chain made). Yarn over, pull through both remaining loops on hook.
For all following stitches: Turn work upside-down so the bottom (foundation) edge is facing you. On the bottom of the previous stitch, there is what looks like the top of a normal crochet stitch (the chain from the previous stitch). Insert hook into both strands of that “stitch”. Yarn over, pull up a loop. Yarn over, pull through one loop on hook (chain made). Yarn over, pull through both remaining loops on hook.
Invisible Slip Stitch: (video tutorial here)
Remove hook from current loop. Insert hook from back to front through the top of the first stitch from beg of round. Place original loop back on hook. Pull loop through the st from front to back.
Hdc2tog:
*Yarn over, insert hook into nxt st, yarn over, pull up a loop.* Repeat from * to * a second time. Yarn over, pull through all 5 loops on hook.
Pattern for Gauge Swatch
Row 1: Ch 26. Sk 2 chs, hdc in 3rd ch from hook. Hdc in ea ch st across. <You should have 24 sts, not including skipped chs.>
Rows 2-16: Ch 2, turn. (Ch 2 does not count as a stitch here and throughout.) Hdc in same st, *hdc in BLO of nxt st, hdc in FLO of nxt st;* repeat from * to * across to last st, hdc in last st. <You should have 24 sts, not including beg ch-sp.>
After blocking, swatch should measure 6” (15.2 cm) wide by 7.4” (18.8 cm) long. If your swatch does not match these finished measurements or the pattern gauge measured in the center of the swatch, please adjust your hook size to get the correct gauge.
Crimson Cardigan Instructions
Notes: Cardigan is worked from the top down, with raglan shaping. We will begin at the neck edge, adding stitches for the back, sleeves, and fronts of the cardigan as we go to create the yoke of our sweater. The shaping for the v-neck is also included in this section. Once we have finished the yoke, we will separate the sleeve stitches from the stitches of the fronts and back, and continue working across those sections to add length to the cardigan body. A band of ribbing is then added to the cardigan hem. Then, we will crochet around the sleeve openings to add our sleeves. We will finish the cardigan by working a band of ribbing along the fronts and neck edge of the cardigan. This ribbing will also include the buttonholes.
This pattern begins with a row of foundation single crochet instead of a foundation chain. The foundation single crochet is simple to work, and makes the foundation chain and the first row of single crochet at the same time. The foundation edge, when worked in this way, has much more stretch and flexibility than a regular foundation chain. This will make the neck edge more flexible, and will be much easier to work into when we add our neck ribbing.
Ch 2. Fsc in 2nd ch from hook, work 49 (49, 53, 53, 57, 57, 61, 61, 65) more Fsc. <You should have 50 (50, 54, 54, 58, 58, 62, 62, 66) sts, not including beg ch-sp.>
Row 1: Ch 2, turn. (Ch 2 does not count as a stitch here and throughout.) (Hdc, ch 1, hdc) in same st, *hdc in BLO of nxt st, hdc in FLO of nxt st;* repeat from * to * 3 more times, (hdc, ch 1, hdc) in nxt st. Repeat from *to* until 10 sts remain, (hdc, ch 1, hdc) in nxt st, repeat from *to* to last st, (hdc, ch 1, hdc) in last st. <You should have 58 (58, 62, 62, 66, 66, 70, 70, 74) sts.>
Row 2: Ch 2, turn, 2 hdc in same st, (hdc, ch 1, hdc) in nxt ch-1 sp, [*hdc in FLO of nxt st, hdc in BLO of nxt st;* repeat from *to* to nxt ch-1 sp, (hdc, ch 1, hdc) in ch-1 sp] 3 times, 2 hdc in last st. <You should have 68 (68, 72, 72, 76, 76, 80, 80, 84) sts.>
Row 3: Ch 2, turn, 2 hdc in same st, hdc in BLO of nxt st, hdc in FLO of nxt st, (hdc, ch 1, hdc) in nxt ch-1 sp. [*Hdc in BLO of nxt st, hdc in FLO of nxt st; repeat from *to* to nxt ch-1 sp, (hdc, ch 1, hdc) in ch-1 sp] 3 times. Hdc in BLO of nxt st, hdc in FLO of nxt st, 2 hdc in last st. <You should have 78 (78, 82, 82, 86, 86, 90, 90, 94) sts.>
Row 4: Ch 2, turn, 2 hdc in same st, [*hdc in FLO of nxt st, hdc in BLO of nxt st;* repeat from *to* till you reach nxt ch-1 sp, (hdc, ch 1, hdc) in ch-1 sp] 4 times. Repeat from *to* to last stitch, 2 hdc in last st. <10 sts increased.>
Row 5: Ch 2, turn, 2 hdc in same st, [*hdc in BLO of nxt st, hdc in FLO of nxt st;* repeat from *to* till you reach nxt ch-1 sp, (hdc, ch 1, hdc) in ch-1 sp] 4 times. Repeat from *to* to last stitch, 2 hdc in last st. <10 sts increased.>
Repeat Rows 4-5; 4 (5, 6, 7, 8, 9, 10, 11, 12) more times. Repeat Row 4 once more. <You should now have 188 (208, 232, 252, 276, 296, 320, 340, 364) sts.>
We will now stop adding stitches for the v-neck and only continue adding stitches at the raglan lines.
Row 6: Ch 2, turn, hdc in same st, [*hdc in BLO of nxt st, hdc in FLO of nxt st;* repeat from *to* till you reach nxt ch-1 sp, (hdc, ch 1, hdc) in ch-1 sp] 4 times. Repeat from *to* to last st, hdc in last st. <8 sts increased.>
Row 7: Ch 2, turn, hdc in same st, hdc in BLO of nxt st, [*hdc in FLO of nxt st, hdc in BLO of nxt st;* repeat from *to* till you reach nxt ch-1 sp, (hdc, ch 1, hdc) in ch-1 sp] 4 times. Repeat from *to* to last 2 sts, hdc in FLO of nxt st, hdc in last st. <8 sts increased.>
Repeat Rows 6-7; 0 (0, 0, 1, 1, 1, 1, 2, 2) more times. <You should now have 204 (224, 248, 284, 308, 328, 352, 388, 412) sts.>
Separate Sleeves & Body
Row 8: Ch 2, turn, hdc in same st, [*hdc in BLO of nxt st, hdc in FLO of nxt st;* repeat from *to* till you reach nxt ch-sp, hdc in ch-sp, ch 4, sk all sts along nxt side of piece, hdc in nxt corner ch-sp] 2 times. Repeat from *to* to last st, hdc in last st. <You should have 132 (144, 160, 180, 196, 208, 224, 244, 260) sts.>
Row 9: Ch 2, turn, hdc in same st, hdc in BLO of nxt st, [*hdc in FLO of nxt st, hdc in BLO of nxt st;* repeat from *to* to ch-4 sp, hdc in ea of nxt 4 chs] 2 times. Repeat from *to* to last 2 sts, hdc in FLO of nxt st, hdc in last st. <You should have 132 (144, 160, 180, 196, 208, 224, 244, 260) sts.>
Row 10: Ch 2, turn, hdc in same st, *hdc in BLO of nxt st, hdc in FLO of nxt st;* repeat from *to* to last st, hdc in last st. <You should have 132 (144, 160, 180, 196, 208, 224, 244, 260) sts.>
Repeat Row 10; 24 more times. Do not tie off. Continue to Ribbing instructions.
Ribbing
Row 1: Ch 11. Sk 1st ch, sc in 2nd ch from hook, sc in nxt 9 chs. <You should have 10 sts, not including beg ch-sp.>
Row 2: Sl st in nxt 2 sts of cardigan hem, turn. Sk 2 sl sts just made, sc in BLO of nxt 10 sts. <You should have 10 sts, not including sl sts.>
Row 3: Ch 1, turn. Sc in BLO of same st and in BLO of nxt 9 sts. <You should have 10 sts, not including beg ch-sp.>
Repeat Rows 2-3 until you have worked your way around the cardigan hem and have reached the other end of the last row of the cardigan body, ending with Row 2. Tie off.

Sleeves
With back of last row around sleeve opening facing you, join yarn in 3rd ch of ch-4 sp at underarm.
Round 1: Ch 2, hdc in same st as join, hdc in nxt ch st, hdc in nxt ch-1 sp from last row around sleeve opening. Working around sleeve opening, *hdc in BLO of nxt st, hdc in FLO of nxt st* around to nxt ch-1 sp from last round of sleeve opening, hdc in ch-1 sp. Hdc in nxt 2 chs of ch-4 sp at underarm. Join with invslst in top of first hdc of round. <You should have 46 (50, 54, 62, 66, 70, 74, 82, 86) sts, not including beg ch-sp or invslst.>
Round 2: Ch 2, turn, *hdc in FLO of nxt st, hdc in BLO of nxt st* around. Join with invslst in top of first hdc. <You should have 46 (50, 54, 62, 66, 70, 74, 82, 86) sts, not including beg ch-sp or invslst.>
Repeat Round 2; 21 (23, 21, 18, 18, 17, 15, 14, 12) more time(s).
Round 3: Ch 2, turn, hdc2tog, *hdc in FLO of nxt st, hdc in BLO of nxt st* around to last 2 sts, hdc2tog. Join with invslst in top of first hdc2tog. <2 sts decreased.>
Round 4: Ch 2, turn, hdc2tog, *hdc in BLO of nxt st, hdc in FLO of nxt st* around to last 2 sts, hdc2tog. Join with invslst in top of first hdc2tog. <2 sts decreased.>
Repeat Rounds 3-4; 3 (3, 4, 6, 6, 7, 8, 9, 10) more times. <You should have 30 (34, 34, 34, 38, 38, 38, 42, 42) sts, not including beg ch-sp or invslst.>
Cuff Ribbing
Row 1: Ch 9. Sk 1st ch, sc in 2nd ch from hook, sc in nxt 7 chs. <You should have 8 sts, not including beg ch sp.>
Row 2: Sl st in nxt 2 sts of last round of sleeve, turn. Sk 2 sl sts just made, sc in BLO of nxt 8 sts. <You should have 8 sts, not including sl sts.>
Row 3: Ch 1, turn. Sc in BLO of same st and in BLO of nxt 7 sts. <You should have 8 sts, not including beg ch-sp.>
Repeat Rows 2-3 until you have worked your way around the sleeve cuff and have reached the last stitch of the last round of the sleeve, ending with Row 2. Tie off, leaving a tail, and whip stitch the foundation edge of Row 1 of the cuff ribbing to the top of the last row of cuff ribbing. Weave in ends.
Repeat instructions for sleeve at other armhole to create the second sleeve.
Button Band
Join yarn at bottom corner of right front (right front of cardigan when worn).
We will be working a band of ribbing along the right front edge, around the back neck edge, and down the left front edge. Buttonholes will also be created in this band of ribbing. We want to create a ribbing that lays flat, and does not flare out or shrink the edge. If you join the rows to the cardigan edge too closely together, the band will flare out. If you join the rows to the cardigan edge too far apart, the band will pull on the cardigan edge and cause it to shrink.
I recommend joining 2 sc rows per row of hdc from the cardigan body. If your button band seems to be flaring or shrinking the edge, feel free to unravel and try again, joining the sc rows to the ends of the hdc rows at a different spacing. The goal is to make the button band lay flat, and to make the top buttonhole approximately line up with the base of the v-neck on the cardigan front.
Row 1: Ch 9. Sk 1st ch, sc in 2nd ch from hook, sc in nxt 7 chs. <You should have 8 sts, not including beg ch-sp.>
Row 2: 2 sl sts in cardigan front edge, turn. Sk 2 sl sts just made, sc in BLO of nxt 8 sts. <You should have 8 sts, not including sl sts.>
Row 3: Ch 1, turn. Sc in BLO of same st and in BLO of nxt 7 sts. <You should have 8 sts, not including beg ch-sp.>
Row 4: 2 sl sts in cardigan front edge, turn. Sk 2 sl sts just made, sc in BLO of nxt 2 sts. Ch 3, sk 3, sc in BLO of nxt 3 sts. <You should have 8 sts,including the 3 chs in the middle of the row, but not including sl sts.>
Row 5: Ch 1, turn. Sc in BLO of same st and in BLO of nxt 2 sts. Sc in ea of nxt 3 ch sts, sc in BLO of nxt 2 sts. <You should have 8 sts, not including beg ch-sp.>
*Repeat Rows 2-3; 7 (7, 7, 6, 6, 6, 6, 6, 6) times, repeat Rows 4-5 once.* Repeat from *to* 3 (3, 3, 4, 4, 4, 4, 4, 4) more times. The last buttonhole (rows 4-5) should end up approximately at the base of the v-neck of the cardigan front.
Continue repeating rows 2-3 until your current row is about 1.5” from the corner of the back neck, where the right side of the back (when worn) meets the sleeve sts, ending with Row 3.
Row 6: 3 sl sts in cardigan neck edge, turn. Sc in BLO of nxt 8 sts. <You should have 8 sts, not including sl sts.>
Row 7: Ch 1, turn. Sc in BLO of same st and in BLO of nxt 7 sts. <You should have 8 sts, not including beg ch-sp.>
Repeat Rows 6-7 until your current row is about 1.5” past this corner of the back neck.
Continue repeating Rows 2-3 until your current row is about 1.5” from the corner of the back neck, where the left side of the back (when worn) meets the sleeve sts, ending with Row 3.
Repeat Rows 6-7 until your current row is about 1.5” past this corner of the back neck.
Continue repeating Rows 2-3 along the left front edge (left front when worn) until you reach the bottom corner of the left front. Tie off, weave in ends.
To Block: (video tutorial here)
For natural fibers, pin project out on foam blocking mats. Spray with water until fully saturated, allow to dry.
OR
For acrylic fibers, pin project out on an ironing board or several layers of towels. Hold a steaming iron 2-3” over the surface of the fabric, making sure all of the fabric is penetrated by the steam. Allow to cool / dry.
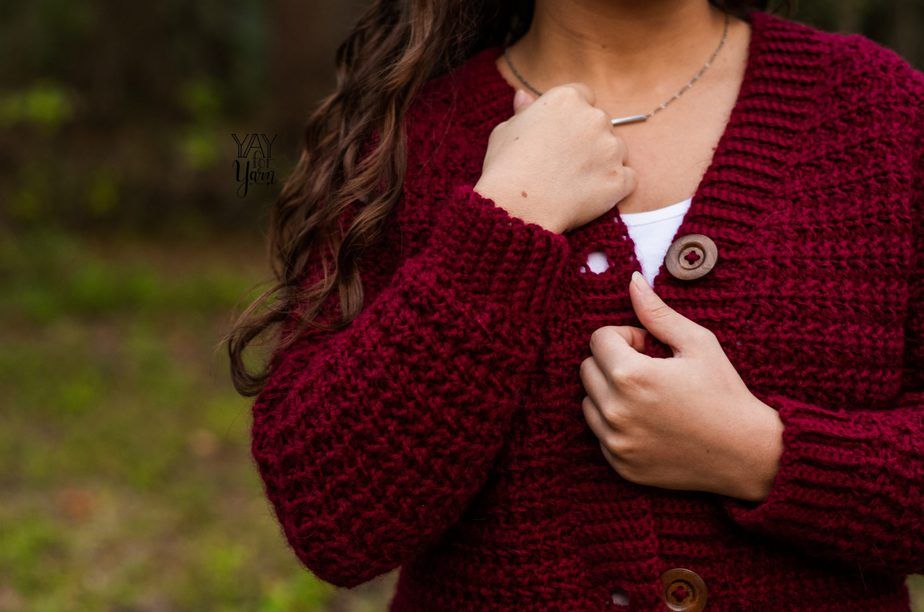
Adding Buttons
Lay cardigan out on a flat surface, overlapping and aligning the front button bands. The button band on the side with the buttonholes should be on top.
With a separate length of yarn for each button, use your yarn needle to sew the buttons onto the button band on the side without buttonholes. The buttons should be aligned with the buttonholes on the other side.
To determine the button placement, I prefer to overlap the button bands and insert my fingertip through one of the buttonholes, temporarily marking the placement of the button on the button band underneath without the buttonholes. Then, when the button band with buttonholes is lifted a little, you can see the spot on the other button band where the button should be.
I recommend sewing on the top and bottom buttons first, and then spacing the remaining buttons in between according to the positions of the buttonholes in the other button band.
After sewing on each button, secure with a knot and weave in ends.
Enjoy your finished Crimson Cardigan!

This pattern is intended for your personal use only. You may not share it, copy it, sell it, give it away, or mass-produce the finished product. However, you may sell the finished items on a small scale, as long as you convey in your item description that you used a Yay For Yarn pattern.
Yay For Yarn Copyright© 2021 – Current. All patterns and photos are owned by Yay For Yarn.
Pin the image below to save this project for later!

")


Can this be made without buttons?
Hi Sandra. Yes, you can make this cardigan without buttons. When you work the button band, just skip Rows 4-5, and the part that says to “*Repeat Rows 2-3; 7 (7, 7, 6, 6, 6, 6, 6, 6) times, repeat Rows 4-5 once.* Repeat from *to* 3 (3, 3, 4, 4, 4, 4, 4, 4) more times. The last buttonhole (rows 4-5) should end up approximately at the base of the v-neck of the cardigan front.” You will just continue repeating Rows 2-3 all along that first side edge of the cardigan front, without making the buttonholes in Rows 4-5. Does that make sense? I hope this helps!
Hello, I have a question on row 2. In row 1 we are finishing with hdc ch 1 hdc, and in the 2 row we are staring with 2x hdc. Should I insert that in the chain space and the next chain space is shifted? If not, where should I put 2x hdc?
Hi Kate. In this pattern, the chain 2 at the beginning of each row is NOT counted as a stitch, so the first stitch of each row will be worked into the same stitch your chain is coming from. In Row 2, you’ll start by putting 2 hdc stitches into the very first hdc from the row below, where your chain is coming from (this is the last hdc that was worked in the previous row). Then, you’ll work “hdc, ch 1, hdc” into the chain space. Does that make sense? If you have any more questions, please let me know.
So I’m at the bottom of the cardigan now. I’d like to add quite a bit more length to the body. I have a very long body so I need to add quite a few more rows. I was trying to work out the pattern count but this is only the second thing I’ve ever crocheted so I’m struggling to work out how many rows to add to make sure the button holes still line up correctly. As I’m making the size large I was thinking of adding 9 more rows is this right?
Hi Danielle! If you’d like to add length, I would suggest adding 7 extra rows. If you would like to add more length than that, add 14 extra rows. Keep in mind that the ribbing along the bottom of the sweater will add about 2 1/2 inches to the length. I hope this helps! If you have any more questions, just let me know. 🙂
I’m currently working on the top body (row 7) the instructions are different to your video, also in your video you don’t mention doing a hdc, ch1, hdc into that first chain space corner, you only say hdc. Should it be a hdc, ch1, hdc or just a hdc? Also you start off with FLO first but the pattern says to do BLO first. I’m kind of stuck now and can’t do anymore because I don’t want to mess the whole thing up.
Hi Danielle. You are correct, in the video, there is a short clip of the beginning of row 7 that is shown twice. Evidently, I had begun to explain row 7, and had decided to start the row over and explain it verbally again in a slightly different way. Somehow, a part of the first take for row 7 remained in the final video. I am so sorry for any confusion! Yes, you will hdc, ch 1, hdc in the corner chain space as the written instructions specify. The pattern instructions for row 7 say to work a half-double crochet into both loops of the same stitch the chain is coming from, and then work the next stitch in BLO. The back loop and front loop stitches will line up differently at the ends of the rows from now on, because we’re not working increases at the beginning and end of the row, but the actual texture of the stitch pattern will remain the same. I hope this helps! If you have any more questions, just let me know. 🙂
Thank you for the clarification. You say the pattern says to work in the FLO first but I’ve just gone back and re-read it and it says BLO first. Although the BLO stitch isn’t within the repeat markers(*) so I’m assuming after I get to the first chain space I then start working FLO for the remainder of the row? Or should that BLO part not be written in the pattern?
Sorry for any confusion. Perhaps there was a typo in my reply to your comment. The first hdc in the row is worked in both loops, then the next in BLO. Then the repeat starts with FLO, BLO, FLO, BLO, etc until you get to the next ch-1 space. This is because, for the stitch pattern to line up correctly, you need to end on BLO when you reach the chain space. So the one stitch in BLO before beginning the repeat is correct. If you ever have any questions about the video versus the written instructions, always follow the written instructions. The pattern instructions have been edited by a professional crochet pattern technical editor to ensure they are error-free. I hope this helps!
That’s amazing thank you. I’m so excited to get it finished, it’s looking beautiful already.
Thank you!!! Wonderful work and the explanation too !!!
Hi! Iam gaving a problem chosing the most size suitable for me ! I didn’t understand the instructions .. after measuring the back and thr full what should I do?? Thank you
Hi, I’m doing the Large size and the sleeves are too short. I’ve read the comments here and I see that others have had this problem. I can’t work out why in this size row 2 is repeated only 7 times compared to 15 times for the smaller sizes? There isn’t a compensating row as there is for other sizes.
Hi Ruth. The Larger sizes require more decrease rounds to get the circumference tapered down to the correct wrist size, which is why there are fewer straight rounds in between. This is necessary to make the tapered shape of the sleeve, as the decrease rounds need to begin higher up on the sleeve on the larger sizes. If you need to add length to the sleeve, feel free to repeat round 2 a few extra times as needed to add however much length you like to the sleeve. If you have any more questions, just let me know. I am happy to help!
Hi! Iam gaving a problem chosing the most size suitable for me ! I didn’t understand the instructions .. after measuring the back and thr full what should I do?? Thank you
Hi Amy. First, you’ll need to take your full bust measurement, and compare it to the list of measurements in the section titled, “To Fit Bust”. See which number that is in the list. Anytime you see a list of numbers given in the pattern, the numbers for each size are listed like this: X-Small (Small, Medium, Large, X-Large, 2X, 3X, 4X, 5X). So the X-Small is always the first number in the list, the Small is the second, the Medium is the third number, and so on. In the “To Fit Bust” section, the numbers are listed 30 (34, 38, 42, 46, 50, 54, 58, 62) inches. So a person with a 30″ bust will need the X-Small, a person with a 34″ bust will need the Small, a person with a 38″ bust will need the Medium, and so on. If a person’s bust measurement is closest to 46″, they’ll need to choose the X-Large size, and every time a list of numbers is given in the pattern, they’ll ignore the rest of the numbers and only follow the 5th number in the list, since the X-Large is the 5th size. Does that make sense? Please let me know if you have any more questions. I am happy to help!
I am making XL and had the proper number of stitches at the end of Row 7 (308), but I keeping coming up with two extra stitches at the end of Row 8. I am following the pattern perfectly and have done it twice now and I end up with 198 every time. I am only putting one hdc at the beginning and end, as well as in the ch1 spaces. Is it possible the count is off? Please help me, I can’t figure out where I am going wrong…
Hi Alison. I’m not sure where the problem would be if you have 2 extra stitches. The pattern has been edited by a professional crochet pattern editor to make sure it is mathematically accurate. If you’re coming up with extra stitches, I would guess that the issue is either at the underarm areas or at the beginning and end of the row. If you’d like some help troubleshooting, you are welcome to send me photos of your piece so I can help figure out where those 2 extra stitches are coming from. You can send the photos to blogger[at]yayforyarn.com, and I will be happy to help!
I have not been able to find the tutorial video showing Front loop only and back loop only. . I need to know which loops are “front loop ” and “back loop ” . On the HDC. there are three loops to chose from. I am using the two most forward loops as front and back. This leaves the very back (3rd) loop alone. Is this correct? Also, you offer two ways to measure the gauge swatch: 16 st =4″ and 13 rows =6″ and blocked “swatch” should measure 6″ wide and 7.4″ long. Should both of these be true? I am still trying to find which size hook I need to use. I have learned in the past that gaugeis crucial. Thanks in advance for your help.
Hi Betty! You can find the tutorial for working in the back loop or front loop only here. Yes, you only need to use the two loops on top of the stitch, not the third loop. And yes, if your stitch and row gauge matches the 16 st =4″ and 13 rows =6″ after blocking, then your finished swatch will also measure 6″ wide and 7.4″ long if you follow the gauge swatch instructions. Those are just two ways of describing the same gauge measurement. I hope this helps, and I hope your cardigan turns out great!
I am crocheting size large but I think the sleeves are very baggy at the top and perhaps little short. I am just ready to crochet cuff ribbing on first sleeve and wonder how to correct before I move on. I am size 16 UK and I think size medium would have been big enough for me but I do not want to rip all out and start over again
Hi Rhonda! If you’d like to add a bit of length to the sleeves, there are two possible ways to do that:
1. You could unravel the sleeve back to the last time you worked Round 2, and repeat Round 2 a few extra times, then finish the sleeve the rest of the way according to pattern instructions.
2. Or, you could try repeating Round 2 a few extra times just before working the cuff ribbing. (For best results, I recommend option 1, but if you really don’t want to unravel the sleeve at all, this could be a possible way to add length.)
I hope this helps, and I hope your cardigan turns out great!
I want to add pockets. Just simple square ones. Can you give directions for pockets?
Hi Kelley. If you want to add pockets, I would suggest making a square, following the instructions for the gauge swatch as a guidelines. You can make it smaller if you like, just chain an even number of stitches to start with. Then, if you stop before the piece has enough rows to be square, you can add ribbing along the top edge of the pocket just like when working the hem ribbing of the cardigan. You can make the ribbing narrower if you like as well, by working fewer stitches for the ribbing. I hope this helps, and I hope your cardigan turns out great!
Hey there,
I am struggling with the sleeves on a size XL. It says I should start my decrease after only 5xs of rows 2. But that just doesn’t make my sleeve long enough. Is that correct? What am I doing wrong?
Hi Ragan. For the X-Large size, you’ll need to repeat round 2 five more times after you worked it the first time, then begin working rounds 3 and 4. Rounds 3 and 4 are repeated as a pair (alternating round 3 and round 4) several times, which will add some length. The X-Large skips round 5, and moves on to the cuff ribbing. The cuff ribbing will add about 2″ of length to the sleeve. I would suggest working through the decrease rounds before deciding whether the sleeve is long enough, keeping in mind that the cuff ribbing will add an additional 2″ of length. The sleeve length is designed according to the Craft Yarn Council’s sizing standards, but everyone is different and some may prefer to adjust the sleeve length. If you would like to add a bit of extra length to the sleeve, you can do so by unraveling back to the last round 2 you worked, and repeat round 2 a few extra times, then go ahead and work through the decrease section as written. I hope this helps, and I hope your cardigan turns out great!
Thank you. I added one extra row before doing cuff. I found the button band difficult to get right. I ripped it out about 4 times until I got top button hole positioned correctly. I had considered putting one less button or using a smaller crochet hook but in the end I watched the video very carefully and tried my best. It’s a little bit bulky around neck but hope it wears OK
You’re welcome, Rhonda! I hope you’ll enjoy your finished sweater!
How long are the sleeves supposed to be? I followed the pattern and the sleeves keep coming out too short. I typically crochet tighter so I know I always need to adjust my rows but I’ve had to take the sleeve out 3 times cuz by the time I do the decrease rows and the cuff ribbing it’s STILL too short. Can you help?
Hi Megan! If the sleeves are coming out too short, that could be from tighter gauge, as you mentioned. The height of a row of stitches is determined by the height of the first loop you pull up when making the stitch, and different people do that differently. So your row gauge could be slightly off. Also, the sleeve is designed to come to the wrist according to the Craft Yarn Council’s standard sizing guidelines, but not everyone’s arms are the same length as the “standard” sizing measurements.
If you’d like to adjust the sleeve length, here’s how you can do that. If you have an approximate idea of how much longer you need the sleeve to be, then you can work extra repeats of Round 2 of the sleeve to add that much length. So for example, if you wanted to add 1.5 inches to the sleeve, you would work an extra 1.5 inches of repeating Round 2. That would add length to the sleeve without affecting the decrease rounds at all. Does that make sense?
I hope this helps! Please let me know if you have any more questions. 🙂
Hi, I’m working the large size of the sweater and I’m having an issue with the repeat of rows 4-5. For large it says repeat 7x which would add 14 rows. It says the end result would end in 252 stitches. I even wrote it out and it would end in 242 stitches, please tell me I’m not going crazy…. Should I just do the 15 rows to get the 252 or do I do 14 rows to get 242?
Hi Jessyca! For the size Large, yes, you do repeat Rows 4-5 seven times, which will give you 242 stitches, as you said. But the instructions then say to repeat Row 4 once more after that, which will add another 10 stitches, bringing the total stitch count to 252. I hope this helps, and I hope your cardigan turns out great!
Oh, I totally missed that. ???? I am going crazy. Sorry, and thank you for clarifying.
Hi I’m absolutely in love with how this cardi looks. So much so that I am making it for my outfit for my 20th anniversary. I can not seem to get the 2nd row right. I’m making a 5x and the 2nd row says I should have 8 more stitches. But I’m only finding 4? Do the chain 1 spaces count as a stitch?
Hi Juanita. Yes, the ch-1 spaces at the corners each count as a stitch. I hope this helps!
Hello, I purchased your Crimson Cardigan to make for my Mom. She is asking if it can be made longer. Would it work to just continue to repeat row 10 to the desired length? And if so, how would I adjust for the ribbing and buttons? I am making the XL size. Thank you for your help.
Hi. Yes, you can lengthen by repeating row 10. You’ll want to stop about 2.5″ from the desired length to leave room for the ribbing at the hem. As for the button band, that will depend on how much longer you’re going to make the sweater. You may need to add an additional buttonhole. I would recommend following the button band instructions as written for the buttonhole section, stopping when you reach the base of the v-neck. The goal is to get the last buttonhole to line up with the base of the v-neck. If the last buttonhole is too high, try repeating rows 2-3 fewer times between buttonholes. If the last buttonhole isn’t quite high enough, try repeating rows 2-3 an extra time between buttonholes. You don’t want the buttonholes spaced too far apart, but you’ll likely need to unravel and retry the buttonhole section of the button band until the buttonholes line up correctly (last buttonhole at the base of the v-neck). I hope this helps!
hello, me and my mother have tried to do this pattern in the 3rd size over and we both come up with the same problem. in row 3 it says to end up with 82 stitches, but the only way to make the row work out is to use the chain stitch at the end because after the last corner, you need 3 stitches left to make the pattern work, but there is only 2 stiches left unless you use up that chain from the previous row…. please help! 🙂
Hi Leslie. If you only have 2 stitches left to work into, it may be that the first stitches of row 2 are worked incorrectly. At the beginning of row 2, it says, “Ch 2, turn, 2 hdc in same st, (hdc, ch 1, hdc) in nxt ch-1 sp”. If you did not work 2 hdc in the same stitch your chain was coming from, that would be the most likely cause of not having enough stitches to work into at the end of row 3. If the piece correctly has the 2 hdc from the beginning of row 2 and the hdc immediately following (the first hdc of the corner), then there will be 3 stitches left to work into at the end of row 3 after working the last corner. Does that make sense? Please let me know if you have any more questions. I am happy to help!
thanks for getting back! unfortunately no matter how many times we do: from beg. to row 2 the math just doesn’t work out. we’ve even diagramed it 5 times… currently if u don’t count the turning chain then row 2 is 61 stitches and row 3 is 71…. i even gave up and added another foundation stitch and redid it and still the math doesn’t work out. can u give more details on where to put the stitches on the tops of the (hdc, chain space 1, hdc), maybe that’s where the issue is? or maybe the math just is off on the pattern? please let me know what think. we’ve spent over 15 hours trying to figure this issue out and we can not come up with the answer. thanks. *maybe list the number of stitches that are supposed to be btw the corner stitches instead of saying “repeat”? that may also help decipher what’s going on? lol i dunno. we are at a loss…
Hi Leslie. Here’s a breakdown of how these rows should work for the third size (Medium). These do not mention or specify the front loop and back loop stitches, just the stitch counts in between increase instructions.
Row 1: (hdc, ch 1, hdc), 8 hdc, (hdc, ch 1, hdc), 34 hdc, (hdc, ch 1, hdc), 8 hdc, (hdc, ch 1, hdc). 62 sts.
Row 2: 2 hdc increase, (hdc, ch 1, hdc), 10 hdc, (hdc, ch 1, hdc), 36 hdc, (hdc, ch 1, hdc), 10 hdc, (hdc, ch 1, hdc), 2 hdc increase. 72 sts.
Row 3: 2 hdc increase, 2 hdc, (hdc, ch 1, hdc), 12 hdc, (hdc, ch 1, hdc), 38 hdc, (hdc, ch 1, hdc), 12 hdc, (hdc, ch 1, hdc), 2 hdc, 2 hdc increase. 82 sts.
Does that help?
Having the same problem with the extra large. Always come up short when doing row 2&3, even though row one is correct.
Hi Carole. The numbers of stitches in between the corner increases works out very similarly for the extra large. The only difference between the Medium and the XL at this point in the pattern is that the XL has 4 more stitches between the 2nd and 3rd corners. Here’s a breakdown of how these rows should work for the XL. These do not mention or specify the front loop and back loop stitches, just the stitch counts in between increase instructions.
Row 1: (hdc, ch 1, hdc), 8 hdc, (hdc, ch 1, hdc), 38 hdc, (hdc, ch 1, hdc), 8 hdc, (hdc, ch 1, hdc). 66 sts.
Row 2: 2 hdc increase, (hdc, ch 1, hdc), 10 hdc, (hdc, ch 1, hdc), 40 hdc, (hdc, ch 1, hdc), 10 hdc, (hdc, ch 1, hdc), 2 hdc increase. 76 sts.
Row 3: 2 hdc increase, 2 hdc, (hdc, ch 1, hdc), 12 hdc, (hdc, ch 1, hdc), 42 hdc, (hdc, ch 1, hdc), 12 hdc, (hdc, ch 1, hdc), 2 hdc, 2 hdc increase. 86 sts.
Does that help?
I have ripped out these rows several times as each time I came up with 4 stitches short of given number. I even watched the video and could not see how I missed 4 stitches in each row. Then I realized that the chains at each raglan corner must be counted as stitches
Yes, the chain stitches at the corners are counted as stitches in this pattern, since they are worked into on the following row. I hope your sweater turns out great!
Hello please help, im making medium size. By row 5 i have 102 stitches. From row 5 we are to repeat row 4 & 5 6 times more, which will give a total of 162 stitches. Adding raw 4 one more time it should come to 172 stitches. But the guide is saying 232. I don’t understand how please help
Hi Brenda. Yes, for the size Medium, you should have 102 stitches at the end of row 5. When you repeat rows 4 and 5 six more times, that means you’ll repeat the pair of rows six more times, for a total of 12 additional rows worked. So both row 4 and row 5 each add 10 stitches. Each time you repeat the pair of rows, you’re adding 20 stitches total (10 stitches on each row). Repeating rows 4 and 5 six more times will be a total of 12 more rows, with 10 stitches added on each row, that is 120 stitches added. 102 + 120 = 232 stitches total after repeating that set of rows. Does that make sense? I hope this helps!
Hi I’m just wondering how I would go about increasing the length of the sleeves. I have really long arms and I’m just guessing that like most average sized things they won’t be quite long enough for my monkey arms lol
Hi Ashlie. Yes, you could increase the sleeve length. To do this, you can repeat round 2 of the sleeve as many additional times as you like. I hope this helps!
Muchísimas gracias por tu total falta de egoísmo para que pidamos tejer tus bellas prendas. Te felicito y te agradezco de corazón! Te escribo desde Argentina y aquí no tenemos posibilidad de comprar en Etsy u otros sitios!
Yo no sé inglés y mi hijo me ayudo mucho, siempre me prometo al empezar el año aprender ese idioma que amo, porque desde muy chica me encanta la música Country y me gustaría mucho entender las letras!
Otra vez muchas gracias!
Un saludo enorme!!!
Thank you for this lovely pattern and video, I’m having a little problem with the pattern and hope you can help me.
After increasing in the first row, I have only added an extra four stitches, the pattern states I should have an extra eight stitches.
Am I missing something?
When I watched the video it seems you too only increase an extra four stitches, I think.
Should I just add an extra four fsc stitches on the foundation row?
This is only my second garment, and I’d like to get it right. I have made heaps of blankets, so not a total beginner.
It’s beautifully explained in the video, and a lovely pattern I can’t wait to get on with it.
Thank you
Hi. Each time you work “hdc, ch 1, hdc” into a stitch, that adds 2 stitches. In this pattern, the ch-1 space is always counted as a stitch. So because the “hdc, ch 1, hdc” is 3 stitches, and you work that set of stitches into one stitch from the previous row, 2 stitches are added. In the raglan section of the sweater, the “hdc, ch 1, hdc” is worked 4 times total in each row. You should have 4 corners to the piece, with a ch-1 space in each corner. Some rows actually add more than 8 stitches to the total stitch count, because the rows begin and end by putting 2 hdc into the first stitch of the row. (This adds stitches to the ends of the row, making the v-neck.) So no, you cannot solve the issue by adding 4 stitches to the foundation row, as that would throw off the raglan shaping and all of the following rows rely on Row 1 being worked as written. If you are counting the ch-1 spaces as stitches, and you cannot figure out why your stitch count still doesn’t match, you are welcome to send me a photo at blogger[at]yayforyarn.com and I will be happy to help troubleshoot. I hope this helps, and I hope your cardigan turns out great!
Thank you so much for your thorough and super quick response.
I was having a total duh moment, I wasn’t counting the chains as stitches, it seems I am still a beginner!
It all makes sense now, happy dance! Guess what I’m doing this evening, yay!
THANK YOU!!!! I have been searching for someone to give detail instructions on how to create button holes on sweaters/cardigans and you gave an excellent description on how to do so!!! Thank you for the video instructions it was very helpful.
I have just purchased this pattern, it is telling me that the download is in my email but nothing is there.
Hi Wendy. I’m sorry you’re having trouble with the download. Please send me a quick email at blogger[at]yayforyarn.com with your order details (email address, where you purchased the pattern, etc). I am happy to help!
this is georgous i cant wait to get started
You make crocheting look so much fun. I only crochet afghans. I’ve tried a couple of dog sweaters but when I was done they were so heavy, my daughter’s toy poodle looked like she was being punished. I am going to have to try this! Thank you for taking the time to make a video to explaining how to make itand supplying links to other tips