

Worked on the bias from corner-to-corner, this soft washcloth features a diagonal stripe pattern with a textured twist. Crochet it in the stripe pattern shown, your own stripe pattern, or no stripes at all!
Table of Contents
Corner to Corner Moss Stitch Washcloth Crochet Pattern
by Yay For Yarn
Skill Level: Advanced Beginner
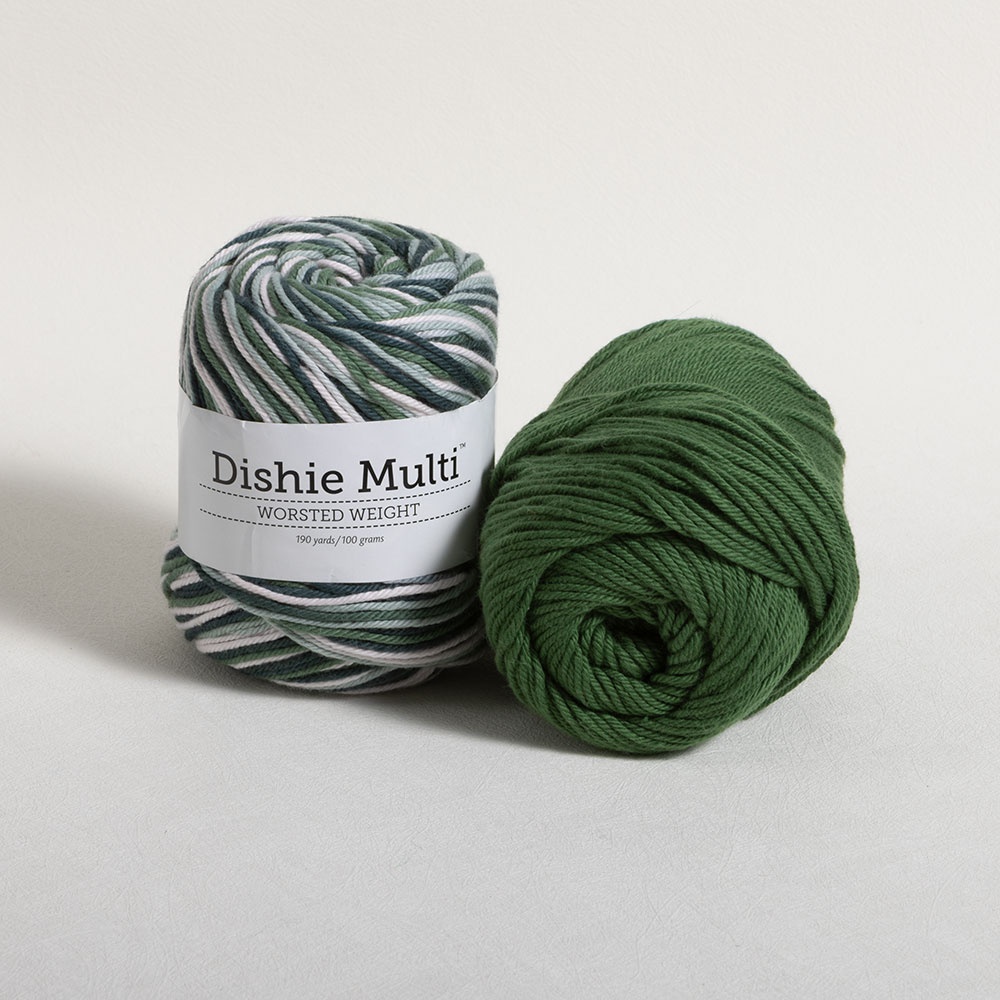
Yarn:
Peaches & Creme, #4 Worsted Weight, 100% Cotton Yarn;
80 yards in “Dark Gray”
50 yards in “White”
You Will Also Need:
US Size H (5.0 mm) crochet hook (or size needed to obtain gauge)
Scissors
Yarn Needle or Blunt Tapestry Needle
Ruler (for measuring gauge)
Shop Supplies for this Project
Dishie Cotton Yarn – Crochet.com
Buy Now →
Sugar ‘n’ Cream Cotton Yarn 2oz Skeins – Amazon
Buy Now →
Sugar ‘n’ Cream Cotton Yarn Cones – Amazon
Buy Now →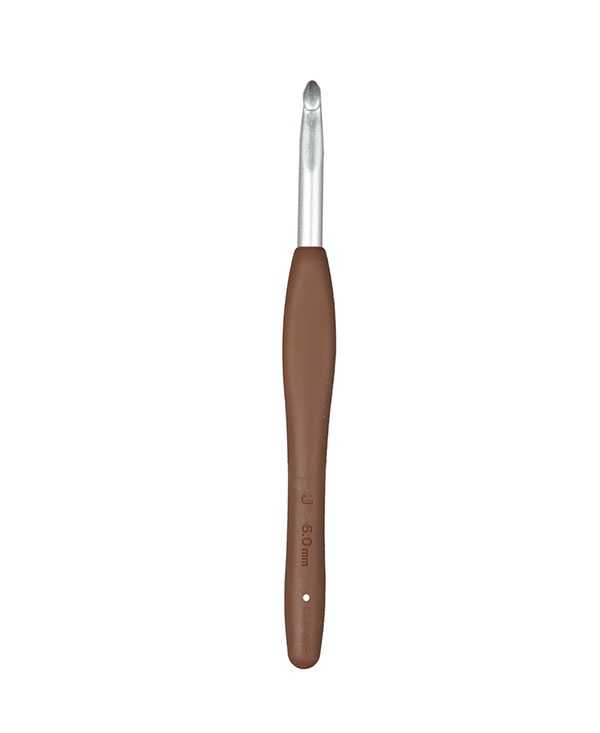 Buy Now →
Knitter’s Pride Rainbow Folding Scissors
Buy Now →
Chibi Metal Yarn Needles – Amazon
Buy Now →
Gauge: 19 sts = 4” (10 cm) in Moss Stitch, 19 rows = 4” (10 cm) in Moss Stitch.
Finished Size: 11 ¼” (28.5 cm) wide by 11 ¼” (28.5 cm) tall.
Abbreviations:
st: stitch
sts: stitches
beg: beginning
sp: space
sp: spaces
sk: skip
nxt: next
sl st: slip stitch
ch: chain
sc: single crochet
hdc: half-double crochet
Corner to Corner Moss Stitch Washcloth Instructions
With Dark Gray, ch 3.
Row 1: Sk 1st 2 chs (2 skipped chs count as 1 st), (sc, ch 1, sc, hdc) in 3rd ch from hook. You should have 5 sts, including beg ch sp and ch-1 sp.
Row 2: Ch 2, turn, sc in same st. Ch 1, sk 1, sc in nxt ch-1 sp. Ch 1, sk 1, (sc, hdc) in top of beg ch sp from row below. You should have 7 sts, including beg ch sp and ch-1 sps.
Row 3-12: Ch 2, turn, sc in same st. *ch 1, sk 1, sc in nxt ch-1 sp*. Repeat between *and* across to last 2 sts. Ch 1, sk 1, (sc, hdc) in top of beg ch sp from row below. By the end of Row 12, you should have 27 sts, including beg ch sp and ch-1 sps. Change to White. As you work the next stripe, you will “carry” the unused gray yarn up the edge of the work by twisting the working yarn with the unused gray yarn at the beg / end of every row that begins or ends on that edge.
Row 13-22: Repeat Row 3. By the end of Row 22, you should have 47 sts, including beg ch sp and ch-1 sps. Change to Dark Gray. As you work the next stripe, you will “carry” the unused white yarn up the edge of the work by twisting the working yarn with the unused white yarn at the beg / end of every row that begins or ends on that edge.
Row 23-30: Repeat Row 3. By the end of Row 30, you should have 63 sts, including beg ch sp and ch-1 sps. Change to White.
NOTE: The following stripe will be a single-row stripe of white. If we work that row as normal, we will be at the opposite edge from the gray yarn when we need to change back to gray. To get the gray yarn to the other edge without cutting and re-joining it, we will be crocheting over it on this next row to carry it across to the other side.
Row 31: Repeat Row 3, laying the unused gray yarn across the row and crocheting over it. You should have 65 sts, including beg ch sp and ch-1 sps. Change to Dark Gray. As you work the next stripe, you will “carry” the unused white yarn up the edge of the work by twisting the working yarn with the unused white yarn at the beg / end of every row that begins or ends on that edge.
Row 32: The gray yarn that was crocheted over during the last row will still be visible. Each time you work into a ch-1 sp during this row, be sure to insert the hook into the ch-1 sp AND under the gray yarn that lays across the gray st from last gray row. ch 2, turn. Sk nxt st, sc in nxt ch-1 sp. *Ch 1, sk 1, sc in nxt ch-1 sp*. Repeat between *and* across to last 2 sts. Sk 1, hdc in top of beg ch sp from row below. You should have 63 sts, including beg ch sp and ch-1 sps.
Row 33-39: Ch 2, turn. Sk nxt st, sc in nxt ch-1 sp. *Ch 1, sk 1, sc in nxt ch-1 sp*. Repeat between *and* across to last 2 sts. Sk 1, hdc in top of beg ch sp from row below. By the end of Row 39, you should have 49 sts, including beg ch sp and ch-1 sps. Change to White. As you work the next stripe, you will “carry” the unused gray yarn up the edge of the work by twisting the working yarn with the unused gray yarn at the beg / end of every row that begins or ends on that edge.
Row 40-49: Repeat Row 33. By the end of Row 49, you should have 29 sts, including beg ch sp and ch-1 sps. Change to Dark Gray. As you work the next stripe, you will “carry” the unused white yarn up the edge of the work by twisting the working yarn with the unused white yarn at the beg / end of every row that begins or ends on that edge.
Row 50-60: Repeat Row 33. By the end of Row 60, you should have 7 sts, including beg ch sp and ch-1 sps. On following 3 rows, continue to carry the unused white yarn up the edge of the work.
Row 61: Ch 2, turn, sk 1, sc in nxt ch-1 sp. Ch 1, sk 1, sc in nxt ch-1 sp, sk 1, hdc in top of beg ch sp from row below. You should have 5 sts, including beg ch sp and ch-1 sp.
Row 62: Ch 2, turn. Sk 1, sc in ch-1 sp, sk 1, hdc in top of beg ch sp from row below. You should have 3 sts, including beg ch sp.
Row 63: Ch 1, turn. Sc2tog into sc / beg ch sp. You should have 2 sts, including beg ch sp. The unused white yarn you have been carrying up the edge should now be at the same corner that you finished with.

Edging
Round 1: Ch 1, do not turn. 2 sc in same st. Working into the ends of the rows, *sc evenly across nxt side of washcloth (about 40 to 45 sc). 3 sc in corner of washcloth.* Repeat between *and* 2 more times. Sc evenly across nxt side of washcloth (about 40 to 45 sc). Sl st in beg ch-1 sp. Insert hook into 1st sc of round, yarn over with White yarn, and pull through all loops on hook (like a sl st). You will work the nxt round with White.
Round 2: Ch 1, do not turn. 2 sc in same st. *Sc in ea st across to center st of 3-sc corner from previous round, 3 sc in center st of corner.* Repeat between *and* 2 more times. Sc in ea st across to beg of round. Sl st in beg ch-1 sp. Insert hook into 1st sc of round, yarn over with Gray yarn, and pull through all loops on hook (like a sl st). You will work the final round with Gray. Cut the White yarn, leaving about a 6” tail. On the next round, lay the White tail over the previous round and crochet over it.
Round 3: Ch 1, do not turn. 2 sc in same st. *Sc in ea st across to center st of 3-sc corner from previous round, 3 sc in center st of corner.* Repeat between *and* 2 more times. Sc in ea st across to beg of round. Cut yarn, leaving about a 6” tail. Pull on the current loop on the hook until the end of the yarn comes out. Thread that tail into the eye of your yarn needle. Insert yarn needle from front to back into the 1st sc of round, and pull it through. Insert yarn needle down into top of the last st of the round (same st the yarn tail originally came out of), and pull through. (This technique re-creates the look of the top of a sc, making the join of the round invisible around the edge.) Weave in ends.

For Single-Color Washcloth without Stripes:
Ch 3.
Row 1: Sk 1st 2 chs (2 skipped chs count as 1 st), (sc, ch 1, sc, hdc) in 3rd ch from hook. You should have 5 sts, including beg ch sp and ch-1 sp.
Row 2: Ch 2, turn, sc in same st. Ch 1, sk 1, sc in nxt ch-1 sp. Ch 1, sk 1, (sc, hdc) in top of beg ch sp from row below. You should have 7 sts, including beg ch sp and ch-1 sps.
Row 3-31: Ch 2, turn, sc in same st. *ch 1, sk 1, sc in nxt ch-1 sp*. Repeat between *and* across to last 2 sts. Ch 1, sk 1, (sc, hdc) in top of beg ch sp from row below. By the end of Row 31, you chould have 65 sts, including beg ch sp and ch-1 sps.
Row 32-60: Ch 2, turn. Sk nxt st, sc in nxt ch-1 sp. *Ch 1, sk 1, sc in nxt ch-1 sp*. Repeat between *and* across to last 2 sts. Sk 1, hdc in top of beg ch sp from row below. By the end of Row 60, you should have 7 sts, including beg ch sp and ch-1 sps.
Row 61: Ch 2, turn, sk 1, sc in nxt ch-1 sp. Ch 1, sk 1, sc in nxt ch-1 sp, sk 1, hdc in top of beg ch sp from row below. You should have 5 sts, including beg ch sp and ch-1 sp.
Row 62: Ch 2, turn. Sk 1, sc in ch-1 sp, sk 1, hdc in top of beg ch sp from row below. You should have 3 sts, including beg ch sp.
Row 63: Ch 1, turn. Sc2tog into sc / beg ch sp. You should have 2 sts, including beg ch sp.
This pattern is intended for your personal use only. You may not share it, copy it, sell it, give it away, or mass-produce the finished product. However, you may sell the finished items on a small scale, as long as you convey in your item description that you used a Yay For Yarn pattern.
Yay For Yarn Copyright© 2018- Current. All patterns and photos are owned by Yay For Yarn.
Pin this image to save this pattern for later!

What’s your favorite kind of knitted or crocheted washcloth?
")


Hello, could I make this with super soft yarn instead of cotton?
Hi. Whether you could use another yarn that is not cotton would depend on your use for the finished washcloth. For example, if you’re using acrylic, that cannot be washed in hot water or come into contact with something hot. I personally prefer to use cotton if the cloth will be used for washing or cleaning, as cotton can be washed in hot water to sanitize if needed. I hope this helps!
Hi, thanks for your advice, I will try it out
Hello, would it be possible to make this washcloth with weight three yarn? Do you know how much it would downsize it
Thanks
Juniper
Hi Juniper. You could make this washcloth with #3 weight yarn if you like. I don’t know how much it would downsize the project, as that will depend on your gauge. I would recommend just trying it, and continue to work the rows that add stitches at both ends until one of the short edges of the piece is the width you want the washcloth to be before the edging. You can then start working the decrease rows to make the other side of the washcloth. I hope this helps!
Thanks for the fun pattern! I wanted a smaller washcloth so I varied the number of rows but kept your strip pattern the same. I’ve been wanting to try C2C crochet so a washcloth seemed like a great way to do that. The video was a huge help since I’ve never done C2C so thanks for including that!
How can I make this 60″ x 60″???
My friend wants only one color so that will be easy – it’s the way to reach the larger size that confuses me.
Thank you very much!
Hi Marny. If you want to make this into a blanket, you can do that. Just continue repeating the rows of moss stitch. Then, when the short edges of your piece are large enough, you can begin working the other half of the square, starting with row 31 and row 32. Again, keep repeating the moss stitch rows (row 33) until you have 7 stitches left, and work the remaining rows to finish the corner. If you prefer, I also have a blanket pattern that uses mostly C2C moss stitch, which would also look lovely in one color. You can find that pattern here. I hope this helps!
Thank you for this pattern! I liked it so much I had to turn it into a blanket. I saw all kinds of possibilities in the lines in the pattern. I am going to have to make several to get all the ideas to become reality! I have pictures of the finished product if you would like to see them. It turned out beautiful! I used 2 colors, turquoise and purple. Half of the squares start with turquoise, the other half start with purple. The arrangement creats interesting optical effects as I had hoped it would. I completed the blanket using a core concept of the original dishcloth, carrying the yarn along through the project. The blanket is 4 squares by 4 squares. I was able to create half of the blanket before having to break the yarn. It was a fun challenge to set for myself. I completed the entire project without having to do any sewing! Thank you again!!!
Hello. I would like to make this pattern into a rectangle. Could you please tell me how to decrease one side? I think I made a mistake as all of my increases are 1sc and 1hdc in the last stitch.
Hi Juli! Yes, you can make this as a rectangle. If your increases are working 1 sc and 1 hdc in the top of the turning chain from the previous row, that is correct. To make it into a rectangle, you’ll need to increase at one side and decrease at the other. Place a stitch marker on the side of the piece you want to decrease. On the decrease side, if it’s the beginning of a row, chain 2 and skip a stitch as instructed at the beginning of row 32. If the end of your row is on the decrease side, skip a stitch and hdc in the beg ch sp as instructed at the end of row 32. On the increase side of your piece, continue working the increases as normal. I hope this helps!
To make a rectangle, crochet increases on one side and decreases on the other side. This will grow the pattern equally on each side. Once the desired length is obtained, decrease on both sides to finish.
Love the pattern and would like to make a baby blanket using this pattern. Do you have any suggestions on increasing this pattern for a baby blanket? Thanks
Hi Barb! If you want to make this into a baby blanket, you can do that. Just continue repeating the rows of moss stitch with whatever stripe pattern you like. Then, when the short edges of your piece are large enough, you can begin working the other half of the square, starting with row 31 and row 32. Again, keep repeating the moss stitch rows (row 33) until you have 7 stitches left, and work the remaining rows to finish the corner. I hope this helps!
I loved crocheting this cloth. It is quite a bit larger than the dishcloth size that I like to knit or crochet. How would I make this smaller and still keep with your design? Obviously I would start decreasing sooner, but does it matter on which row? Do I have to end up with an odd number of rows before starting the decrease section? Thanks so much for such a beautiful and intuitive pattern.
Hi Lisa! You can make the dishcloth smaller if you like. It doesn’t matter whether you begin decreasing after you have an odd number of rows or an even number of rows if you are changing the stripe pattern. The only reason mine starts and ends where it does is to create the stripe pattern I wanted. So, feel free to make any stripe pattern you want or no stripes at all. You can start the decrease rows whenever the dishcloth is the size you want. Hope this helps!
I love this pattern. First I bought the pattern so I had it with me and would look at tutorial to clarify. I found that I would take a piece of paper and write each number row and how many stitches for that row. I would mark it off at end of each row as I was crocheting. I always count the stitches across because if I dont something will go wrong and I end up taking out many rows. I also have trouble counting rows with single stitches. This is what works for me . Like I say I love this and have given away many of them as gifts. Everyone is always impressed with the pattern. Thank you
Thanks so much, Karen! I’m so glad you are enjoying this pattern!
Would you send this to me in a PDF format please so I can print it? Thank you.
Hi Sara! The page above provides a free version of this pattern. You can purchase the Large Print, Ad-Free Printable PDF version of this pattern here. Thanks!